
This post may contain affiliate links, view our disclosure policy.
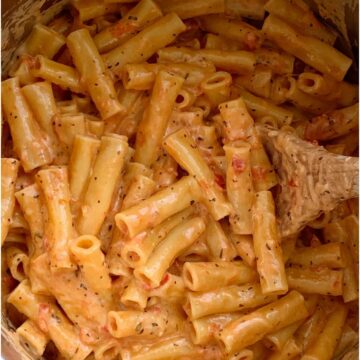
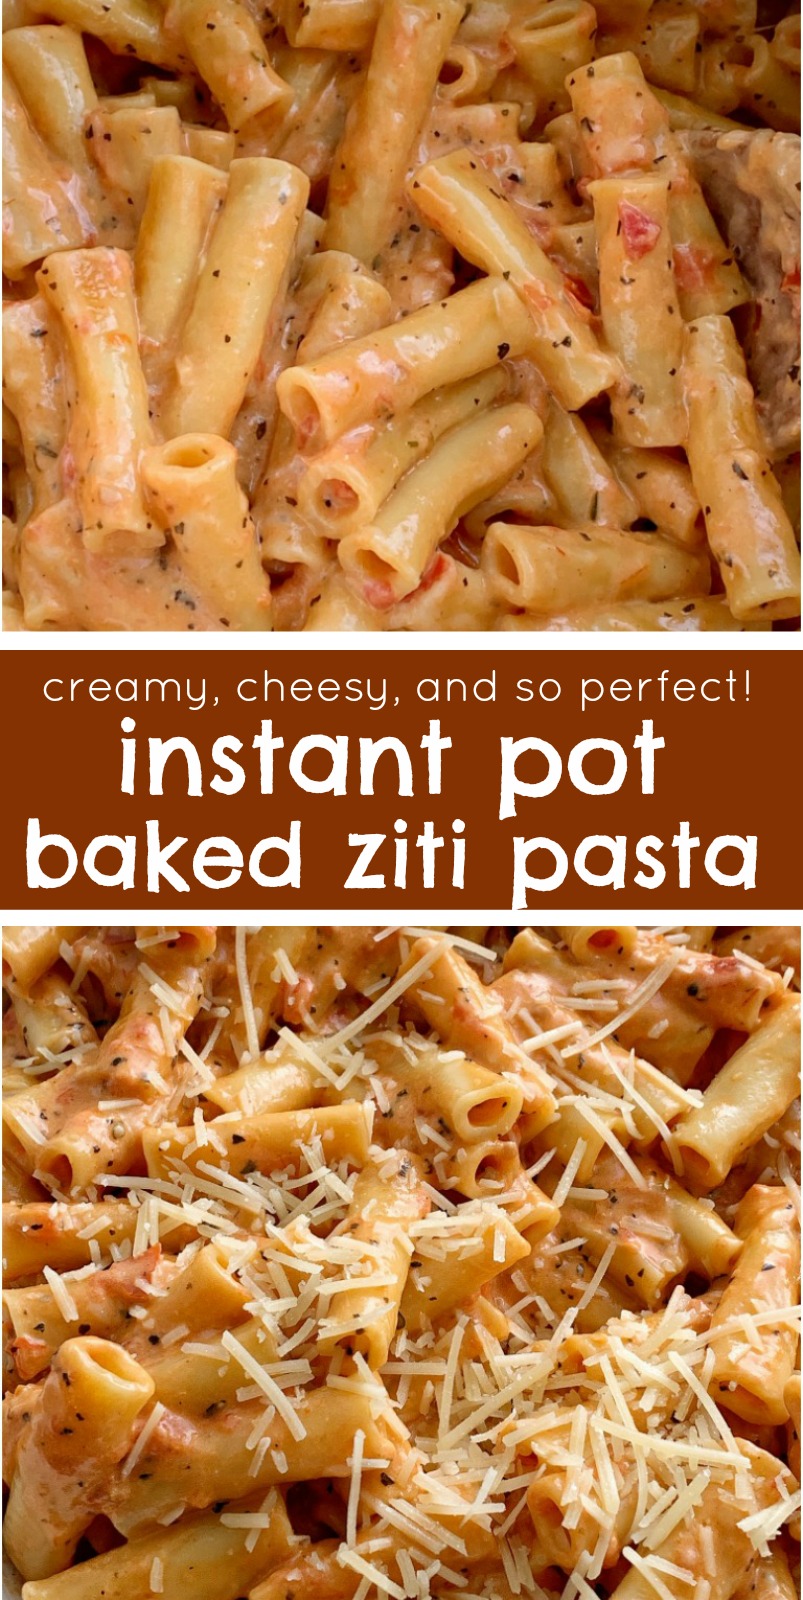
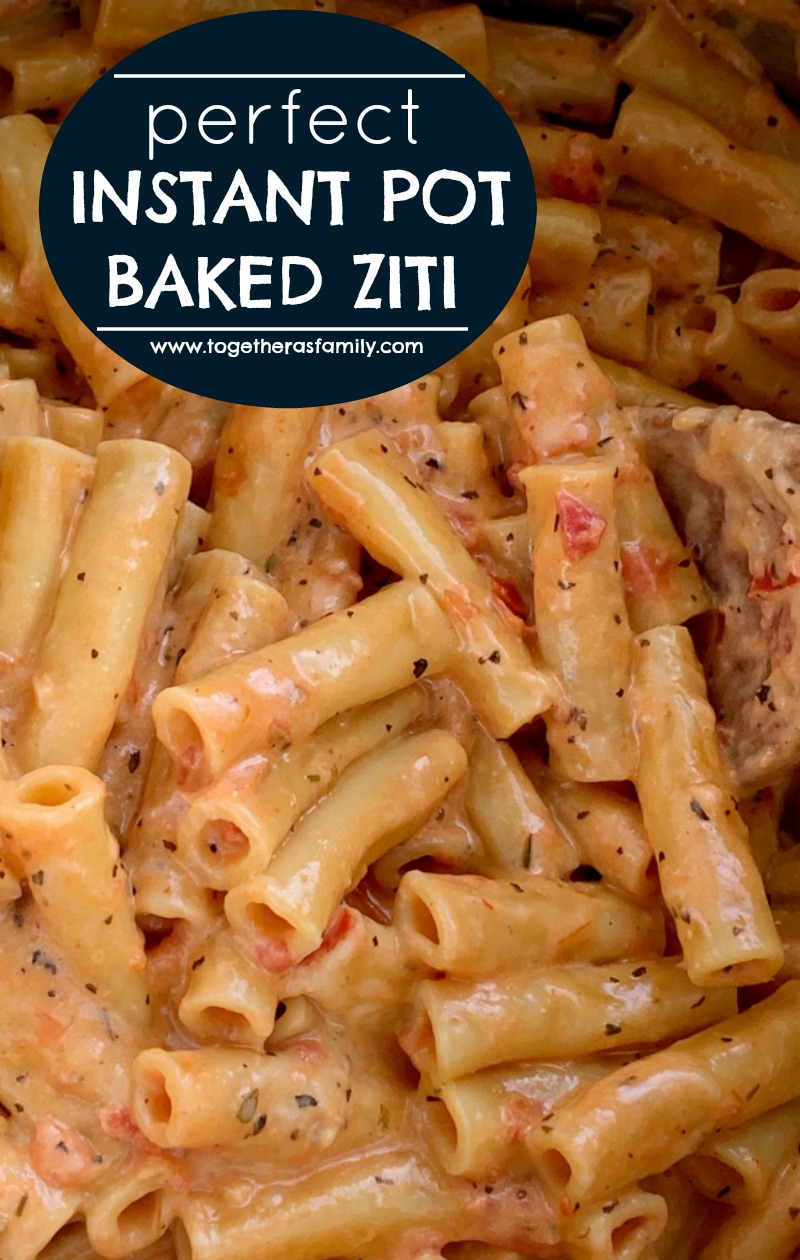
Instant Pot Baked Ziti is a family favorite dinner that’s made even easier when you “bake” it in an Instant Pot! 15 minutes start to finish and only a few simple ingredients. Your family will love this perfect baked ziti recipe.
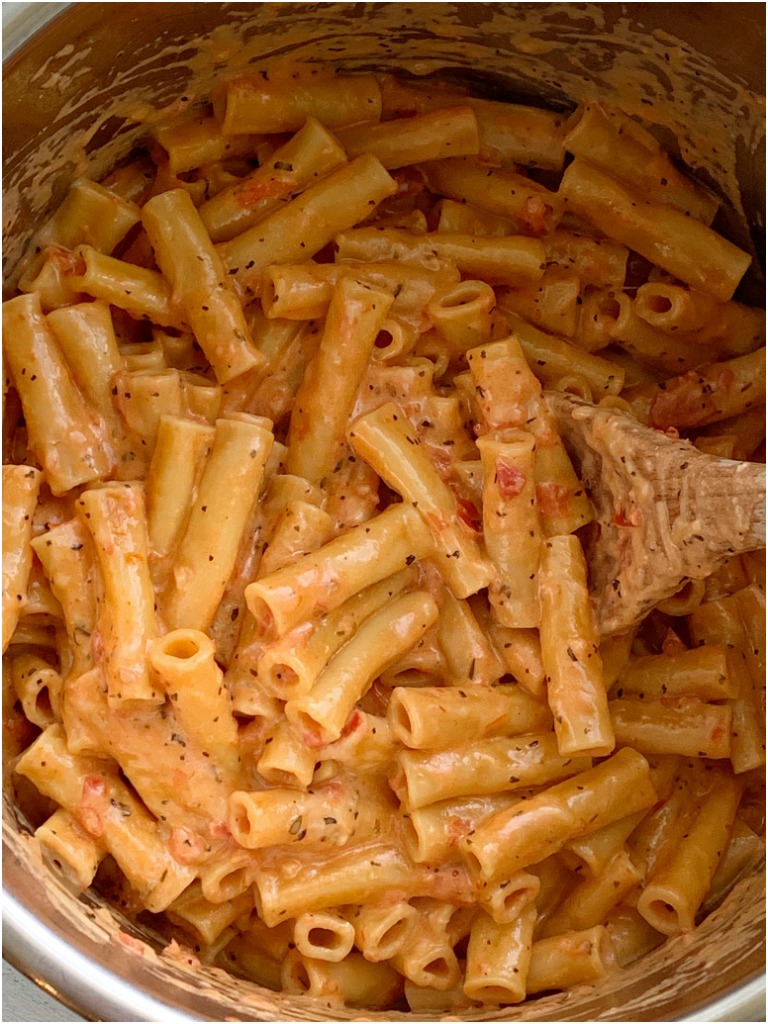
BAKED ZITI IN THE INSTANT POT
Confession time… I have made this baked ziti 3 different times in just 1 week! It is that good and I literally want to force everyone of you to make it 🙂 Not really, but you should!
I am always hesitant when it comes to Instant Pot Recipes because of that ‘burn’ notice. I have gotten that thing more times than I can count. Which is why when this recipe worked the first time I was amazed.
WHY DO I GET THE BURN NOTICE ON THE INSTANT POT?
- I did a little “research” about the Instant Pot and found that they changed their model at some point. Kind of like the iPhone. It starts at 1 or the basic model and then progresses from there. Same thing with the Instant Pot. They made their first model that only had the different categories to choose from, and then they made one that had the ‘manual’ button function , and then they changed it to one that had the ‘pressure cooker’ button function in place of the manual. Lately, I have had more and more comments saying that they get the burn notice when they make some of my Instant Pot Recipes. I’ve honestly had the same problem. I bought a new version of the Instant Pot a few months back and it has the ‘pressure cooker’ button. Apparently it’s a thing that those models get the burn notice all the time, Google it if you don’t believe me, compared with the older models that just have the button that says ‘manual’. And hey, the older models with the ‘manual’ feature are way cheaper. So I ditched my “old” one and paid $49 for the older model. I would highly suggest getting yourself an Instant Pot that has the button that says’ manual’ on it NOT the one that says ‘pressure cooker’ on the button in place of the ‘manual’ button. I hope this makes sense. Basically, if you want a higher chance of success buy the cheaper version of the IP with the ‘manual’ function/feature on it (like this one) instead of one that has the ‘pressure cook’ button (like this one).
- Basically, you get the burn notice on the Instant Pot when there is not enough liquid or food is stuck to the bottom of the insert. This recipe has plenty of liquid and if you follow the directions, and DO NOT STIR THE PASTA into the liquid, then you should not be getting the burn notice at all.
INGREDIENTS NEEDED TO MAKE INSTANT POT BAKED ZITI
Low-Sodium Chicken Broth – Regular chicken broth will work just fine but you may have to decrease the salt by 1/4 teaspoon.
Heavy Whipping Cream – No one is making baked ziti for diet food, right? haha 🙂 Use the heavy whipping cream and don’t try to substitute it with something else. Plus, that Keto diet is all the rage now so basically this baked ziti with heavy whipping cream is diet food!
Seasonings – Simple seasonings like salt, pepper, crushed garlic, dried basil, and dried oregano are all you need. Use any type of garlic you prefer. I always use the tube of garlic paste and just squeeze some out, but you can also mince and press fresh garlic cloves, or use the chopped garlic from the small glass jars.
Ziti Pasta Noodles – A 16 oz (1 lb) box is what you need for this recipe. Yes, you can use any tube shaped pasta but the ziti pasta really is the best thing to use and it’s very common so you should have no troubles finding it in any grocery store.
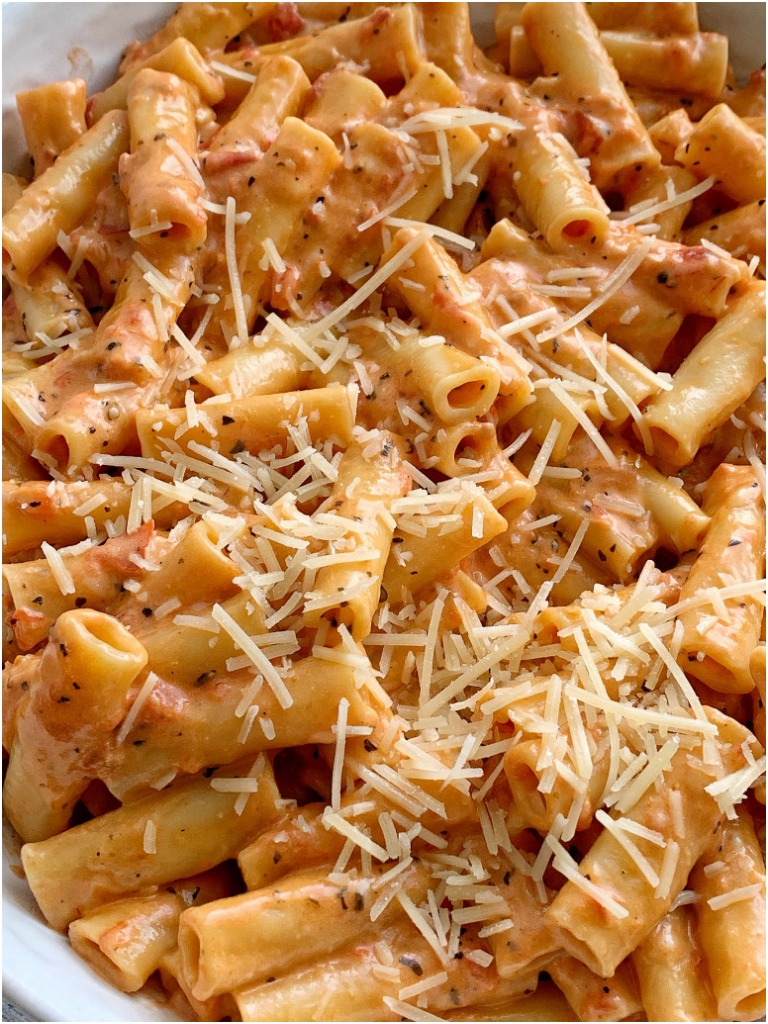
Shredded Parmesan Cheese – I normally say grate your own from a wedge but after experimenting, the pre-shredded stuff you buy in a bag or plastic container does just fine! I actually prefer it because it’s easier. I would not recommend using the cheaper, grated parmesan cheese in the green can. Use the shredded parmesan cheese that you can find by the bagged shredded cheese at the grocery store. Or by all means, grate your own from a wedge!
MY QUICK TIPS FOR MAKING THIS RECIPE
-
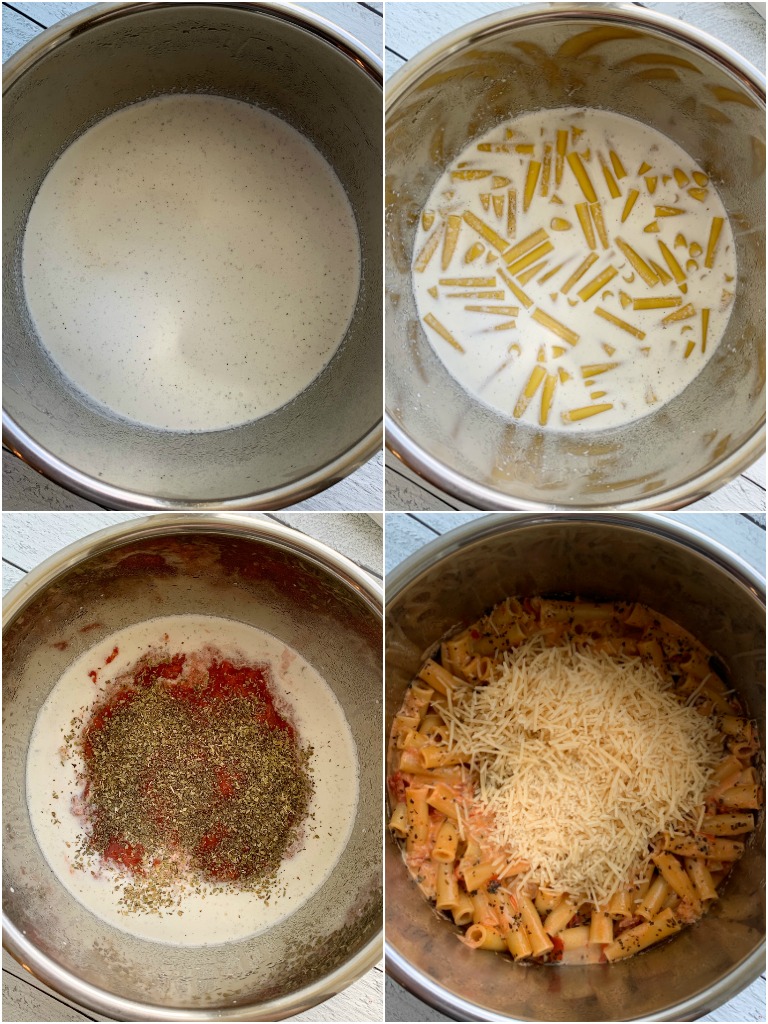
Add the ingredients into the IP in the order listed!
- Why? Because there is a reason for it. You want the chicken broth first so that the cream is not at the base of the insert (sometimes dairy can trigger the burn notice).
-
Do not stir the pasta
- You will be tempted to but don’t do it! Just pour the pasta in and gently poke down the pasta that is very obviously sticking way above the liquid. Don’t stir! Just gently push it down with a spatula or wooden spoon.
-
Use the heavy whipping cream
- It makes this baked ziti so creamy and thick and basically makes it amazing so just trust me and use it.
TRY THESE OTHER FAVORITE INSTANT POT RECIPES
Instant Pot Cilantro Lime Rice
Instant Pot Sante Fe Chicken Burrito Bowls

Perfect Instant Pot Baked Ziti
Ingredients
- 2 cups low-sodium chicken broth
- 2 cups heavy whipping cream
- 3/4 teaspoon salt
- 1/4 teaspoon black pepper
- 2 cloves garlic, minced or pressed (I use garlic paste OR chopped garlic in a jar)
- 1 box (16 oz) ziti pasta
- 1 can (15 oz) crushed tomatoes
- 2 teaspoons dried basil
- 1 teaspoon dried oregano
- 1 cup shredded parmesan cheese
Instructions
- Spray the insert of a 6 QT Instant Pot with cooking spray. Pour in the chicken broth and then the heavy whipping cream. It's important to pour them in separately and the chicken broth needs to be first.
- Add the salt, pepper, and garlic into the liquid.
- Add the pasta but DO NOT STIR. If there is a mound of pasta or pasta that is sticking way out of the liquid, then gently press it down with a wooden spoon or spatula but do not stir it into the liquid!
- Evenly pour the crushed tomatoes over the pasta, and then sprinkle the basil and oregano over top the tomatoes. DO NOT STIR!
- Secure the lid of the Instant Pot and set the valve to the 'sealing' position. Select 'manual' (or 'pressure cooker' if that's what your IP has) and change the time to 5 minutes cook time. It will take about 8 minutes to come to pressure and then the 5 minute cook time will start.
- Let the pressure release naturally for 10 minutes (meaning do not unseal the valve just let the IP sit there for 10 minutes after the cook time), and then quick release the remaining pressure.
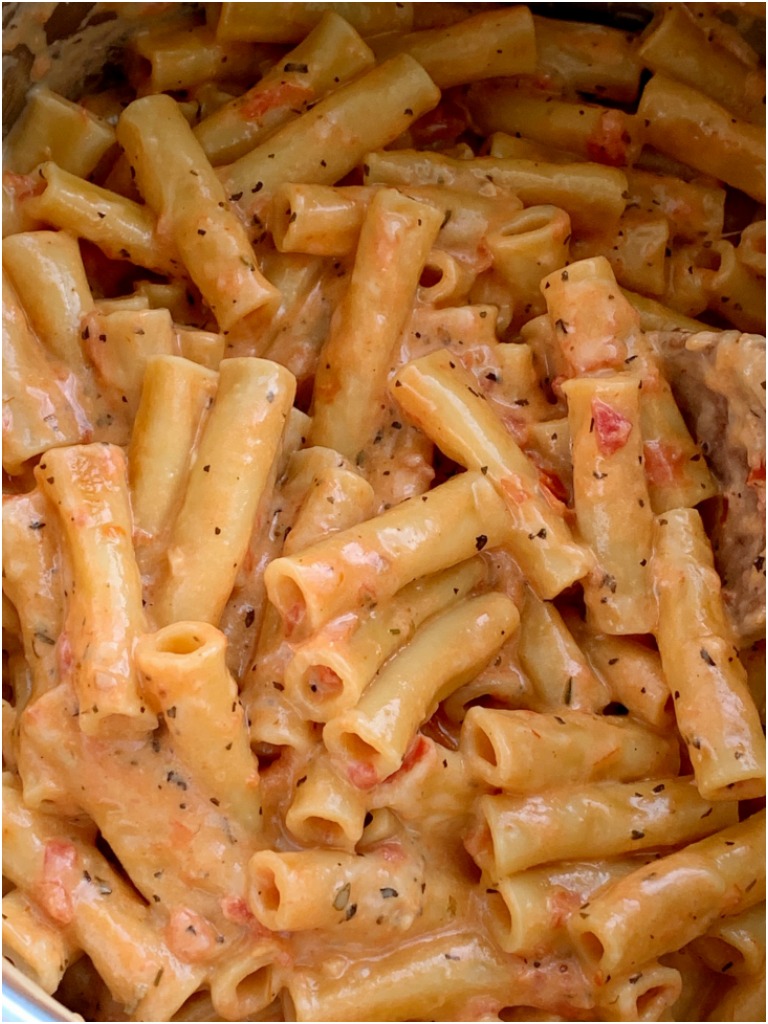
- Add the parmesan cheese and stir everything together until it's well combined.
- Serve with additional parmesan cheese and/or chopped fresh basil if wanted.
Video
Notes
Nutrition
Did You Make This Recipe?
I'd love to see it! You can share it with me on @togetherasfamilyblog and follow on Pinterest @together-as-family-blog-recipes or Facebook @togetherasfamilyblog for more!
recipe adapted (very slightly) and found at Mel’s Kitchen Cafe


Good day lady! I am making this right now, ingredients are on the counter. One thing, my pressure cooker has no seal at the moment so we’re waiting on it to arrive. I do have a crock pot, may I use that in its place? Thank you for the recipes! Do you do all this by yourself?
I am a one woman show on this blog, yes! It keeps me busy but I absolutely love it. I have never made this recipe in the crockpot. Cooking anything with pasta in the crock pot has always scared me so I would suggest waiting for the seal to arrive for your IP. The recipe would have to be totally adapted for the slow cooker and I just have not tested it yet, so I am not sure. Sorry I can’t help more and thank you so much for being here 🙂
My picky kiddos love it! It’s part of our rotation now!
I have never had a problem with any pasta in the instant pot. You have to be alert to all the directions.
This was fantastic. My picky kids LOVED it, in fact my pickiest child who was hesitant to even try it had seconds. The only modification I made was I bought a can of diced tomatoes and put them in my ninja for a few pulses until it was more like the consistency of crushed tomatoes. Not only was it delicious, it couldn’t have been easier. It took less than 5 minutes to put it all together before I ran out the door and left my husband to finish it up when it was done cooking. Thank you for the fantastic recipe!
Our new “go to” IP recipe!! Love this recipe! One thing our family found was that it was bland written as is, I pretty much triple the spices and add a pinch of crushed red pepper flakes. I’ve made spicy ground Italian sausage to add after cooking, and another time I cut up a Johnsonville 3 cheese sausage and pan fried that to add after cooking- that was the best. Next time I want to try a Italian chicken sausage for a better texture. Leftovers last maybe a day for our family of 6….we do find that the noodles soak up the sauce in the fridge- so you may need to add some extra spaghetti sauce when you reheat. I would love to know if anyone has used a different kind of noodle than ziti? I have shared this recipe with lots of friends and families- it’s fantastic and SO easy!!
Made exactly as recipe stated with following modifications due to what we had on hand. Had no cream so used 1/4 c cream cheese and 2 c whole milk and used mini penne. Was a big hit!
Instead of crushed tomatoes, can regular jarred pasta sauce be used?
You could try it just make sure the size is the same as the crushed tomatoes called for in the recipe.
Just made this ! Thank you for this recipe . It’s absolutely delicious.
Has anyone added ground beef to this?
I add 1# ground beef and 1/2 # pork sausage (i cook in separate skillet so i dont get a burn notice and easier to drain)
It adds wonderful flavor.
I add more spices abt 1 1/2 times the recipe.
do you cook separately then add it to the pressure cooker or just mix it all together once the pasta is done?
Can I double this?
I don’t recommend doubling any IP recipe. If you do choose to experiment with it, make sure your IP is large enough to accommodate the extra ingredients.
I made this tonight and I got the burn sign on my instapot. How do I avoid burning the bottom? I followed the recipe exactly. We still ate it and all six of us enjoyed it! Even my pickiest kid ate seconds!
Some Instant Pots are more sensitive to the burn notice. Do you happen to have an IP that has a button labeled ‘pressure cook’ rather than ‘manual’? In my experience (I have both) the pressure cook IP does not work well. I always get the burn notice with that one. But with the same recipe, it comes out with no burn notice with my IP that just has the ‘manual’ button. OR the other thing I can think of is that maybe you stirred the pasta into the liquid too much. Just gently pat down the pasta if some is sticking above the liquid. No stirring needed. Hopefully one of those will help. Let me know 🙂
Do I have to put in tomatoes because we don’t like tomatoes
I guess you don’t have to but I am not sure what else you would use as a substitute. You could try it without the crushed tomatoes but then it would just be a creamy white pasta, which might be great, I just don’t know.
If you use crushed tomatoes they cook up and taste fine.
I always use i can of crushed and a 15 zz can of tomato sauce because i like extra sauce.
Will it fit if I double the recipe in a 6 qt pot?
I don’t recommend doubling any recipe that cooks in the IP. Instant Pots do not do well when there is too much ingredients in it. If you want to double, I would just make two separate batches. But again, you can always try it and experiment cause maybe it will work fine.
I am making this recipe tonight, sounds amazing. I just had one quick question…I got the tube if garlic paste and was wondering how much of it did you add to yours?
I use the garlic paste as well. The tube says 1 teaspoon = 1 garlic clove. I just use that measurement for when I am using the paste.
Hello! I made this once and it is fabulous!! I wanted to double the recipe for the holidays. Have you ever done this? And how would it change the cooking time?
If you double I would probably just make two different batches. From my experience, IP don’t do well with lots of ingredients (like a double batch of this recipe).
Just made this so good and easy!! Your so good at step by step! This is a new fav!
So glad they’re helping. The step by step photos are something I am trying to do more of. Happy that it was a hit for you.
This was very good!! I did add an additional cup of chicken broth because I was concerned the noodles were not covered well even with the 2 cups chicken broth and 2 cups heavy cream. I also cooked up a pound of hamburger seasoned with italian seasoning and added it to the ziti at the end because my husband doesn’t approve of “no-protein” meals! Haha. We both loved this!! Adding it to our regular rotation!
I too have a husband who rolls his eyes at no protein meals, haha 🙂 Your addition of meat sounds delicious!
I just used my instant pot for the first time with this recipe and it turned out fantastic!!! I couldn’t be happier with this recipe, especially for my first use! I did use jarred tomato sauce but it turned out perfectly. This recipe is definitely a keeper so thanks so much!!
How much jarred sauce did you use?
I’m not Tiffany, but I the first time I made it I used one jar of sauce, three cups of chicken broth and one cup of cream (because those were the ingredients I had on hand). It was great!! Hope that helps 🙂
Have you ever added hamburger meat or sausage ?
I have not but it would work just fine to do that. I would add already cooked ground beef or whatever you are using to the instant pot after the cook time. At the same time you add the cheese. Give it all a good stir and then serve.
This recipe was a family favorite for my house!! I had my parents and grandparents over – they all absolutely loved it! Not a single complaint!
After the natural release of pressure, I quick released. After a couple seconds of steam being released from the vent, the liquid sauce started spewing out like a volcano! It was a giant mess. Pasta sauce all over everything, including my ceiling. What did I do wrong? It was my first time using this appliance and now I am very hesitant! Side note: after the mess was cleaned, the pasta was very delicious, but I’m not trying to do that again! HELP!
Oh wow, I am so sorry to hear this! I honestly don’t know what happened. That has never happened to me before. Yes you do get a lot of steam release/condensation when you are doing the quick release but I have never had pasta sauce spew out during the quick release. Hmmmm, I really am not sure. Only thing I can think of is maybe the valve was not in the sealed position during cooking but you mentioned that you did a quick release after the neutral release so I am just not sure.
I had sauce squirt out during steam release the first time I used my IP too. When I make something saucy I just toss a tea towel over the IP while I release the steam.
Also, I bought a steam diverter on Amazon so that the moist steam doesn’t damage the cabinets above my countertop (I think it was like $5).
Hope that helps!
Hi! I am making this tonight 🙂 How many servings does this make? Thanks!
It just depends on how many adults vs kids you’re feeding. It’s a pound of pasta so you can safely feed 6 adult servings from it. Enjoy!
Oh my goodness!!! Soooo good. This recipe is definitely a keeper and will be making it many times over I’m sure
I just made this recipe for dinner tonight, and it was SO YUMMY! Thank you for sharing your insta pot expertise! Delicious!!! ?
Can you make this recipe without an instant pot?
If you’re looking for a non instant pot recipe then I would just search ‘baked ziti pasta’ on google or pinterest.
This was phenomenal! I use my instant pot for lots of rice, steel cut oats, and yogurt, but haven’t done much pasta in it. This was fabulous! Love that it was a “dump and go” so I could focus on sauteeing chicken and spinach while it did its thing. 🙂 My 6 YO, a fairly picky eater, even liked it. 🙂
Hey I have an 8qt IP. Will that work?
Yes an 8 QT works just fine. Follow the recipe as written.
Can this be made in an 8 quart instant pot w/o any adjustments?
Yes an 8 QT would work fine. Follow recipe as is.
Delicious and easy to make. Thank you!
Has anyone tried making this with Italian sausage or ground beef? Curious how the recipe would differ with the extra ingredient.
I know that those who have tried it with meat have just added it after the cook time (so make sure it’s already cooked and seasoned) and then stir it all together. I am not sure about adding raw meat into the IP for this recipe…. I am no help there!
So yummy! Super easy- thanks for the new addition to our weekly Instapot meals!
I just made this and it’s fantastic!!!! So easy and satisfying on a cold winter day. Thank you so much for this (now a staple) recipe.
Love this recipe! So good! I did add 1lb ground beef seasoned with italian seasoning once I followed all your directions!! So good!! Thank you for this yummy italian dish that is now a part of our regular rotation!!
Could I use grated parm (like in the shaker) vs.shredded?
You can try it…. I have never done it so I can’t say for sure. The grated parmesan cheese in that plastic shaker bottle usually lends a gritty texture to whatever you add it it, so I would guess it would not work as well as the shredded. But you can always try and see what you think. It probably couldn’t hurt the dish, it’s just up to preference. Hope that helps.
I made this and the pasta color wasn’t orange like the picture I didn’t put all the diced tomatoes in it only because my kids don’t like a lot of tomatoe
I had an “instant pot” class at my house last night to teach some friends the basics of using it. We made this dish – super easy!! And it is definitely the BEST pasta recipe I’ve had in the instant pot! Everyone loved it and can’t wait to make it again! Thank you for sharing – this will be made on the reg!!
Oh my goodness, this makes me so happy! So glad you chose this recipe to share 🙂 Thanks so much for coming back to leave your comment.
This is my new favorite pasta to cook in the IP. So delicious and super easy. My husband grilled brats to go with it. Perfection! Thank you!
Soooooooo good and super easy! Thank you for sharing this recipe. It’s amazing! Just made it for the first time and I’ll definitely make this again.
Can I just use water instead of the chicken stock for a vegetarian?
Yes you could use water. It may affect the flavor slightly but it should be just fine.
I have used a veg broth instead of chicken. Delicious
This is so amazing! Thanks for giving me another meal that all my family will eat and it’s easy to make too. We added some ground turkey to give it some protein. Yum!
This recipe is so good! My 3 year old loved it as well!
I did everything that the directions said to do and I continue to get the burn notice on my IP. I have a different brand of IP that is t so fussy and it was perfect in that IP.
So sorry to hear this, that is so frustrating I’m sure. I have noticed that one kind of IP is more sensitive to the burn notice. The IP that has the ‘manual’ button I have found is the best when it comes to the burn notice. Does your IP by chance have the ‘pressure cooker’ button instead? Because I own both and I will get the burn notice on the ‘presser cooker’ button one, but then make the exact same recipe in my other IP with the ‘manual’ button and I won’t get the burn notice at all. So weird but it’s what I have found. If it helps, I once owned the crock pot brand of the IP and it was awful and I always got the burn notice too.
This is the most amazingly tasty and easy recipe for baked ziti I have ever made! I followed the directions exactly!! I almost fell over when much to my surprise and delight…..the meal was ready to serve within 15 minutes and very little effort! Sooooooo delicious!!
Can I cut this recipe in half? I love it, but my family of picky eaters does not.
Also can I substitute gluten free noodles?
I have had others that say gluten-free noodles work great but watch the cook time because I am not sure if they cook faster/softer than the regular noodles. I have never used gluten free noodles. You could cut the recipe in half by just using half of each ingredient. It should work just fine but I have never personally done that so I really can’t say for sure.
This is the most amazingly tasty and easy recipe for baked ziti I have ever made! I followed the directions exactly!! I almost fell over when much to my surprise and delight…..the meal was ready to serve within 15 minutes and very little effort! Sooooooo delicious!!
Made this tonight and the flavor was delicious! But, the noodles came out little over cooked. Has anyone else had this happen? Suggestions to avoid it next time? I’m almost certain I followed the recipe exact, so I wasn’t sure if cutting down on those last 10mins would help?
Thanks!
You could try doing the natural pressure release for less time. The cook time in the IP is only 3 minutes so I probably would not go much less than that. Try doing the natural pressure release for a few minutes less and see if that helps.
This is a delicious and time saving recipe, but I did get the burn notice both times even though I followed the directions. Luckily by the time the burn notice came up the pasta was already cooked perfectly.
Oh shoot. I have noticed that one kind of IP is more sensitive to the burn notice. The IP that has the ‘manual’ button I have found is the best when it comes to the burn notice. Does your IP by chance have the ‘pressure cooker’ button instead? Because I own both and I will get the burn notice on the ‘presser cooker’ button one, but then make the exact same recipe in my other IP with the ‘manual’ button and I won’t get the burn notice at all. So weird but it’s what I have found.
I have never used Instant Pot brand! My first was a Farberware, and then I moved up to a Ninja Foodi. Never had a burn notice at all. Farberware buttons were apparently very confusing, though. Many people have told me they couldn’t figure them out. I just used the chicken button for all pressure cooking.
I’ve made this twice, it’s just delicious comfort food! While it was cooking I browned a couple of pounds of sweet Italian sausage and threw it in just before I served it. Instant meal!
Question…. can you use regular milk instead of heavy cream? I don’t have any at the moment? Fully knowing I’m sacrificing the richness
I would try and use the highest fat percentage of milk you have. Like 2%, whole, or even half and half.
This was a huge hit with my 5 kiddos. I added meatballs and a side salad to make it a full meal. It will definitely be added to our dinner rotation. Thank you!
Love it! And adding meatball is such a great idea. I think I may do that too cause my kids live for meatballs 🙂
This is my new go-to favorite meal! I’ve made it about 10 times since I first tried it a couple of months ago. It’s so easy and delicious! One time I accidentally used a 28 oz can of crushed tomatoes instead of 15 and it still came out great. My husband preferred the extra tomatoes, but I love the recipe as-is.
So good to hear this!! Thanks so much for leaving your review and rating. I appreciate it tons 🙂
This looks delicious. Do you think I could substitute evaporated milk for the heavy cream?
Yes, I think that would work actually! I’ve never done it so I can’t guarantee it but I think it would. Maybe not be as thick but that’s fine.
Holy Buckets! Let me start by saying, I am a terrible cook. I did everything just like you said and it turned out amazing! My husband and I took one bite, looked at each other and couldn’t believe how delicious this was! I felt like I was at the Olive Garden (or some other Italian food place. I obviously live in a small town where the Olive Garden is the only Italian place I know?) The only thing I did different was we used gluten free noodles so they were a bit too tender. But it didn’t matter. We will definitely make this again, and I’m telling all my friends. Thank you!
Seriously, I love your comment 🙂 It made my day after all the mean comments. So glad it worked and that you loved it. I love getting reviews like this. Others have said the noodles came out softer than what they like, so for sure next time just reduce the cook time to like 4 minutes and try that.
Do you think I could make this and freeze it for later? Single mama here so making big recipes can be wasteful sometimes.
I generally don’t like freezing anything with pasta or dairy in it, just because the dairy tends to curdle and chunk up once thawed and pasta I have just never liked the texture of it once thawed. You could always try it and see what you think. Or try halving the recipe. Use half the box of pasta and then only about 1 cup of crushed tomatoes. Half all the other ingredients and that should work fine.
Thank you for the recipe, works great in my Ninja Instant Cooker. I just watched my 7 year old son make this entirely by himself and it turned out just the way it did when I made it last week. So if that doesn’t tell you how easy and consistent this recipe is, nothing will. Best pasta recipe I have found for IP. Writing this down for my recipe box now.
I made this for dinner and my kids and I Loved it! So super easy to make and so yummy!!
The first time I made it we liked it so much I ended up making it again the very next day! There were no leftovers either day. So this time I made a double batch! I doubled everything exactly except I used 6 cups of chicken broth. I put the timer on for 7 minutes instead of 5. And I let it self release for 14 minutes instead of 10. Turned out perfect! Just slightly less thick than the first 2 batches. And it thickened right up once I added the cheese and let it sit for a few minutes. Thanks for such a great recipe! And SO easy!
This is my 10 year old stepson’s favorite dinner (and mine)! It is SO easy and delicious and I make it usually every week 🙂 I will also either mix in cooked ground beef or cooked chicken breast chunks in after stirring in the cheese. Thanks so much for this recipe!!
This is a great recipe!! Works every time for me! That being said and also to address some comments about the burn notice and the addition of meat, I have found that if you brown ground beef in the instant pot first then follow the recipe as written putting everything in on top of the meat, the meat acts like an insulator so the dairy doesn’t reach the bottom of the pot and possibly trigger the burn notice!
Happy Cooking Ya’ll
What would the cooking time be if I used rigatoni noodles instead? Thanks!
Not sure. It will probably be the same cook time as they are similar in size.
Do you add the liquid from the tomatoes or do you drain them?
Just dump the can straight into the IP. NO draining.
Hi! Love this recipe! It was the first thing I ever made with my IP, now I’ve branched out and add cut up jalapeño sausage links, and just crumbled sausage. I add the meat after everything has already cooked.
My question after making it several times- do you leave the “keep warm” setting on during the natural release?
So happy to hear you have enjoyed this recipe. I am loving all the meat additions you are doing. Sounds yummy. As far as your question, I just leave the IP alone after the cook time and during the natural release. I never touch any buttons, and actually did not even know you could keep it on the warm setting while natural releasing the pressure. So I am not sure I answered your question and I apologize but I just leave it alone and never touch anything after the cook time and during the natural release time. Hope that helps.
Hi I was wondering how I could adjust this for the 8 qt? Thank you
Make the recipe as is for the 8 QT. I don’t think there should be any special changes, as there is enough liquid in the recipe.
Is it possible to make this in a Ninja Foodi?
I have never used a Ninja Foodi so I really have no clue. If it’s like an IP or pressure cooker then yes that would work fine. The buttons may not be the same on the Ninja but just manually set the cook time.
For those who have asked if you can double this, I doubled it in my 6 quart IP and it wasn’t a problem at all. So delicious! My whole family liked it! Thank you!
We have made this recipe SO many times. A definite favorite in our house!
What is a serving size?
It serves 8 people with a serving size of about a little over 1 cup each.
I absolutely love this recipe. I have made it a few times now. Even my husband year old daughter love it. It cooks perfectly every time.
Thanks so much! I appreciate your comment and visiting the recipe 🙂
Could you add sweet Italian sausage and a cup of white cooking wine?
I am not sure about the cooking wine as I have never used it before. You could add it but I am pretty sure you would need reduce the chicken broth if using the cooking wine. Lots of people have added cooked, grounded up sausage or ground beef after the cook time when they stir in the parmesan cheese.
I love making this recipe. I have made it a few times now and turns out perfect every time! One of my favorite instant pot recipes!
When I opened my Instant Pot the cream had curdled at the top. Any idea why? We still ate it because the flavor was fantastic but it didn’t look as appetizing as yours!
Not sure. I’ve never had that happen. Did you use real (full fat) heavy cream? Sometimes the lite products can do that because there is more random ingredients in the lighter dairy products. That would be my only guess. So sorry I can’t help more!
That could be it. I think I only had half and half on hand. Next time will try the heavy cream. Thanks!
This pasta recipe has become a family favorite in our home! Thank for sharing it . It reminds us of the big rig pasta from Oreganos
If i double this recipe in my insta pot do i double the cooking time as well?
I have never doubled this recipe but I would imagine the cook time would be the same?? That’s my guess. I would make sure you have the larger 8QT IP if you’re planning on doubling.
I’m devouring this right now ❤️ So very flavorful and so quick and easy!
Could this recipe work as is if reducing all the ingredients by half?
Thanks!
I am sure it would work just fine. I’ve never done it but I see no reason why it couldn’t work. I believe the cook time would be the same because you’re still cooking pasta. Let me know if you try it!
This my absolute favorite recipe! I do add 1/2 lb butterball ground turkey and 1/2 lb Jimmy Dean ground Italian sausage and cook that on sauté until browned and then I follow the recipe as normal and this really kicks it up a notch!
I have made this three times now since I got my instant pot. My family loves this. My picky eater devoured it in minutes. I kinda tweaked the recipe though this time around, instead of crushed tomatoes I just used pasta sauce and I added mozzarella to it this time and it came out super yummy. Thank you for posting this recipe.
I have done this recipe several times but it just doesn’t seen to have
Much sauce. Can yoy double the tomatoes?
Yes, if you want more sauce then I would double the tomatoes. I have never done that so I can’t say for sure if it would be too much sauce but if you like lots of sauce then that would be the best way to get it.
This isn’t a traditional ziti recipe (no mozzarella or ricotta) but that being said, I’m making it for the second time in 4 days. I stirred in some sausage crumbles and used spaghetti sauce instead of crushed tomatoes (because I’d just made the sauce in my instant pot and wanted to try it!) and it turned out really well.
Thanks for a keeper!
So glad you like it! And you’re right it’s not a true baked ziti recipe but it definitely reminds of that gooey, cheesy baked ziti. Using spaghetti sauce is a great idea. Yum! Thanks for your comment and rating. I appreciate it.
This recipe was delicious! Everyone in the family raved about it! Thank you!!
This turned out great! Thanks!
So incredibly easy and the hubs loved it. I used half and half because that’s what I had and it turned out great. Thank you for such a quick and tasty recipe.
Fingers crossed this comes out right. I have a crux pressure cooker & there is no manual, pressure cook or pasta setting. I hit the rice one & put for 7 minutes. Hope for the best lol
I am not going to lie… this sounded amazing but I was skeptical about the dairy being cooking in the pressure cooker since all the manuals say not to do that… but it all worked out! I used my ninja foodi, so I didn’t need to spray the liner, and I used prepared diavlo tomato sauce, with rigatoni… Cooked it for 6 minutes instead of 5 since rigatoni takes 12-13 minutes to cook. It was delightful! Thanks for sharing!
Great! Also seems easy to adapt to different tastes. I might add some prosciutto next time but this is one of the few recipes that now has me following for new recipes.
Awesome! Thanks for being here and following along. Prosciutto sounds amazing in this. If my kids would eat it then I would totally add it 🙂
This has turned into my kids favorite meal. I make it about once a week. You can vary it up too, I often cook sausage or ground beef on saute in the IP, then start the recipe. Jarred sauce works well too as it has all the seasonings in it. My daughter has actually requested it for her birthday meal tomorrow!
How would you make this ziti instant pot recipe with chicken in the instant pot?
And
How would you make the ziti meal on the stove top?
Thanks,
Michelle
Not sure about the stove top as I have only ever made it in the IP. If you want to add meat, then I would add it after the cook time. The recipe is not written for the extra meat in the IP. Lots have added ground sausage, ground beef, or some chicken. Make sure it’s cooked and add it in with the parmesan cheese.
Make this in my Ninja exactly as directed and it is perfect! Thank you so much!!
Everyone loved it including my picky kids. I cubed chicken and seasoned it with italian seasoning in a frying pan while the noodles were cooking and stirred that in. It was delicious!
I used all low sodium chicken broth and crushed tomatoes.
Added chicken partially cooked and chopped. Once done added spinach leaf and pink salt.
This was so much better than making noodles with jarred sauce! Delicious! My family of 7 loved it! Just wanted to note for the people wondering about doubling the recipe: I doubled it in my 8 quart instant pot and it turned out perfect! I feel like it took longer to come to pressure, but with the short cooking time, it wasn’t a big deal. Served it up with some Texas toast garlic bread. Thanks for your recipe!
This has become a family favorite! We add Instant Pot cooked chicken to it with a sprinkle of Tony Cachere’s Creole seasoning. DELICIOUS! But this recipe needs no alterations! We are in love.
I made this tonight and halved the recipe as there is only 2 of us. It turned out great, I was worried as I wasn’t sure if halving the ingredients would be a problem but it wasn’t. Super easy and delicious, thank you.
If I were to half this recipe, would the pressure cooker settings be the same? Thanks!
Hi! Yes it would. As far as I know the time or pressure does not change even with half a recipe in a pressure cooker. Enjoy!
I made this vegan by using vegetable broth and unsweetened almond milk instead of the heavy cream. I even added vegan parmesan at the end! I had no problems using a plant milk and my non-vegan husband didn’t suspect a thing!
This is amazing – great meal for kids and adults alike. This recipe really comes in handy when you want to cut down on your grocery costs. No meat in this!
Yes! I actually love no meat dinner recipes too. This one is still hearty and filling that you don’t miss the meat. So happy to hear you love the recipe. Thanks for your comment and rating.
This was fantadtic. I used diced basil, garlic, oregano tomatoes instead of crushed tomatoes that I pureed in the blender. I stirred in ground beef after the pasta was finished, which I browned with italian seasoning. Will definitely make this again. I might try mixing in ilalian sausage next time.
Yummy! Love the addition of the ground meat seasoned with Italian seasoning. Thanks for you comment and sharing your tips.
Made this last night, was perfect. We added pan seered chicken to it, not sure what spices hubs put on the chicken but it went perfectly with the pasta. This will be added to our normal rotation of meals.
Hi, um… why do you call it baked ziti?
Because it’s like baked ziti but “baked” in the Instant Pot 🙂 It’s just a baked ziti recipe made easier by cooking it in the IP.
I read through your comments about not recommending doubling the recipe but have you ever cut it in half? This recipe is most liked in my house right out of the instant pot so I’d prefer to not have leftovers. I’d rather cook half the recipe two nights in a row than end up with extra on the first night. Thank you!
I think it would work just fine cutting the recipe in half. I believe half of a 16 oz box of pasta is equal to 2 cups of dried pasta. And then also cut every other ingredient in half. The cook time may be slightly less but that is just a guess. I will have to try it sometime cause now I am curious too. Let me know if you try it.
Hi! Is there a way to add 2 boneless, skinless chicken breasts to this recipe?
If you add chicken I would add it at the very end when you mix in the parmesan cheese. Make sure it’s cooked! The recipe cook time is not designed or created to cook raw chicken.
I just made this for my family and can I say…OMG! So good! The only changes I made were to use regular sodium chicken broth and 2 cups of shredded Parm cheese. Finally a baked ziti that I can eat, since there is no ricotta! Thank you!
Aww, I love this! Thanks so much for your comment. I love hearing stuff like this.
Delicious and SO simple!
Has anyone ever used gluten free pasta with this? If so how did you adjust the cook time?
Could I make this on the stove? I don’t have an instant pot yet but this sounds delicious!
I have never tried this recipe on the stove so I really can’t say for sure. There are lots of stove top baked ziti recipes out there or you can try making a classic baked ziti casserole. Lots of those recipes on Pinterest. Hope that helps a little.
I make this at least once a month, I do like to add ground sausage so after I get the pot going I brown some meat, I also add extra crushed tomatoes to compensate for the meat. My kids and husband love this recipe and it’s so easy and fast.
Has anyone added mozzarella cheese at the end of cooking instead of parmigiana cheese?
This was sooooooo easy to make & extremely fast!!! It came out perfect even my 2 yr old loved it!!!! Definitely going to be a good when when short on time or money
My 12 yr old daughter and I are growing a garden this year so we used fresh herbs and it was delicious. I was hesitant on how pasta noodles would turn out in the IP but they were perfect. Such a quick and easy recipe that tastes like it came from our favorite Italian restaurant.
It all started with a 1/2 jar of leftover spaghetti sauce. Followed recipe with a few add ins. Sautéed an onion in pot first. Husband does not like garlic. I had frozen cooked turkey meatballs to use up. Thawed and crushed up. (I too have a husband who wants meat) Used 1/2 & 1/2 my go to. Always have on hand. Blended spaghetti sauce in with crushed tomatoes for a total of 2 cups. Glad I did add more because of the meat it needed it. Hint of red pepper flakes. Cook and release time were prefect! It’s a keeper, shared with family and friends who have Instant Pots.
I doubled it!! Same cook time and it’s still perfect!! Came out absolutely the same way.
Oh yay! Thank you for sharing because I have had some people ask about doubling the recipe.
What size was your instant pot? Thanks!
Could I double this recipe for a crowd?
If you have a really large IP then you could. If you need to double it, I would recommend making the recipe, as is, in two different batches. I don’t think they make an IP big enough to hold a double recipe of this.
i made this for dinner tonight and it can be out fantastic. However, I did not cook my pasta 5 minutes. I cooked it 3 min and natural release for 4 min. Perfectly al dente!
So glad you liked it! Thanks for sharing what worked for you!
This was delicious. I stopped using my Instant pot as most recipes were very bland, not this. Even my super picky husband loved it and sent recipe to my son. Lol
I love it! So glad this recipe worked for you!
The recipe itself is great and it tastes amazing, but I’m taking stars off because the cooking directions are a joke, and I’m honestly surprised that no other reviews I’ve read mentioned it. When the directions said to natural release pasta for TEN MINUTES I had serious doubts, but when I make a new recipe I always try to do it as written. Result: overcooked, mushy pasta. It’s SO overcooked, in fact, that there’s no good way to reheat the leftovers- your pasta just falls apart. I’ve made a very similar recipe multiple times, but I wanted to try this one since it had crushed tomatoes vs jarred pasta sauce, and I think the next time I make this (and I will make it again, because like I said, it TASTES great and is super simple), I will follow that recipe’s cooking instructions: cook for 5 minutes, natural release for 6 minutes.
So overall: if you like your pasta as far from al dente as you can get, this is the perfect recipe for you as written. If you like your pasta to have a bit more resistance (but still be done), I would use the same recipe but half the natural release time.
Thank you for your comment! I understand the preference for different pasta texture. I’m glad you were able to figure out what works for you!
I have made this many times and it is sooooooooooooooo good.
Thanks Yvonne! I love hearing when recipes work for people and are loved!
Is this something I could make, and then freeze?
I have never tried freezing this recipe after making it. I usually try to not freeze cooked pasta because I feel like the pasta becomes mushy. Let me know if you try freezing it and how it turns out!
you should add 1lb of mild Italian sausage to this. brown it up first and then follow the rest of the recipe. It takes this to a new level!
Love that idea! Thank you for sharing!
At my house we call this “Miracle Pasta” because everyone in my family loves it-it’s a miracle!!!
😂 That really is a miracle! Glad to hear the recipe is loved!
Made this for supper. So delicious! Thanks!
You are so welcome! I’m glad you liked it!
This recipe was delicious. I very rarely cook, but now I’m hooked on my instant pot. This was the best pasta dish I’ve ever eaten.
An instant pot is the best! I’m so happy to hear you liked the recipe!
So so yummy! Is it typical for the milk to curdle because mine always does when it is finished. Just kinda creates a weird consistency but it is still yummy for sure.
I haven’t noticed that before, I’ll have to look for it next time I make this. Thanks for your comment!
Love making this recipe! super easy and yummy! My whole family definitely loves this ziti!
Wonderful! Thanks for commenting!
Loved this! Have you ever tried adding frozen chicken breasts in with this recipe? Curious how it would turn out. Thanks!
I haven’t tried it with frozen chicken breast, I think it could effect the liquid amount and how the pasta cooks. I would try thawed chicken breasts though, I think that could work. Let me know if you try it!
This has become a family favorite and one of our go-to recipes. It’s quicky, easy, and delicious. We like to add extra garlic and Cajun spices, as well as andouille sausage and zucchini.
Your additions sound delicious. 🤤 I love reading how people make a recipe their own!
My cream separated, I’m bringing this to a neighbor. Can I fix this?
Sorry I’m just seeing this! Slowly reheating the dish should help the cream go back together. Let me know how it turned out!
I don’t have an IP but hve a pressure cooker would this work in there It’s very good
I’m sorry, I’m not familiar with pressure cookers. I bet there are quite a few blogs or websites that could help you convert an IP recipe for use with a pressure cooker. Good luck!