
This post may contain affiliate links, view our disclosure policy.
Chocolate Chip Cookie Layered Pudding Dessert is the ultimate layered dessert made in one pan – a chocolate chip cookie base, layered with chocolate and vanilla pudding, and a whipped cheesecake layer.
Chocolate Chip Cookie Layered Pudding Dessert Recipe
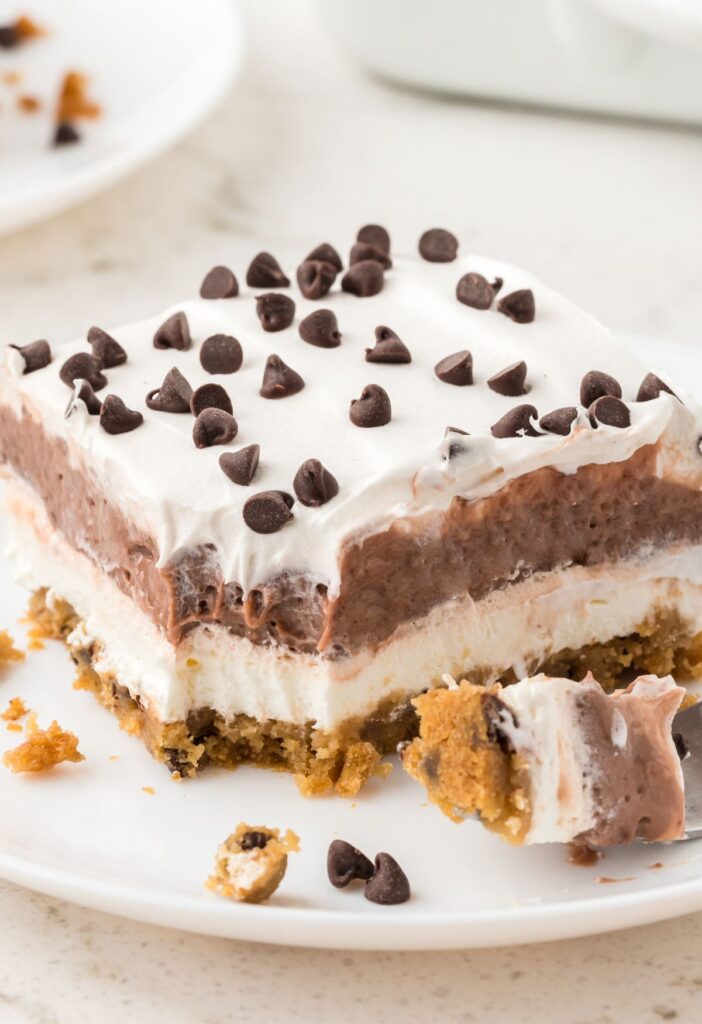
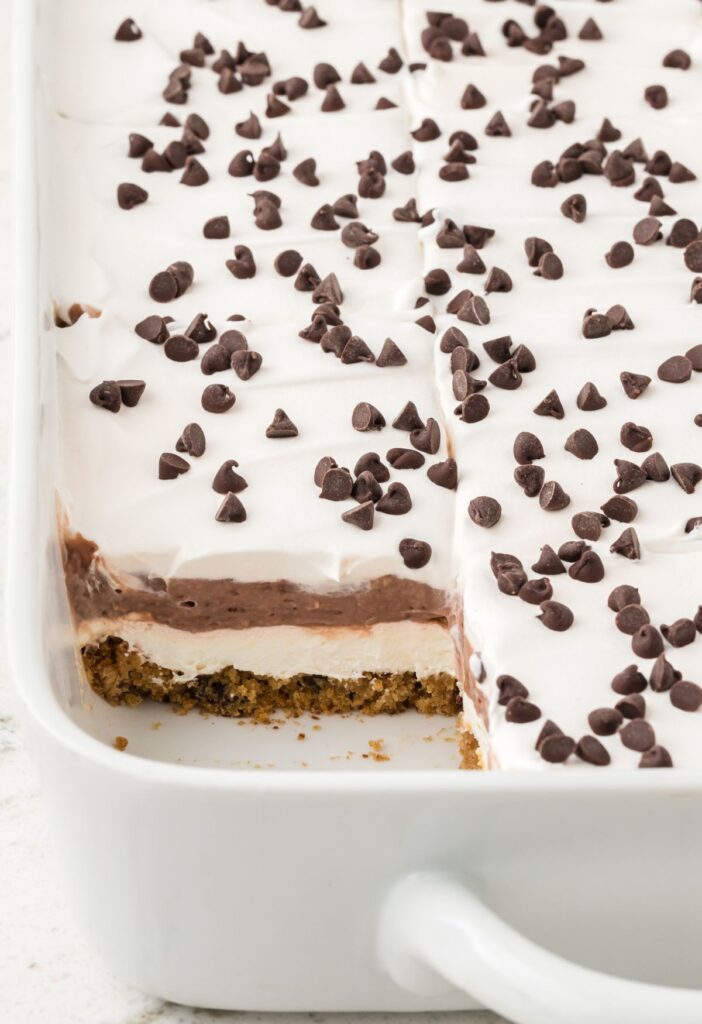
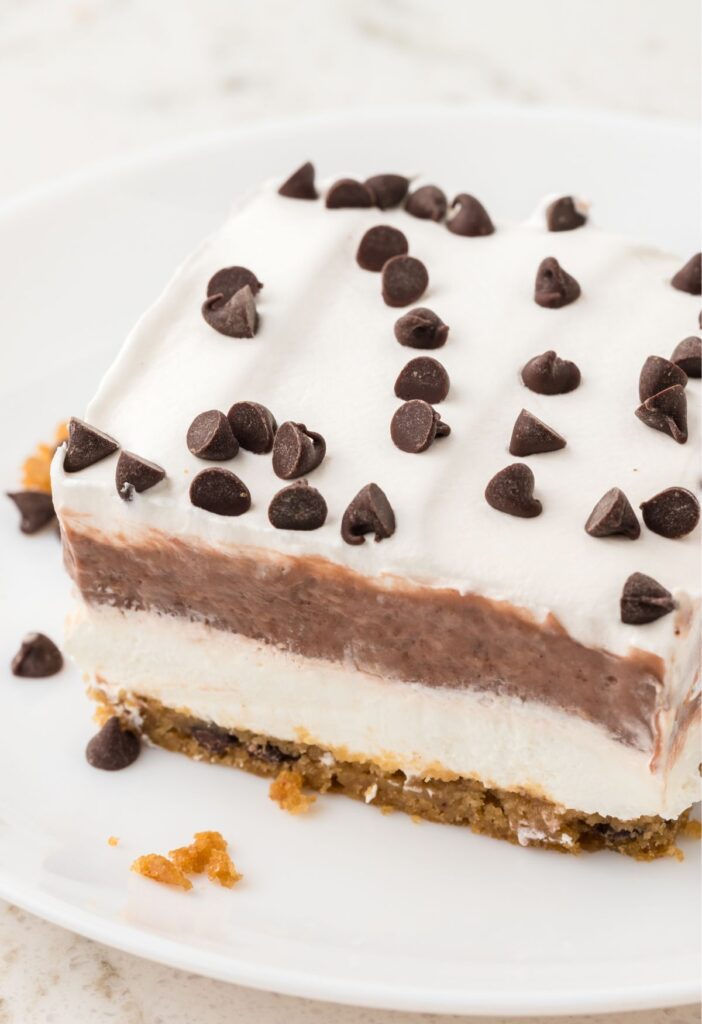
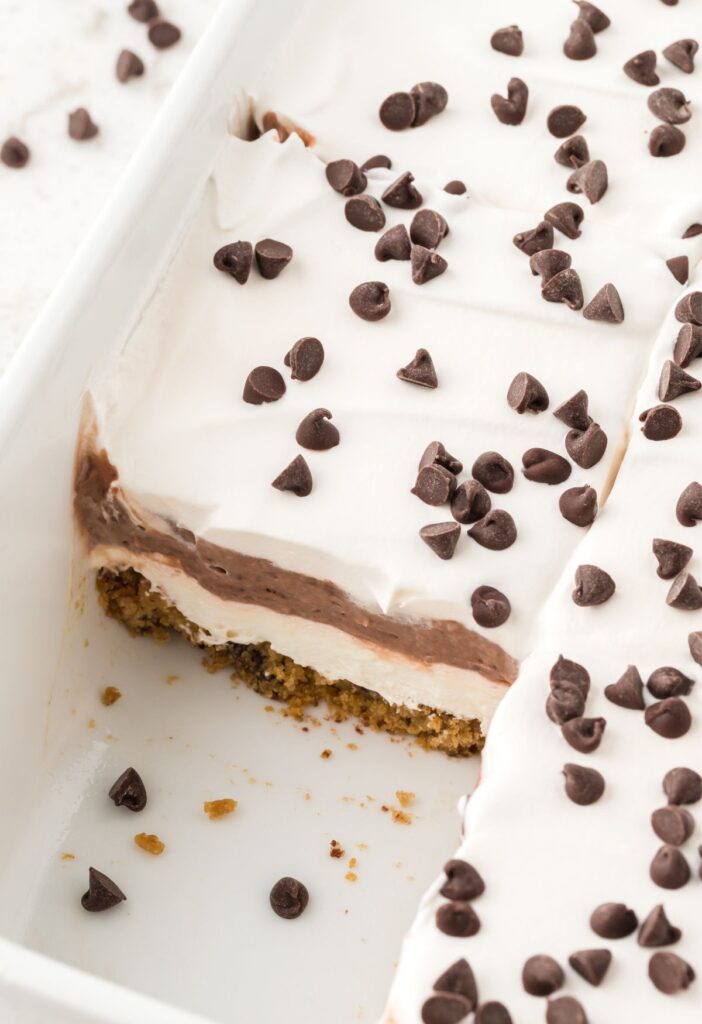
I love layered pudding desserts – sometimes called a ‘lush’ or ‘dessert lasagna’ – it’s basically a cookie crust layer or in this case a chocolate chip cookie layer, and then topped with a no bake whipped cream cheese layer (like a cheesecake), and an instant pudding layer.
It really is the perfect dessert because all the layers come together to form a cool, creamy, sweet, dessert that tastes like a chocolate chip cookie.
Perfect dessert to make-ahead and it transports really easily, so it’s perfect for picnics, parties, family dinner, or gatherings.
Why You’ll Love This One Pan Pudding Dessert
- It’s the best make-ahead dessert because it needs lots of fridge time before serving! So make it the day before and refrigerate overnight.
- Easy, store-bought convenient ingredients like chocolate chip cookie dough, Cool Whip, instant pudding, and cream cheese.
- A crowd favorite dessert that is tried & true, and guaranteed to be loved by all.
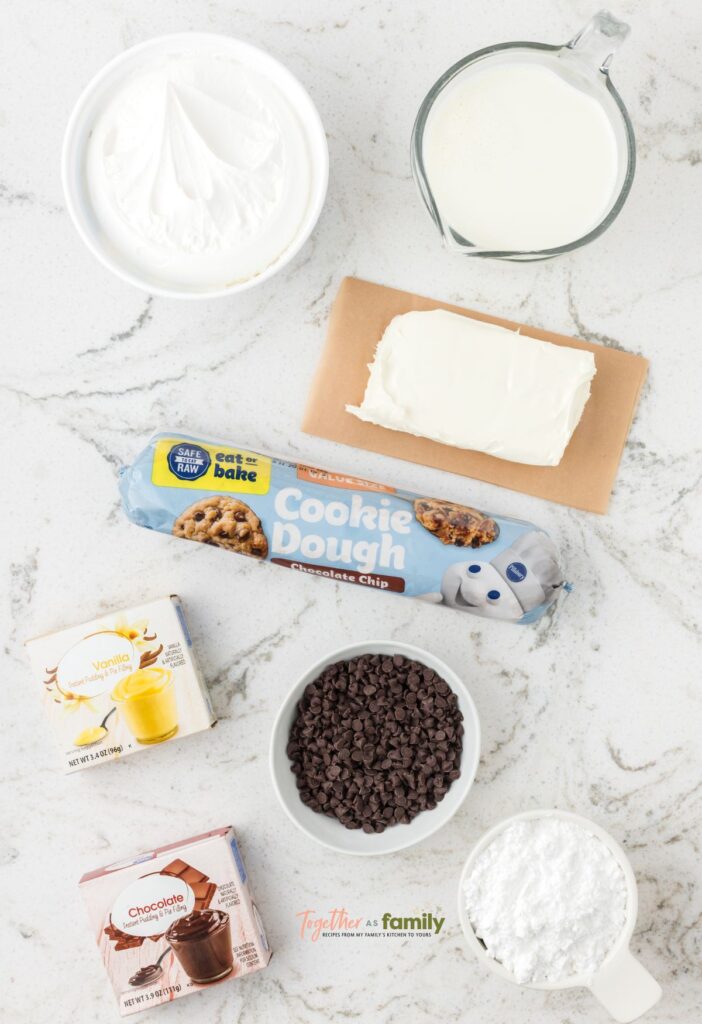
Only 7 Simple Ingredients Needed
- Refrigerated Chocolate Chip Cookie Dough : This is the cookie dough that comes in the log shape. You will slice it and then place the slices in the bottom of the pan, and smoosh them together to form an even crust.
- Cream Cheese : Full-fat cream cheese is always best in no-bake desserts like this one.
- Powdered Sugar
- Cool Whip : Two 8-ounce containers of thawed Cool Whip.
- Half and Half : The extra fat in half and half is needed so this no bake dessert can set and thicken properly.
- Chocolate Instant Pudding Mix
- Vanilla Instant Pudding Mix
How To Make Layered Pudding Dessert With Chocolate Chip Cookie Crust (Printable Recipe Card)
Remove the rube of refrigerated cookie dough from the fridge and allow it to sit at room temperature for 10 minutes.
Heat the oven to 350°F and lightly spray a 9×13-inch baking pan with nonstick cooking spray.
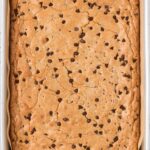
Make The Cookie Layer : Cut the cookie dough into 12 slices and lay the slices into the bottom of the prepared pan in even rows. Press and smoosh the cookie dough together to form an even layer for the crust.
Cook for 15-17 minutes. Remove from the oven and allow it to cool completely before proceeding with the recipe. About 1 hour.
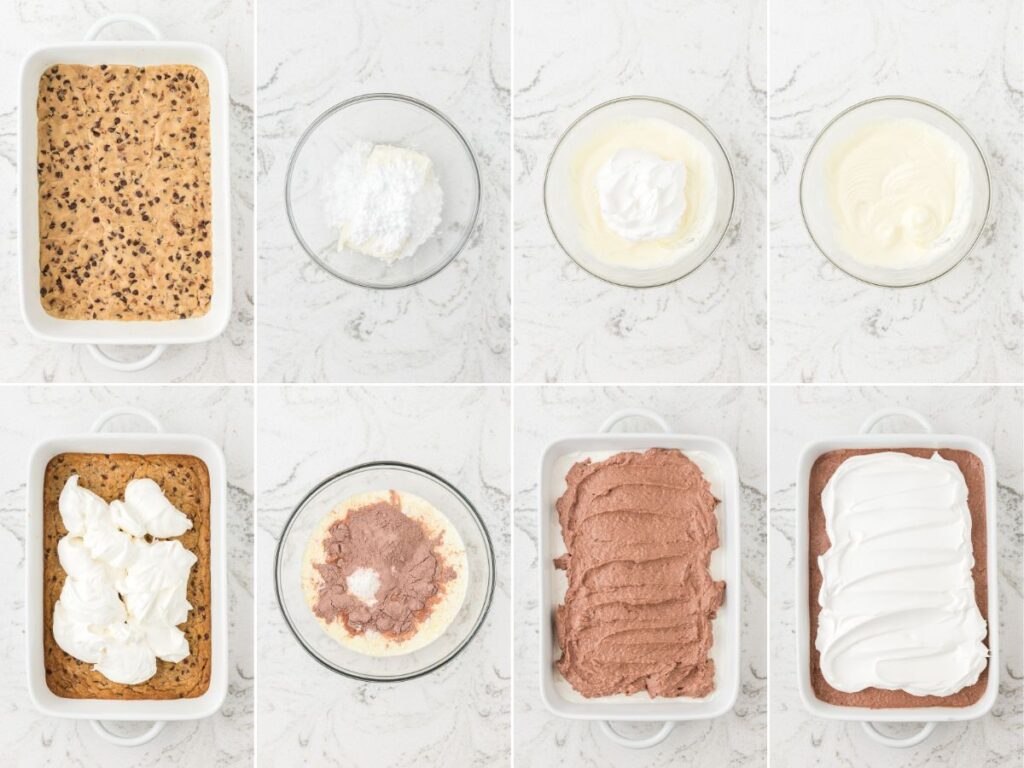
Make The Whipped Cream Cheese Layer : In a mixing bowl using an electric hand mixer, beat together the cream cheese and powdered sugar until smooth and combined well. Add in the Cool Whip and beat on low speed just until thoroughly combined.
Spread the whipped cream cheese mixture in an even layer over top the cooled cookie base.
Make The Pudding Layer : In a separate mixing bowl, add the chocolate and vanilla instant pudding mixes and the half and half. Stir with a wire whisk for 1-2 minutes until mixed well, pudding is dissolved, and it starts to thicken. Let the pudding sit for 5 minutes.
Spread the pudding in an even layer over top the whipped cream cheese layer.
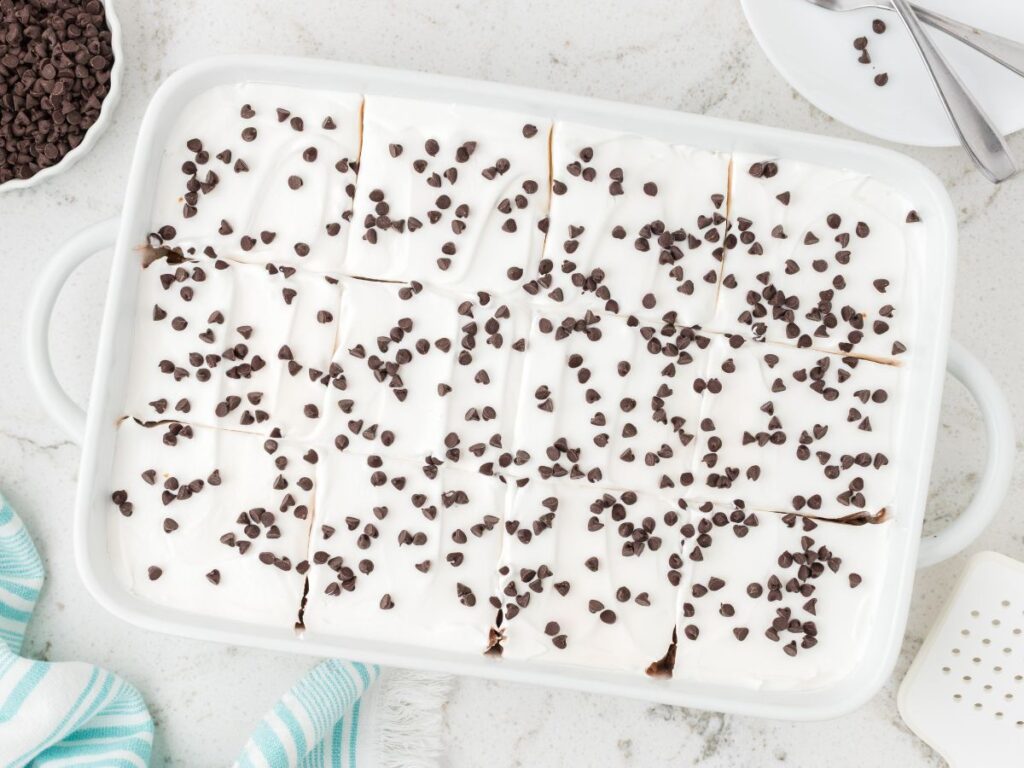
Whipped Cream Layer : Spread the remaining Cool Whip over top for the final layer. You don’t have to use all of it, I use about 3/4 the container.
Chill Time & Garnish : Cover the pan with a lid or plastic wrap, and refrigerate for at least 6-8 hours before serving, or overnight is preferred.
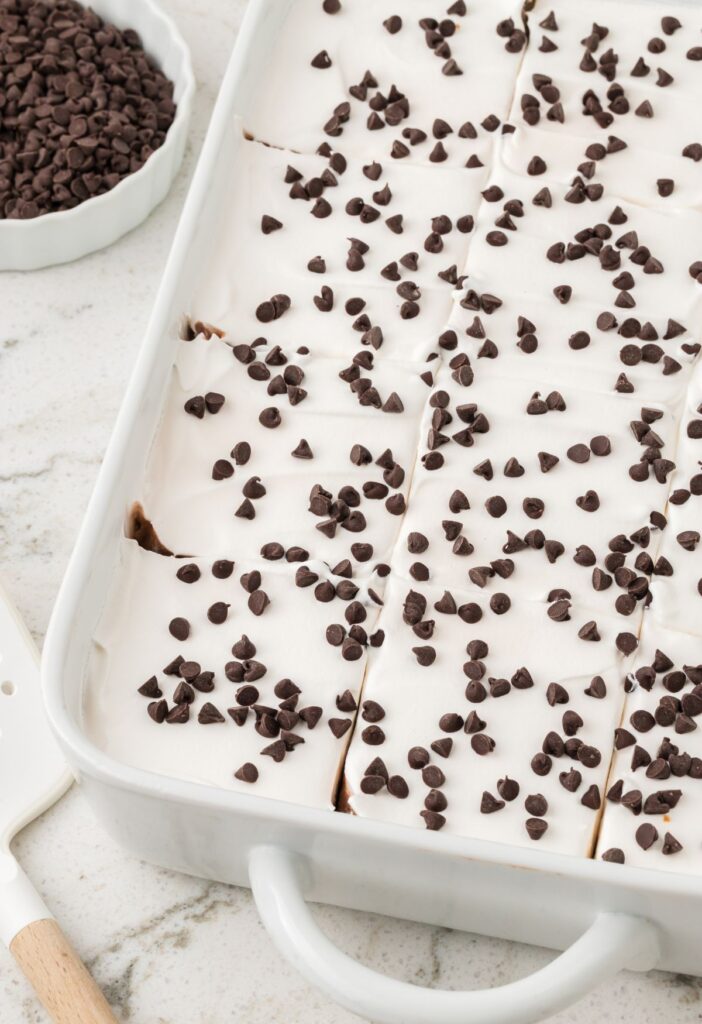
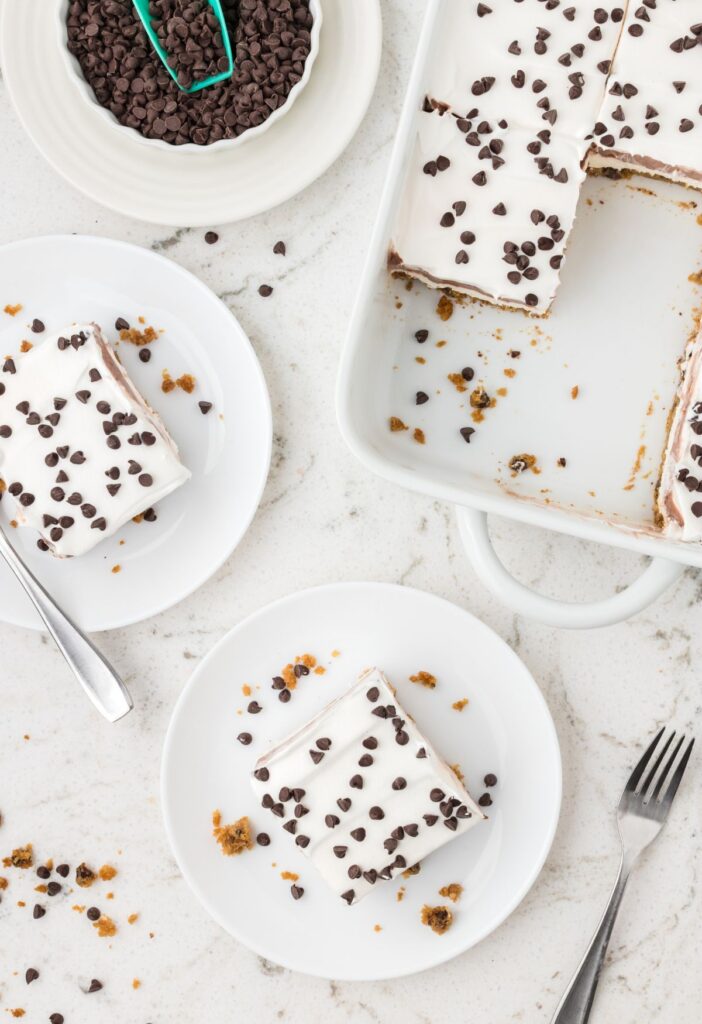
Right before serving, add some miniature chocolate chips or chopped chocolate chip cookies (like Chips Ahoy) over top. Cut into squares and serve chilled. Enjoy!
How To Store Leftovers
Keep leftovers inside the dish, covered with a lid or plastic wrap, or you can remove individual leftover slices to an airtight container. Store in the refrigerator for up to 4 to 5 days. The crust will start to soften and the layers will become softer, the longer it sits in the fridge.
I don’t recommend freezing this dessert as the dairy and pudding layer will take on a weird texture, and separate, once frozen and thawed.
Pro Tips From The Test Kitchen
- I have never made this dessert using sugar-free instant pudding mixes. So if you are trying that then try at your own risk.
- Don’t substitute the half and half. You need the higher fat content from half and half, to help the layers thicken and set properly when chilling.
- Plan ahead because this dessert needs at least 8 hours in the fridge before serving. I like to make it the day before and refrigerate it overnight, so closer to 12 hours or so.
- I love adding some miniature chocolate chips or chopped cookies on top of the dessert. Do not add garnishes until after the chill time right before you serve it. Either mini chocolate chips or chopped cookies such as Chips Ahoy or Famous Amos (or other store-bought chocolate chip cookies) are really yummy on top. But you can also eat it plain with no toppings/garnishes and it’s still so good.
More Chocolate Chip Cookies Desserts


More Layered Pudding Desserts (Lush Desserts)
- Pistachio Pudding Dessert
- Pumpkin Cheesecake Layered Pudding Dessert
- Layered Oreo Dessert
- Raspberry Cheesecake Lush
- White Chocolate Lasagna (Lush Dessert)
- Key Lime Lush
- Birthday Cake Lush
- Butterscotch Lush
- Lemon Lush
- Pina Colada Lush Dessert
- No-Bake Coconut Cream Lush Dessert


Chocolate Chip Cookie Layered Pudding Dessert
Ingredients
Cookie Layer
- 1 tube (16.5 oz) refrigerated chocolate chip cookie dough
Whipped Cream Cheese Layer
- 1 bar (8 oz) cream cheese softened
- 1 cup powdered sugar
- 8 ounces Cool Whip divided
Pudding Layer
- 3 cups half and half
- 1 box (3.4 oz) chocolate instant pudding mix
- 1 box (3.4 oz) vanilla instant pudding mix
Whipped Cream Layer & Garnish (For Later)
- 8 ounces Cool Whip thawed
- miniature chocolate chips or chopped Chips Ahoy cookies optional for garnish
Instructions
- Remove the tube of refrigerated cookie dough from the fridge and allow it to sit at room temperature for 10 minutes.
- Heat the oven to 350°F and lightly spray a 9×13-inch baking pan with nonstick cooking spray.
Make The Cookie Layer
- Cut the cookie dough into 12 slices and lay the slices into the bottom of the prepared pan in even rows. Press and smoosh the cookie dough together to form an even layer for the crust.1 tube (16.5 oz) refrigerated chocolate chip cookie dough
- Cook for 15-17 minutes. Remove from the oven and allow it to cool completely before proceeding with the recipe. About 1 hour.
Make The Whipped Cream Cheese Layer
- In a mixing bowl using an electric hand mixer, beat together the cream cheese and powdered sugar until smooth and combined well.1 bar (8 oz) cream cheese, 1 cup powdered sugar
- Add in the Cool Whip and beat on low speed just until thoroughly combined.8 ounces Cool Whip
- Spread the whipped cream cheese mixture in an even layer over top the cooled cookie base.
Make The Pudding Layer
- In a separate mixing bowl, add the chocolate and vanilla instant pudding mixes and the half and half. Stir with a wire whisk for 1-2 minutes until mixed well, pudding is dissolved, and it starts to thicken. Let the pudding sit for 5 minutes.3 cups half and half, 1 box (3.4 oz) chocolate instant pudding mix, 1 box (3.4 oz) vanilla instant pudding mix
- Spread the pudding in an even layer over top the whipped cream cheese layer.
Whipped Cream Layer
- Spread the remaining Cool Whip over top for the final layer. You don't have to use all of it, I use about 3/4 the container.8 ounces Cool Whip
Chill Time & Garnish
- Cover the pan with a lid or plastic wrap, and refrigerate for at least 6-8 hours before serving, or overnight is preferred.
- Right before serving, add some miniature chocolate chips or chopped chocolate chip cookies (like Chips Ahoy) over top. Cut into squares and serve chilled. Enjoy!miniature chocolate chips or chopped Chips Ahoy cookies
Notes
- I have never made this dessert using sugar-free instant pudding mixes. So if you are trying that then try at your own risk.
- Don’t substitute the half and half. You need the higher fat content from half and half, to help the layers thicken and set properly when chilling.
- Plan ahead because this dessert needs at least 8 hours in the fridge before serving. I like to make it the day before and refrigerate it overnight, so closer to 12 hours or so.
- I love adding some miniature chocolate chips or chopped cookies on top of the dessert. Do not add garnishes until after the chill time right before you serve it. Either mini chocolate chips or chopped cookies such as Chips Ahoy or Famous Amos (or other store-bought chocolate chip cookies) are really yummy on top. But you can also eat it plain with no toppings/garnishes and it’s still so good.
Nutrition
Did You Make This Recipe?
I’d love to see it! You can share it with me on @togetherasfamilyblog and follow on Pinterest @together-as-family-blog-recipes or Facebook @togetherasfamilyblog for more!


This was one of the best desserts ever! We all loved it and wanted seconds, even my dairy-free daughter. The cookie crust was delicious. It was simple to make even though there were several steps, but it was worth it. I didn’t even add chocolate chips on top because it was decadent enough. Thank you!
I love that you can change up some of the combinations with this. I am thinking peanut butter cookie at the bottom, with banana pudding and then sliced bananas on top. This dessert is so versatile, thanks for sharing.
That combo sounds amazing! Yes, it’s super versatile. Enjoy 🙂
Great recipe! It was very good and everyone loved it. I will be making this again!
So good to hear. Thank you 🙂
This was so good! I changed vanilla pudding by adding peanut butter to it for peanut butter pudding. Topped it with chocolate chip and peanut butter morsals. Will definitely make it again
Oh yum! Peanut butter sounds amazing in this.
Hi. What would happen if I chose not to use vanilla pudding? We are chocoholics over here… Thanks!
Just replace the vanilla pudding with another chocolate pudding. It will work just fine. Enjoy!
What size dish did you use?
9×13 baking dish
what size pudding boxes did you use? Mine is very watery and i can’t get it to thicken
It’s the small box of pudding, 3.4 oz is the size. Are you using the fattier half and half milk? That will help it thicken nicely. Pudding does take a few minutes to thicken after you stir it into the milk. Let it sit for 3-5 minutes after stirring and it should be nice and thick.
I used both the 3.4oz of chocolate and vanilla pudding mixture and 3 cups of half &half milk and it’s not getting thick..it’s very watery
That’s so odd. I just made this over Easter weekend and it was fine. Are you letting the pudding and milk mixture sit for 3-5 minutes for it to get thick? When you first stir it, it will be very runny. But if you let it sit for several minutes the mixture thickens up really nicely. I’m hoping it worked for you!
You probably did not use instant pudding. I didn’t get instant last week making a different dessert and it’s very watery. I had to microwave and put in fridge to thicken. Very easy to grab the wrong pudding.
My family loves this dessert so much! This is an awesome site and I will be making more of your recipes. 🙂
Thank you so much. So happy to have you here and I hope you enjoy lots more recipes.
This recipe is amazing. It’s light and refreshing. I crushed up Oreos and out on top instead of chocolate chips and it was a hit. I will be making this again.
Why does this have to sit in fridge for 8 hrs? I picked this dessert to make for a get together to make on the fly day of and now I’m irritated because I don’t know if I should serve it.
It needs the fridge time in order for the pudding layers to thicken up so it will cut nicely. If you are in a hurry, I would suggest using heavy cream to make the puddings. The higher fat content will help it thicken faster. You would probably only have to refrigerate it for a few hours if you used a high fat milk like heavy cream. 8 hours would also be the maximum, so you could possibly be fine with 4-6 hours of refrigeration. So make it in the morning or early afternoon and then let it refrigerate until that evening.
Can I make my own cookie dough or does it have to be store bought
You can make your own if wanted. Enjoy.
This dessert was amazing! It required patience with the different levels of pudding, etc…but it was so worth it. It needs to be made 8 hours in advance , and 2 days later it was just as good. I love the fact it can be made a day in advance and not have to worry about it the day of the event, as you would a trifle dessert. Everyone loved it.
Can I put it In the freezer to save time ?
You could try? Just don’t leave it in there for too long! Dairy and pudding don’t really freeze well so I would only leave it in there to set up quickly. But even then, I have never done that so I just can’t say for sure.
Everyone loved it.Would make again.
that was the recipe I baked in a while. there wasn’t a thing I left didn’t have it home everyone else did for leftovers. the chocolate puddling mixed with vanilla pudding genius wasn’t that rich at all.
Thank you for your comment!
I am making this for a family cookout this Saturday. Thank you so very very much for sharing I know it’s going to be delicious!
You’re welcome! I hope everyone loves it!
Great dessert – made it for a work potluck – everyone loved it. Will definitely make this again
Lucky people that work with you! Glad to hear it was loved!
Does this freeze well? I’m thinking of doing this in cupcake pan to make small individual servings and freeze for when my sweet tooth hits.
I don’t think freezing this much dairy works well. Once frozen and thawed, it has a weird texture and never seems to get firm and thick as it is when it’s fresh. I also don’t freeze a ton so maybe you’ll find that it’s just fine to freeze. Maybe experiment and try freezing one slice of it and see how you like it.
Was a bid hit at my Brothers house for our late Christmas 🎄
Thank you 😊
Great desert and easy to make, it’s a hit ❣️
So easy to make and so delicious!
By far one of my favourite desserts.
It’s also my son’s favourite.
I’ve given some to my neighbour and I was told they hid it from the kids because they want it all for themselves.
Have you ever made this with a homemade whipped cream top instead if the cool whip? Is there any reason that wouldn’t work? Thank you – I’m looking forward to making this!
In this recipe I have found that the Cool Whip tastes just fine. Normally I always make my own whipped cream, especially if it’s like a stand alone thing like the top layer of this dessert. Each carton of cool whip is about 2 cups so you would need to beat 1 cup heavy whipping cream + 1/4 cup (or less) powdered sugar until stiff peaks form for each 8 ounce carton of cool whip called for.