
This post may contain affiliate links, view our disclosure policy.
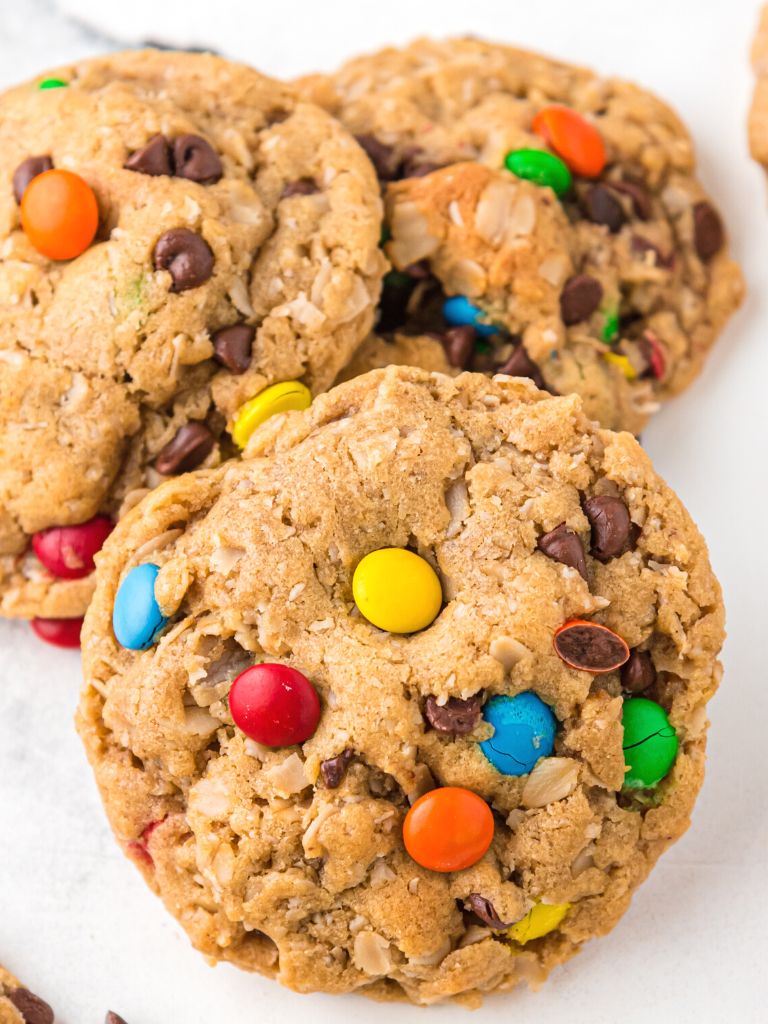
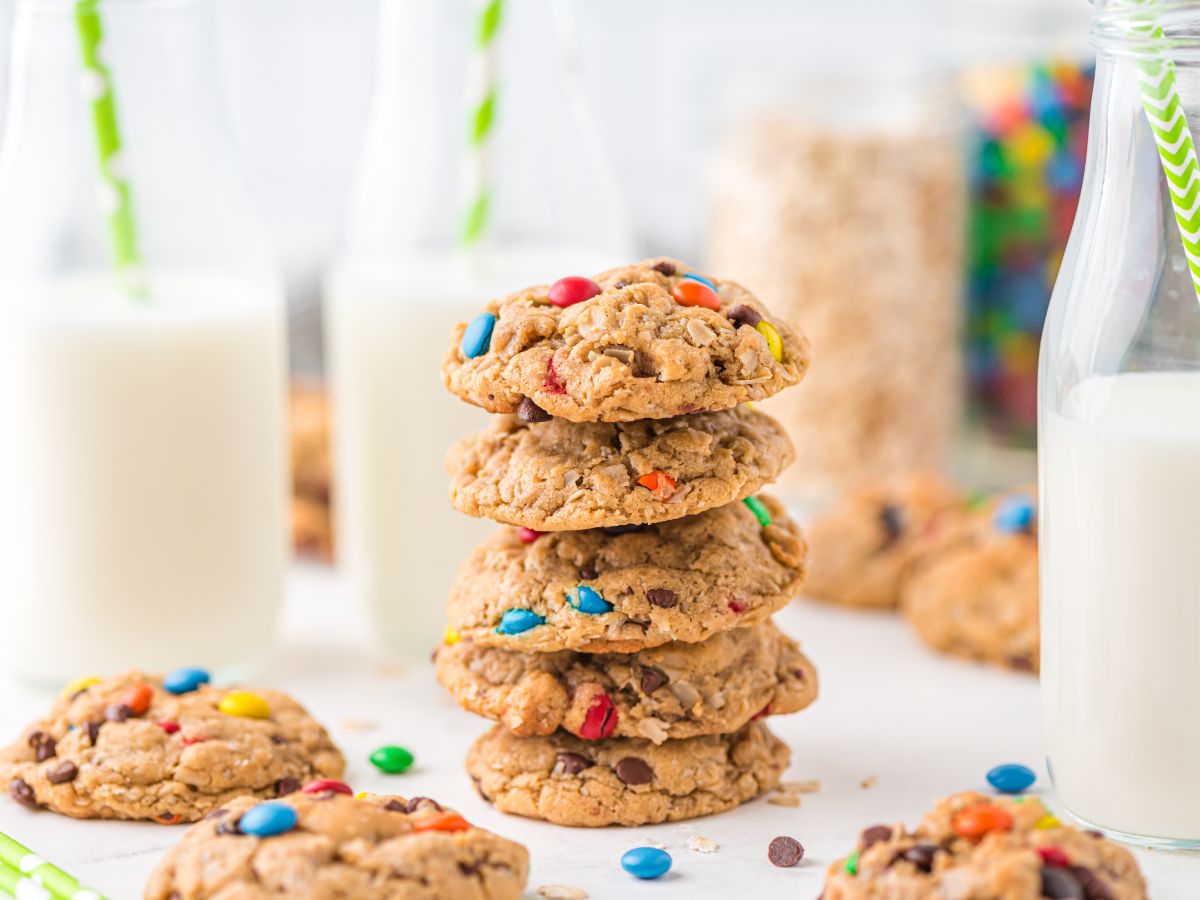
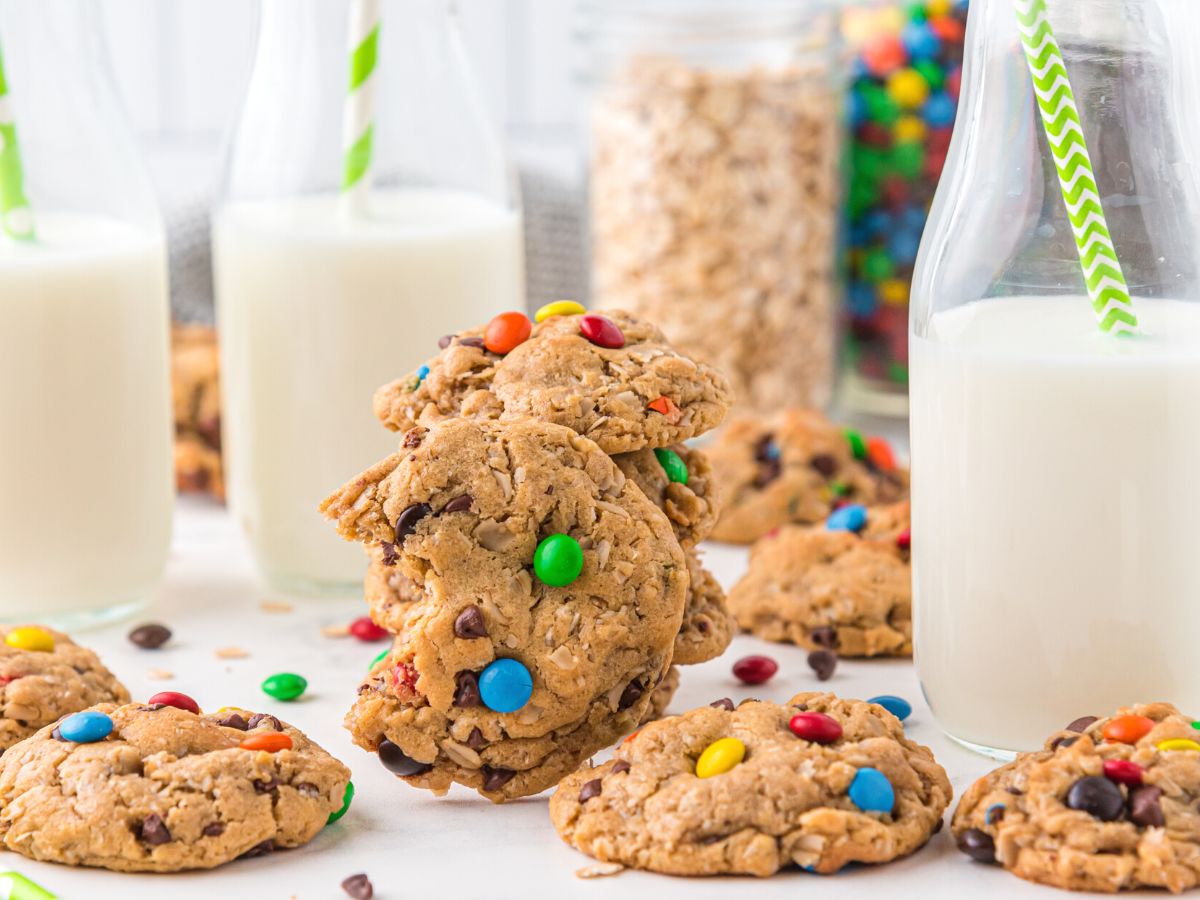
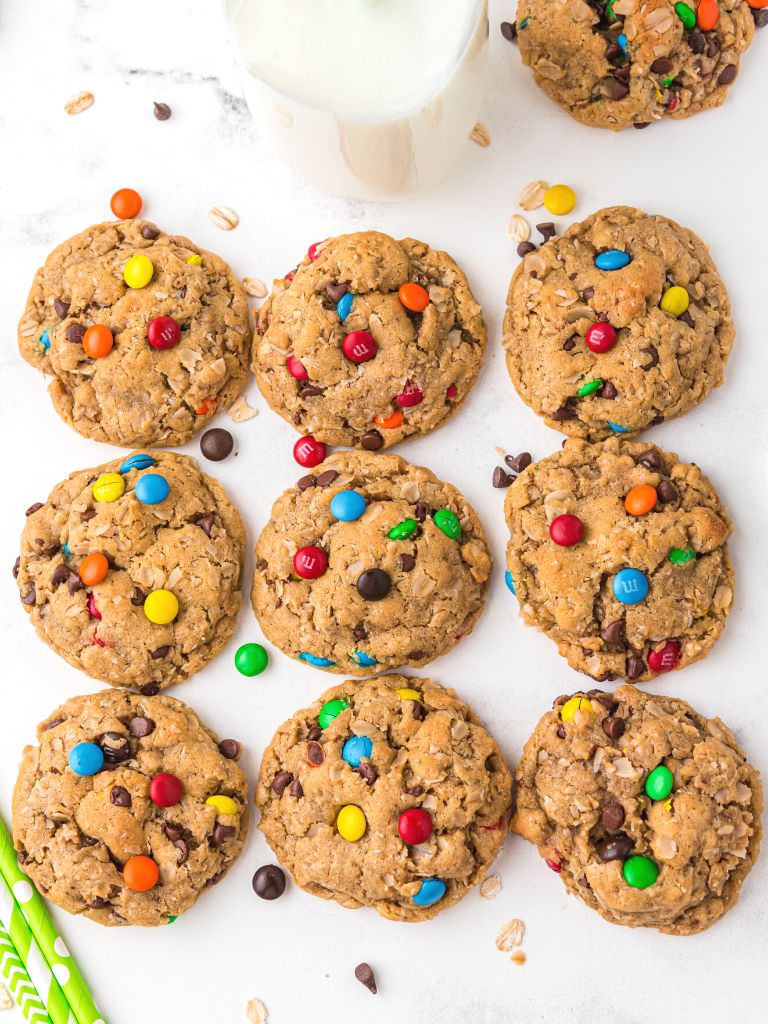
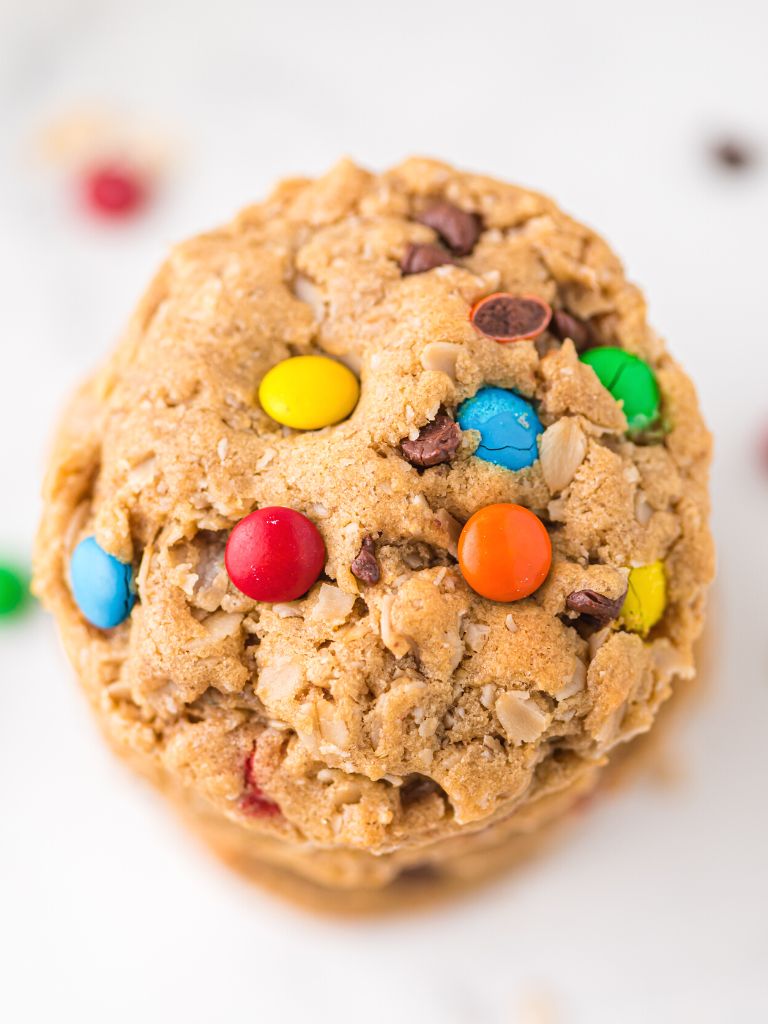
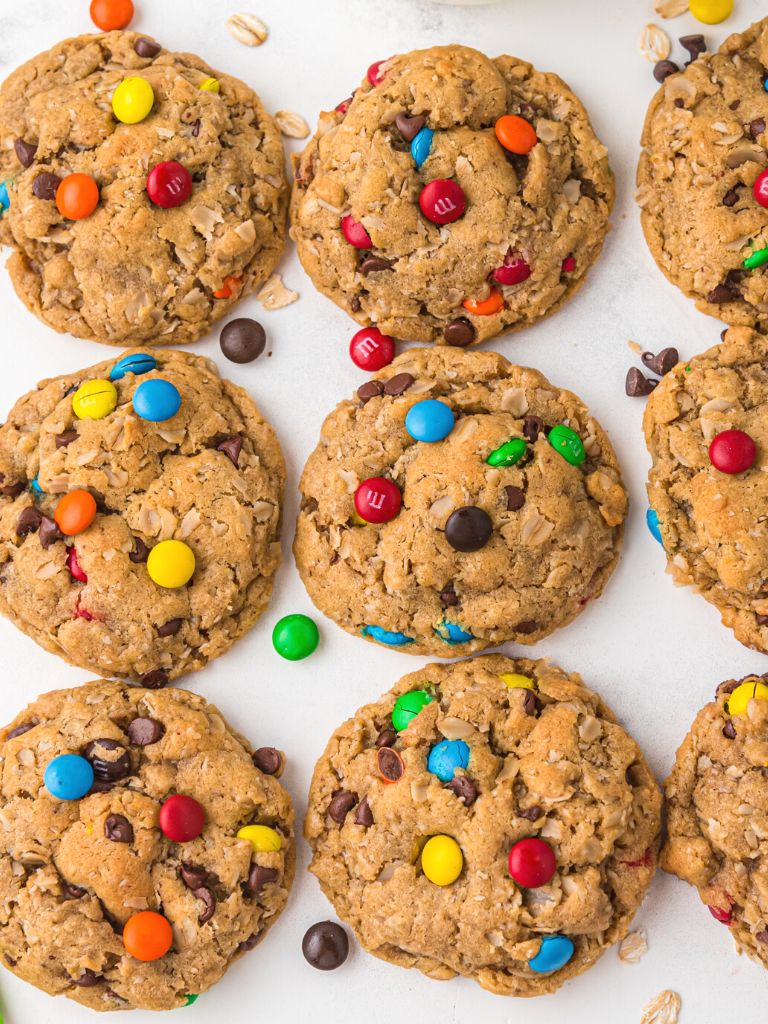
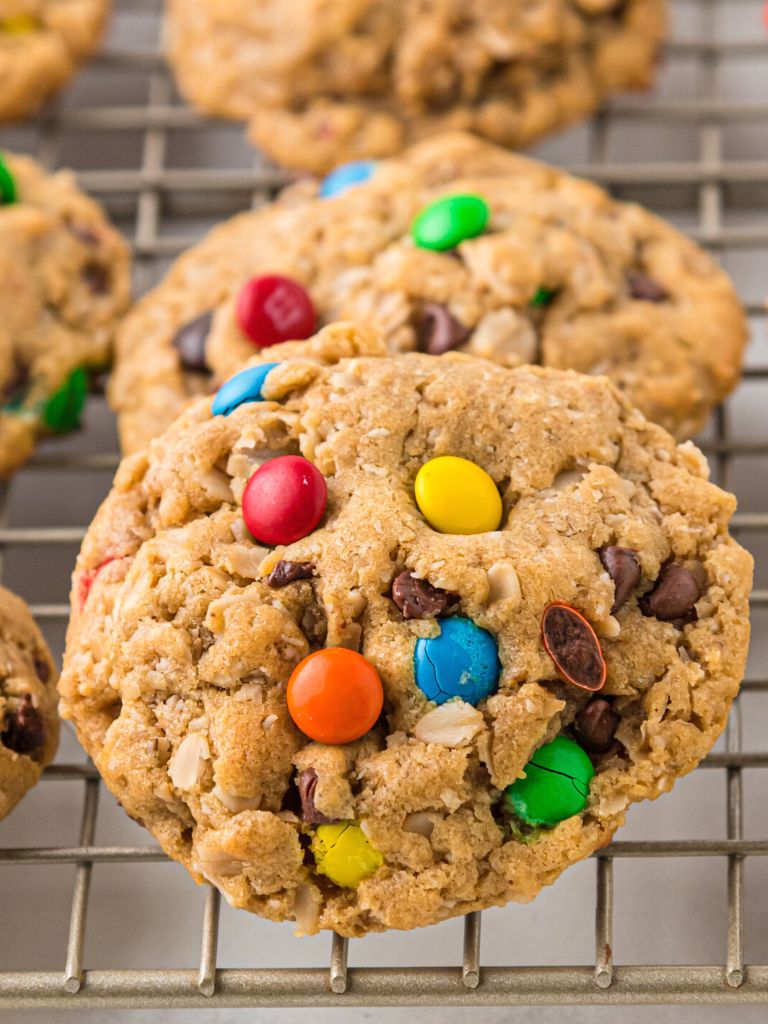
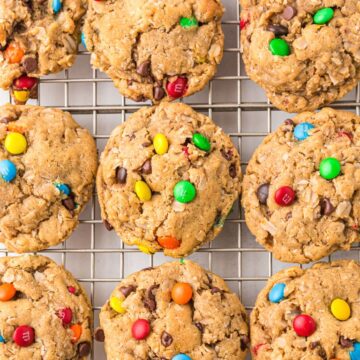
Learn how to make thick, chewy, giant Bakery Style Monster Cookies at home with this easy to follow recipe with tons of tips! Monster cookies are loaded with so much texture and flavor thanks to the oats, peanut butter, chocolate, and colorful m&m’s.
If you prefer your cookies in bar form try my No Flour Monster Cookie Bars. Or if you’re a fan of just the monster cookie dough then make my No Bake Monster Cookie Dough Bars.
Monster Cookies Recipe (Bakery Style)
It’s no secret by now that my family loves all things monster cookie! If you have followed this blog of mine for any amount of time then you know that I have so many varieties of ‘monster cookies’.
It’s an addicting mix of peanut butter + oats (tons of texture) + chocolate + m&m’s. You can’t go wrong with that combination!
My family loves this Monster Cookie Dough Cheeseball for a movie night snack or a party snack when friends are over. Pair it with mini Oreo cookies, pretzels, mini Nutter Butter cookies for dipping. Or if you’re a peanut butter lover then you must make my Triple Peanut Butter Monster Cookies. They have 3 types of peanut butter thanks to the creamy peanut butter, mini Reese’s Pieces candy, and peanut butter chips.
Ingredients Needed
- Creamy Peanut Butter – It’s best to use regular processed peanut butter and not the all-natural or no-stir varieties. This recipe has been tested and made with regular creamy peanut butter (Peter Pan brand, Jif, and Skippy brands).
- Salted Butter – Salted butter provides a nice balance to all the sweetness. If you use unsalted butter just be sure and add a pinch of salt (1/4 teaspoon or so) in with the other dry ingredients.
- Granulated Sugar
- Light Brown Sugar
- Large Eggs
- Vanilla Extract – Pure vanilla extract is what I recommend using as the flavor is much better, especially in baking recipes like cookies.
- Old-Fashioned Oats – I prefer the whole oats (NOT the quick oats) because they provide that really hearty and chewy texture that these bakery style monster cookies are known for. Quick oats can be used if wanted. I recommend using whole old-fashioned oats.
- All-Purpose Flour
- Baking Soda
- Mini Semi-Sweet Chocolate Chips
- Mini M&M’s – I prefer the mini sizes inside the cookies but I love to decorate the tops of each cookie (once it’s out of the oven) with the larger, regular sized m&m’s.

How To Make Big, Thick, Chewy Monster Cookies
Learn how to make bakery style cookies at home with the easy to follow steps. Be sure and read to the bottom of the page where there is a detailed recipe card, a printable option, and a pin it button so you can save the recipe for later.
- Prep : Preheat the oven to 350 degrees F. Line a cookie sheet(s) with parchment paper.
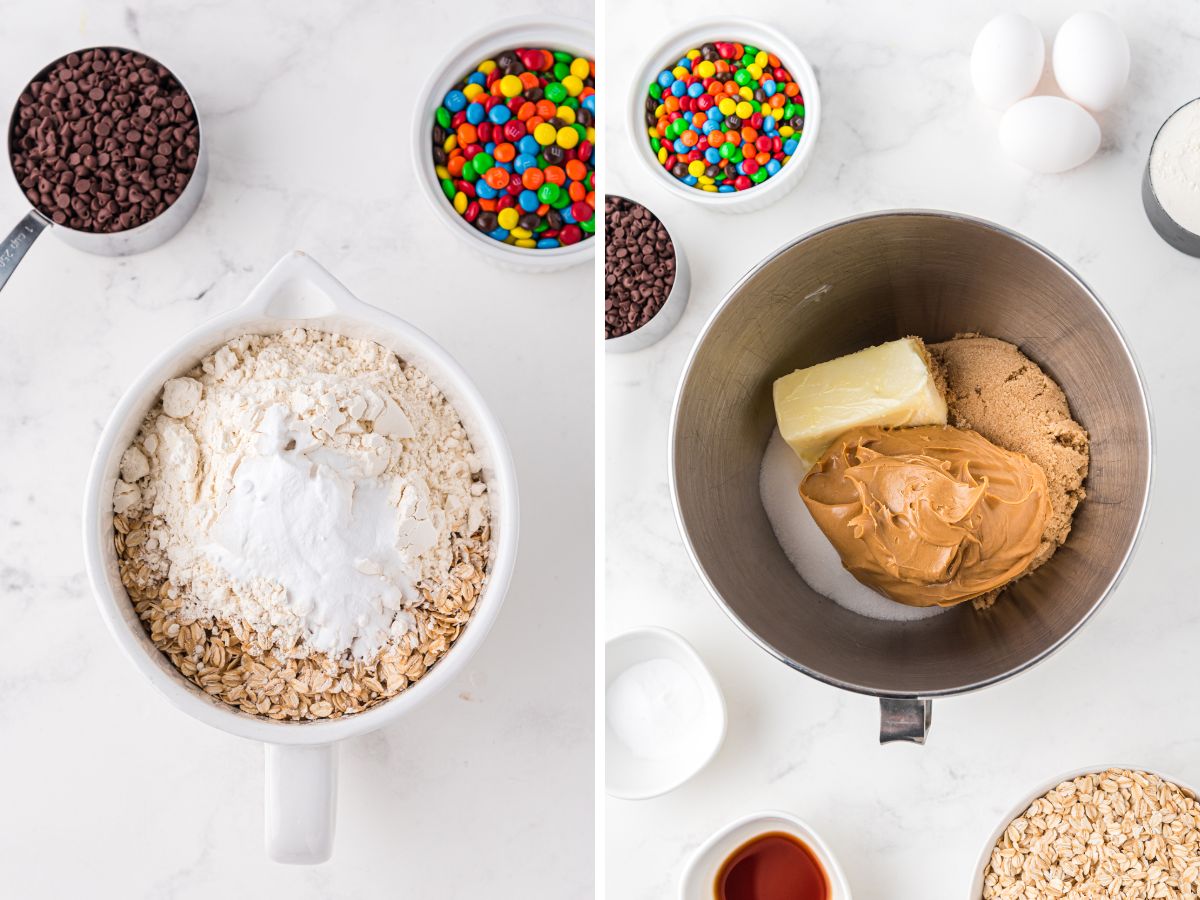
- Cream Butters + Sugar : In the bowl of a stand mixer, add the peanut butter, butter, sugar, and light brown sugar. Cream together, starting on low speed and increase as needed, for about 2 minutes. The mixture should be fluffy looking and much paler in color.
- Eggs + Vanilla : Add in the eggs and vanilla extract. Beat just until combined. No need to keep mixing it.
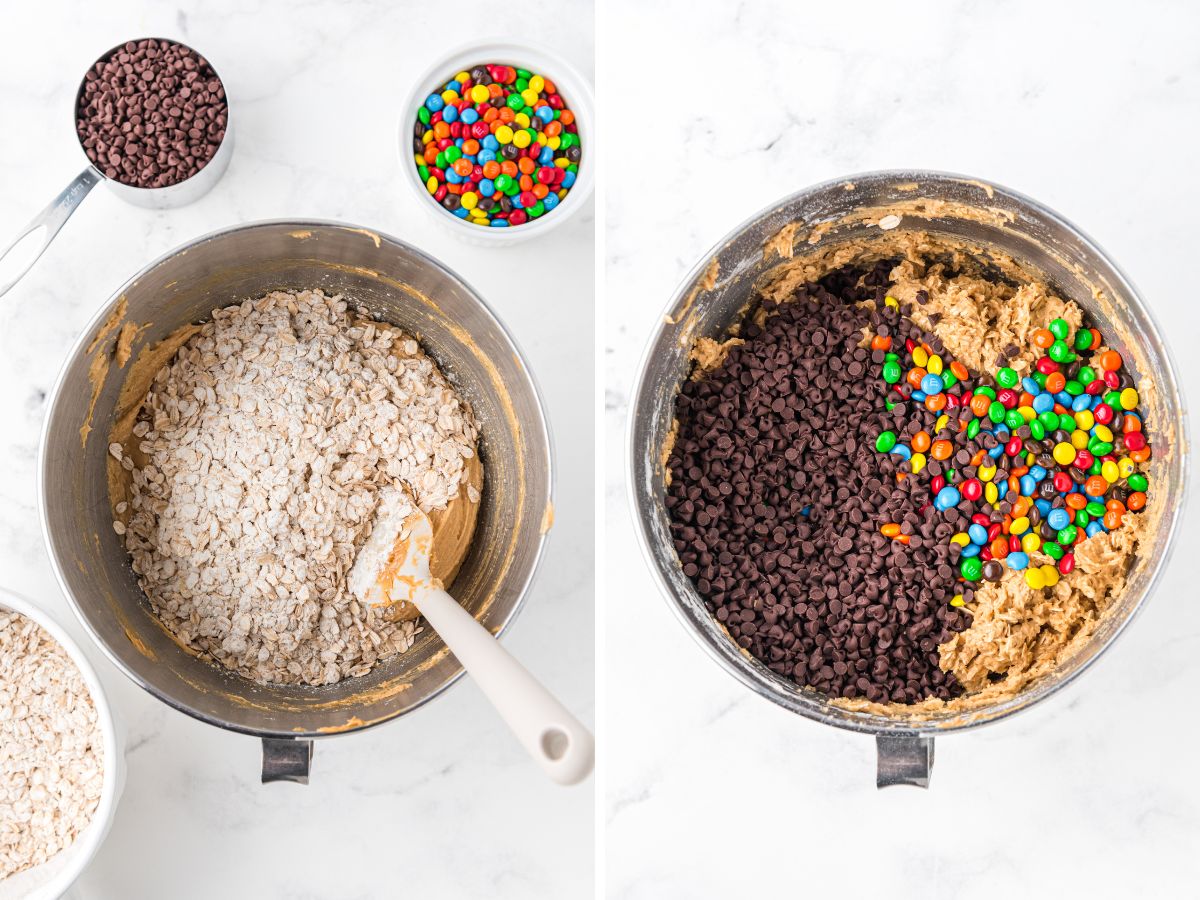
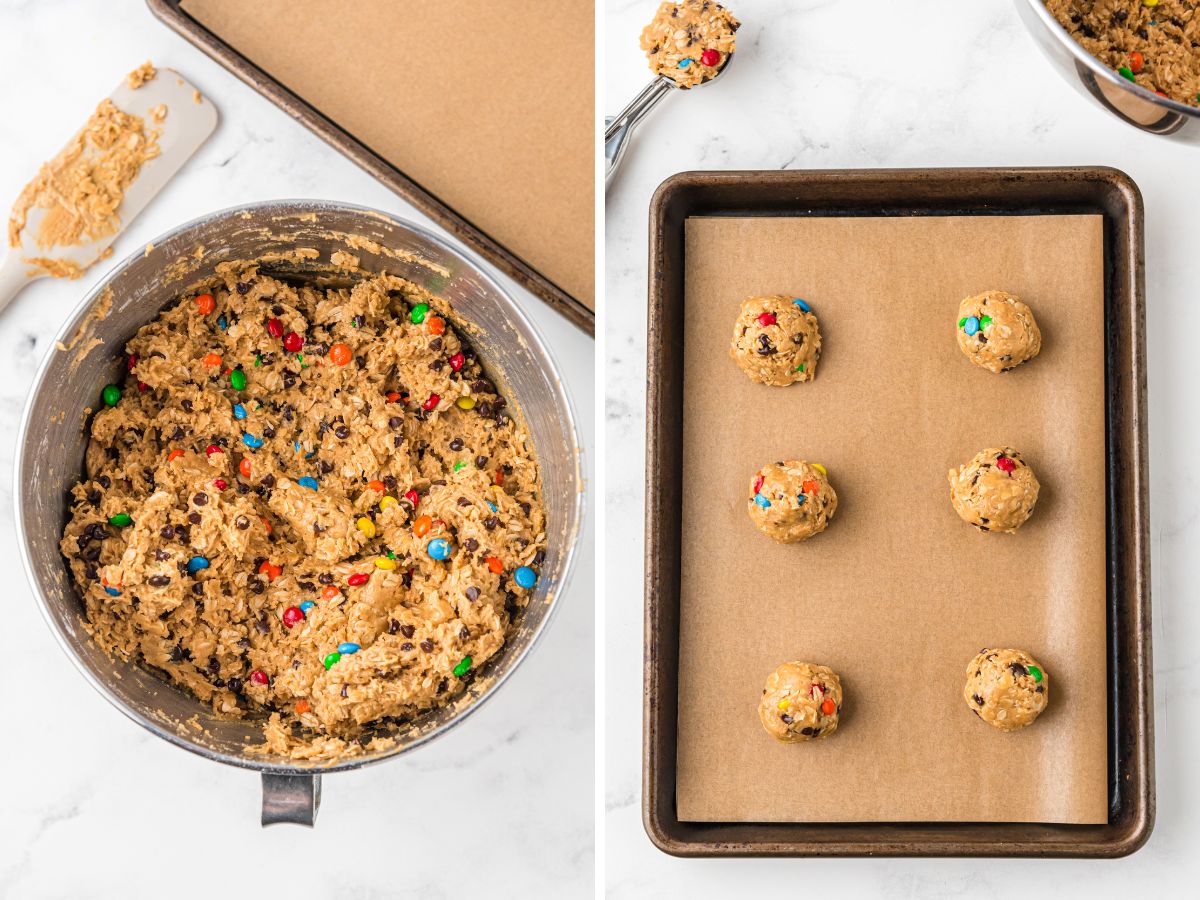
- Dry Ingredients : In a separate bowl you’ll want to first add the dry ingredients and stir it with a whisk. Add them into the bowl and mix on low speed just until combined. Add in the chocolate chips and m&m’s and mix just until combined.
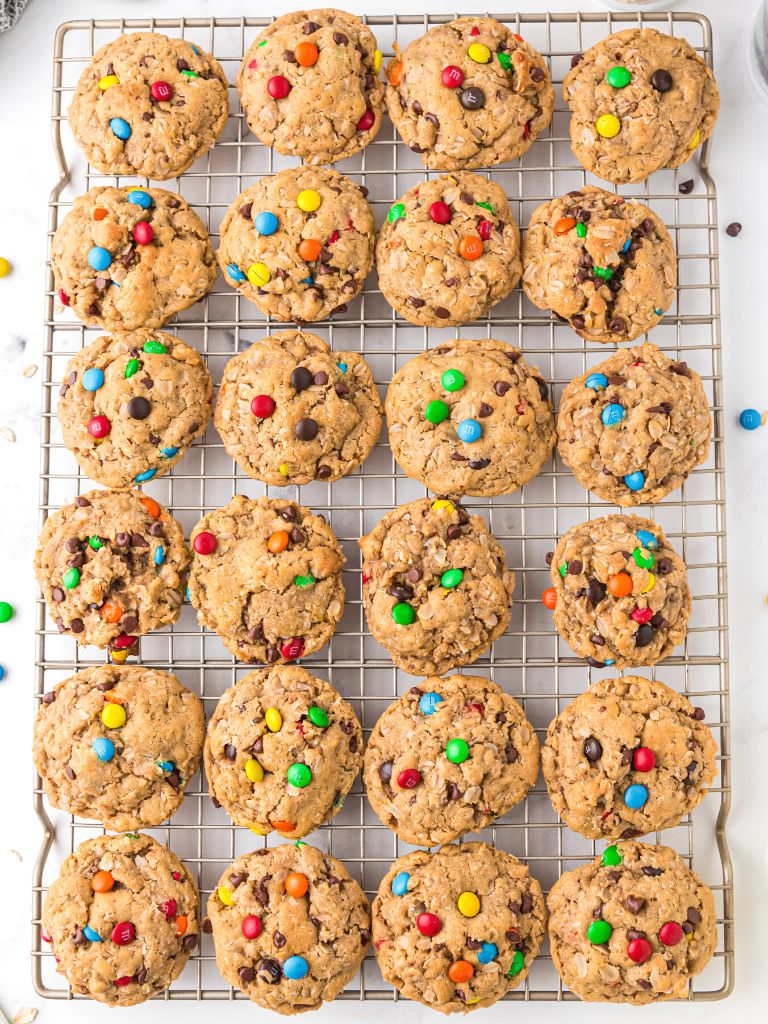
- Cookie Dough Scoops : Use a 3 tablespoon cookie scoop to scoop out the dough and roll it into a ball with your clean hands. Place 6 per cookie sheet.
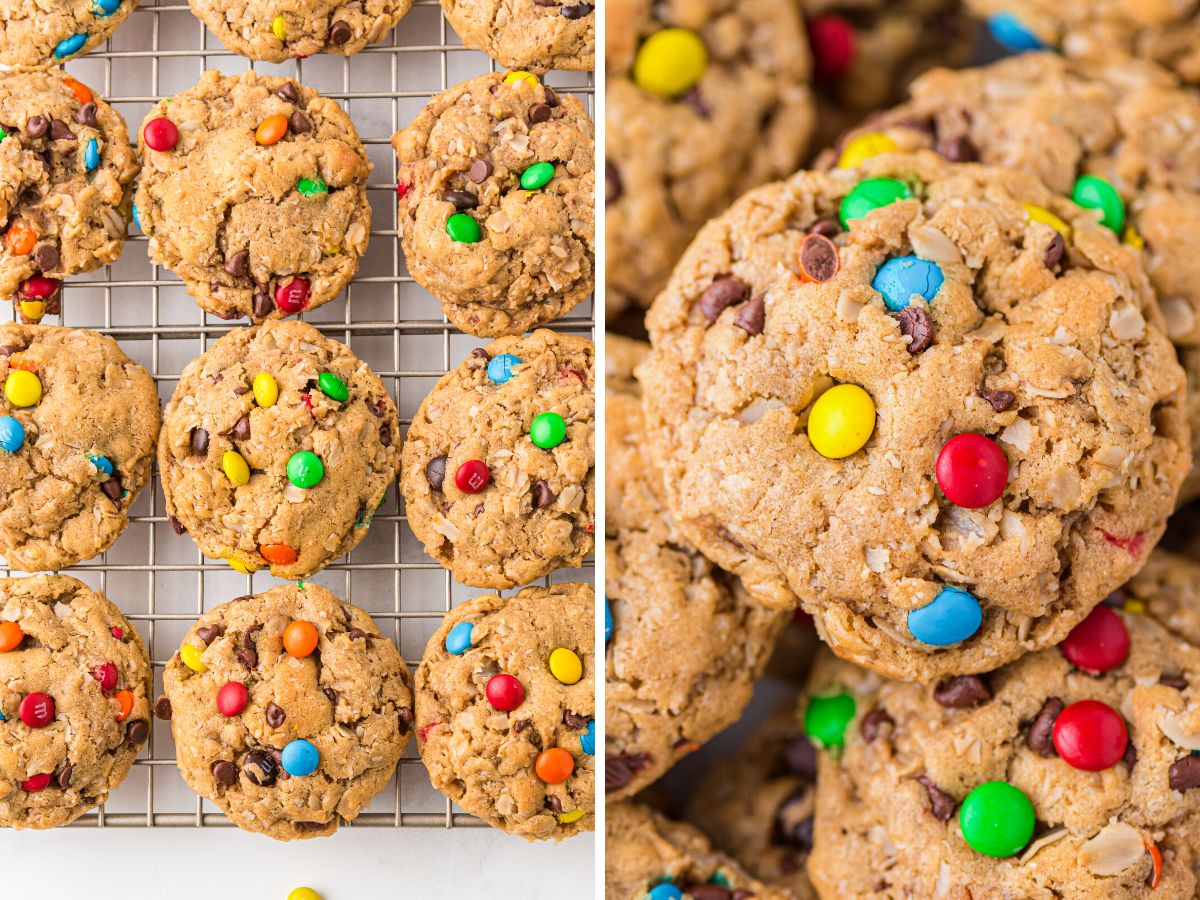
- Bake : Bake the cookies for 8-12 minutes. The time range is longer but all ovens are different. The cookies will still appear pretty round and puffy and should be very lightly golden brown at the edges.
- Decorate & Cool : Gently press a few m&m’s onto the top of each cookie when they’re fresh out of the oven. This helps the cookie flatten slightly and makes them look pretty. Allow them to cool on the warm cookie sheet for at least 15 minutes and then move them to a cooling rack to cool completely.
Monster Cookies FAQ’s
-
How To Store Leftovers
- Store leftover cookies in an airtight container or Ziploc bag, at room temperature, for 2-3 days.
- They tend to dry out the longer they are sitting out at room temperature.
- If you’re not going to be able to finish eating the batch within 3 days, I recommend freezing them.
-
Can I Freeze Monster Cookies?
- Yes! I freeze these cookies all the time. You can freeze them unbaked or baked. I personally prefer to freeze them already baked. I don’t love how cookie dough bakes up after it has been frozen, but that might just be a personal preference thing.
- Freeze Unbaked : Portion out the dough into the dough balls and freeze them on a plate or cookie sheet first. Once they are firm and mostly frozen, place the dough balls into a freezer-safe container or bag, and freeze for up to 3 months. You want to first freeze them individually so that they won’t stick together while freezing. When ready to eat, let the dough balls thaw in the fridge or at room temperature, and back according to the recipe instructions.
- Freeze Baked : This is my preferred way to freeze them. Bake the cookies according to the recipe and let them cool to room temperature. Once cooled, place one or two (or several cookies) in a freezer-safe container or bag. Freeze for up to 1 month. Let the cookie(s) thaw at room temperature for a few minutes or you can warm it up in the microwave.
- Yes! I freeze these cookies all the time. You can freeze them unbaked or baked. I personally prefer to freeze them already baked. I don’t love how cookie dough bakes up after it has been frozen, but that might just be a personal preference thing.
-
Variation Ideas
- There are lots of ways to switch up this recipe! Here are some ideas.
- Peanut Butter Chips : Use all peanut butter chips (instead of the chocolate chips) or use half & half.
- Chocolate Chips : I love the mini semi-sweet chocolate chips but you can use anything. Dark chocolate chips make a nice contrast to all the sweetness, you can try using milk chocolate chips, or even white chocolate chips. I just love the mini sized chips and m&m’s so much in this recipe!
- M&M’s : Try using peanut butter m&m’s (roughly chop them first), peanut m&m’s, or even the pretzel m&m’s. Roughly chop the larger, regular size m&m’s so they will incorporate into the cookie dough better.
- Garnish : I love to buy a small pack of regular m&m’s and press a few into the top of each cookie when they’re out of the oven. I prefer the mini m&m’s inside the cookie, but I really love the look of the regular size m&m’s on top of the cookie. Makes it look pretty.
- Holidays : This is my favorite way to switch up this recipe! Use any Holiday colored m&m’s in this recipe. These are so fun to make for Christmas (red & green m&m’s), Valentine’s Day (pink, red, and white m&m’s), Easter, and 4th of July. They make m&m colors/mixes for all the Holidays so have fun with it.
- There are lots of ways to switch up this recipe! Here are some ideas.
-
What Peanut Butter is Best for Monster Cookies?
- I only recommend using the regular process peanut butter like Peter Pan brand, Skippy brand, or Jif brand. There are also store brands too. Don’t use anything labeled as ‘no-stir’ or ‘all-natural’ on the label. Those are much drier and don’t have the moisture needed to make these cookies. Those peanut butters tend to dry out baked good and make them crumbly.
- With that said, I have had many readers tell me over the years (on my other monster cookie type recipes) that they use those peanut butters just fine. So maybe it’s just a personal preference. Experiment if you choose.
Recipe Tips
Here are a few of my helpful tips so that you can have success recreating this monster cookies recipe in your own kitchen ♥
- Use a Cookie Scoop : This is the best way to get even uniform, pretty looking cookies. I have linked to the cookie scoop that I use all the time, down below in the recipe card. It holds 3 tablespoons of dough and it’s the “secret” to these giant and thick cookies.
- Cream Sugars + Butter + Peanut Butter Tip : It’s so important to beat a lot of air into this mixture. It’s 2 minutes of mixing time. Seems like a long time, but it’s important to get the mixture nice and fluffy, lighter in color, and whipped well so the cookies turn out big and soft-baked while still being thick and chewy.
- Pre-Cut Parchment Paper : For the best cookies use parchment paper on your cookie sheet. It helps cookies bake evenly and it prevents the bottoms from over browning. I love (like really love!) the pre-cut parchment paper cookie sheets from the Reynold’s brand. I keep a stock of them in my pantry. For real, I probably have like 10 boxes in there right now!
More Cookies Your Family Will Love
- Perfect Chocolate Chip Cookies (Thick & Chewy) – These have a secret way of shaping the dough and it’s a game-changer for sure.
- Family Favorite Sugar Cookies – I make these all the time! Perfectly thick, sweet, and they hold their shape even after baking.
- Strawberry Cake Mix Cookies – Starts with a strawberry cake mix and then they’re rolled in powdered sugar. The prettiest, pale pink cookies ever!
- M&M Chocolate Cookies – A chewy chocolate cookie base stuffed with m&m candies.
- The Best Oatmeal Chocolate Chip Cookies – These are the cookies that I crave more than any other cookie recipe.
- Key Lime Pie Cookies – So fruity and sweet! Made with key lime juice and graham cracker crumbs, and then drizzled in a key lime glaze.

Bakery Style Monster Cookies
Equipment
Ingredients
- 1½ cups creamy peanut butter (NOT all-natural or no-stir)
- 1/2 cup (1 stick) salted butter softened
- 1½ cups light brown sugar
- 3/4 cup granulated sugar
- 3 large eggs
- 1 tablespoon pure vanilla extract
- 3½ cups whole old-fashioned oats
- 1 cup all-purpose flour
- 2 teaspoons baking soda
- 1 cup mini semi-sweet chocolate chips
- 1 cup mini m&m's
Instructions
- Preheat the oven to 350° F. Line a cookie sheet(s) with parchment paper. Set aside.
- Using the bowl of a stand mixer with the paddle attachment, add the peanut butter, butter, brown sugar, and sugar into the bowl. Beat together for about 2 minutes, increasing speed as needed, until the mixture looks fluffy and lighter in color. * It's important to beat air into the butters + sugars mixture. You want the mix to be fluffy, light looking, and much lighter in color. * You can also use a mixing bowl with an electric hand mixer, but I find it easiest to use a stand mixer in order to ensure that it gets beaten well.
- Add in the large eggs and vanilla extract. Beat just until it's incorporated and mixed in.
- In a separate mixing bowl add the oats, flour, and baking soda. Stir with a wire whisk. Dump this into the stand mixer bowl and beat on low speed just until combined and no flour streaks remain.
- Add in the mini chocolate chips and mini m&m's and beat on low speed just until combined.
- Use a 3 tablespoon cookie scoop to scoop out the dough and roll it into a ball with your hands. Place 6 cookies per cookie sheet.
- Cook for 8-12 minutes. * Tops of the cookies should be lightly golden brown and the cookies will look puffy and round still. It's ok if the very top of the cookie still has a little wet looking dough. Not the whole cookie but just a small part on the very top. * It's so important to not overcook because they will firm up and cook as they cool on the warm cookie sheet.
- Immediately after taking the cookies out of the oven take 4-5 M&M's (I prefer the regular sized ones) and gently press them onto the top of each cookie. This makes them look pretty and it allows the cookie to not be as puffy and round. * I also like to take the pan, right after I pull it out of the oven, and tap it against the counter. This helps the cookies flatten slightly. I then put the m&m's on top. * Tip : To really get that pretty round cookie shape take a round biscuit cutter or a cup (one that fits around the cookie) and move it around in a circle, on the cookie sheet, to shape the cookie.
- Allow the cookies to cool on the warm cookie sheet for about 15 minutes before removing them to a cooling rack to finish cooling.
Notes
- Use a Cookie Scoop : This is the best way to get even uniform, pretty looking cookies. I have linked to the cookie scoop that I use all the time, down below in the recipe card. It holds 3 tablespoons of dough and it's the "secret" to these giant and thick cookies.
- Cream Sugars + Butter + Peanut Butter Tip : It's so important to beat a lot of air into this mixture. It's 2 minutes of mixing time. Seems like a long time, but it's important to get the mixture nice and fluffy, lighter in color, and whipped well so the cookies turn out big and soft-baked while still being thick and chewy.
- Pre-Cut Parchment Paper : For the best cookies use parchment paper on your cookie sheet. It helps cookies bake evenly and it prevents the bottoms from over browning. I love (like really love!) the pre-cut parchment paper cookie sheets from the Reynold's brand. I keep a stock of them in my pantry. For real, I probably have like 10 boxes in there right now!
-
How To Store Leftovers
- Store leftover cookies in an airtight container or Ziploc bag, at room temperature, for 2-3 days.
- They tend to dry out the longer they are sitting out at room temperature.
- If you're not going to be able to finish eating the batch within 3 days, I recommend freezing them.
-
Can I Freeze Monster Cookies?
- Yes! I freeze these cookies all the time. You can freeze them unbaked or baked. I personally prefer to freeze them already baked. I don't love how cookie dough bakes up after it has been frozen, but that might just be a personal preference thing.
- Freeze Unbaked : Portion out the dough into the dough balls and freeze them on a plate or cookie sheet first. Once they are firm and mostly frozen, place the dough balls into a freezer-safe container or bag, and freeze for up to 3 months. You want to first freeze them individually so that they won't stick together while freezing. When ready to eat, let the dough balls thaw in the fridge or at room temperature, and back according to the recipe instructions.
- Freeze Baked : This is my preferred way to freeze them. Bake the cookies according to the recipe and let them cool to room temperature. Once cooled, place one or two (or several cookies) in a freezer-safe container or bag. Freeze for up to 1 month. Let the cookie(s) thaw at room temperature for a few minutes or you can warm it up in the microwave.
- Yes! I freeze these cookies all the time. You can freeze them unbaked or baked. I personally prefer to freeze them already baked. I don't love how cookie dough bakes up after it has been frozen, but that might just be a personal preference thing.
-
Variation Ideas
- There are lots of ways to switch up this recipe! Here are some ideas.
- Peanut Butter Chips : Use all peanut butter chips (instead of the chocolate chips) or use half & half.
- Chocolate Chips : I love the mini semi-sweet chocolate chips but you can use anything. Dark chocolate chips make a nice contrast to all the sweetness, you can try using milk chocolate chips, or even white chocolate chips. I just love the mini sized chips and m&m's so much in this recipe!
- M&M's : Try using peanut butter m&m's (roughly chop them first), peanut m&m's, or even the pretzel m&m's. Roughly chop the larger, regular size m&m's so they will incorporate into the cookie dough better.
- Garnish : I love to buy a small pack of regular m&m's and press a few into the top of each cookie when they're out of the oven. I prefer the mini m&m's inside the cookie, but I really love the look of the regular size m&m's on top of the cookie. Makes it look pretty.
- Holidays : This is my favorite way to switch up this recipe! Use any Holiday colored m&m's in this recipe. These are so fun to make for Christmas (red & green m&m's), Valentine's Day (pink, red, and white m&m's), Easter, and 4th of July. They make m&m colors/mixes for all the Holidays so have fun with it.
- There are lots of ways to switch up this recipe! Here are some ideas.
-
What Peanut Butter is Best for Monster Cookies?
- I only recommend using the regular process peanut butter like Peter Pan brand, Skippy brand, or Jif brand. There are also store brands too. Don't use anything labeled as 'no-stir' or 'all-natural' on the label. Those are much drier and don't have the moisture needed to make these cookies. Those peanut butters tend to dry out baked good and make them crumbly.
- With that said, I have had many readers tell me over the years (on my other monster cookie type recipes) that they use those peanut butters just fine. So maybe it's just a personal preference. Experiment if you choose.
Nutrition
Did You Make This Recipe?
I'd love to see it! You can share it with me on @togetherasfamilyblog and follow on Pinterest @together-as-family-blog-recipes or Facebook @togetherasfamilyblog for more!


Did you love this recipe?
Make sure to comment below so we can chat about it! Or follow on your favorite social network for even more family recipes.