
This post may contain affiliate links, view our disclosure policy.
Funfetti Icebox Cake is a party in a layered no bake dessert! Vanilla wafers, sweetened whipped cream, instant pudding, and colorful rainbow sprinkles make this birthday cake flavored icebox cake so fun and colorful.
If you want more funfetti recipes with rainbow sprinkles then be sure and try my Funfetti Cake Batter Cookie Bars, Easy Funfetti Dip, and Mini Funfetti Cheesecakes.

Funfetti Icebox Cake (No Bake Icebox Cake Recipe)
Anything funfetti loaded with rainbow sprinkles is always the ultimate birthday party cake! But this no bake funfetti icebox cake doesn’t just have to be for a party!
It’s the perfect summertime no bake dessert, so easy to make, and always a crowd favorite. You can even switch up the sprinkles used for different holidays – think red, white, and blue sprinkles for a 4th of July dessert. Or use pastel springtime sprinkles for Easter, Valentines Day sprinkles, Halloween themed sprinkles, and Christmas. So many options to switch up this funfetti icebox cake.
Icebox cakes are layered desserts with some sort of creamy whipped cream pudding mixture in between layers of cookie. Icebox cakes require chill time, which is necessary, in order to soften the cookie layer and help the pudding layer set and thicken.

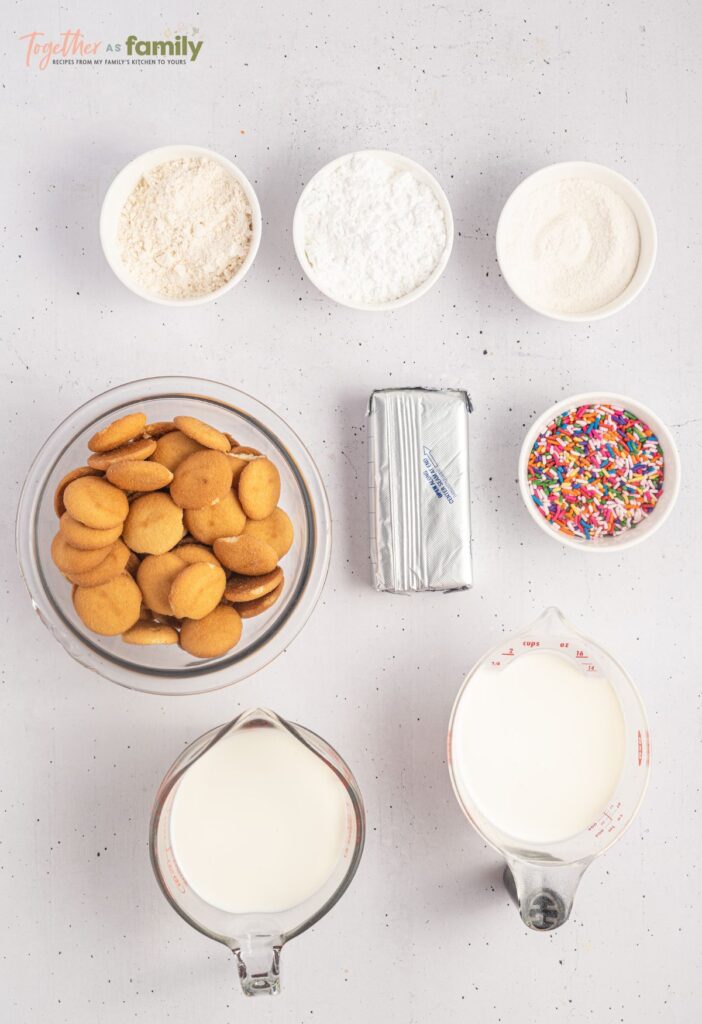
Ingredients Needed
- White Chocolate Instant Pudding Mix : You can also use sugar-free white chocolate instant pudding mix if wanted. Feel free to sub this with vanilla instant pudding mix for a slightly different flavor.
- Cream Cheese : For the best thick texture and rich taste, I highly recommend using full-fat cream cheese rather than the lite reduced-fat cream cheese.
- Powdered Sugar
- Yellow Cake Mix : See notes for how to heat treat the dry cake mix. You can also use vanilla or white cake mix as well.
- Whole Milk : This is the preferred milk to use because of the higher fat content, which will help the layers set and be thick.
- Heavy Whipping Cream
- Rainbow Sprinkles : Use the rainbow jimmies (the longer shaped ones) rather than the non-pareils (the small ball shaped ones) because those will bleed color into the icebox cake.
- Vanilla Wafers
How To Make A No Bake Icebox Cake With Rainbow Sprinkles & Cake Batter
Grease a 9-inch springform pan with butter shortening, and cut a round piece of parchment paper and place it on the bottom of the pan. Set aside.
In a large mixing bowl, add the white chocolate instant pudding mix powder, cream cheese, 1/2 cup of powdered sugar, and the heat treated cake mix. Use an electric hand mixer to beat the ingredients together on low speed, while gradually adding the milk. Continue mixing until the mixture is thick and all of the milk has been added, and everything is thoroughly combined.
In a separate mixing bowl, add the heavy whipping cream and the remaining 1/4 cup powdered sugar. Beat with an electric hand mixer, starting on low speed and increasing the speed as needed, until stiff peaks form. This takes about 4-5 minutes.
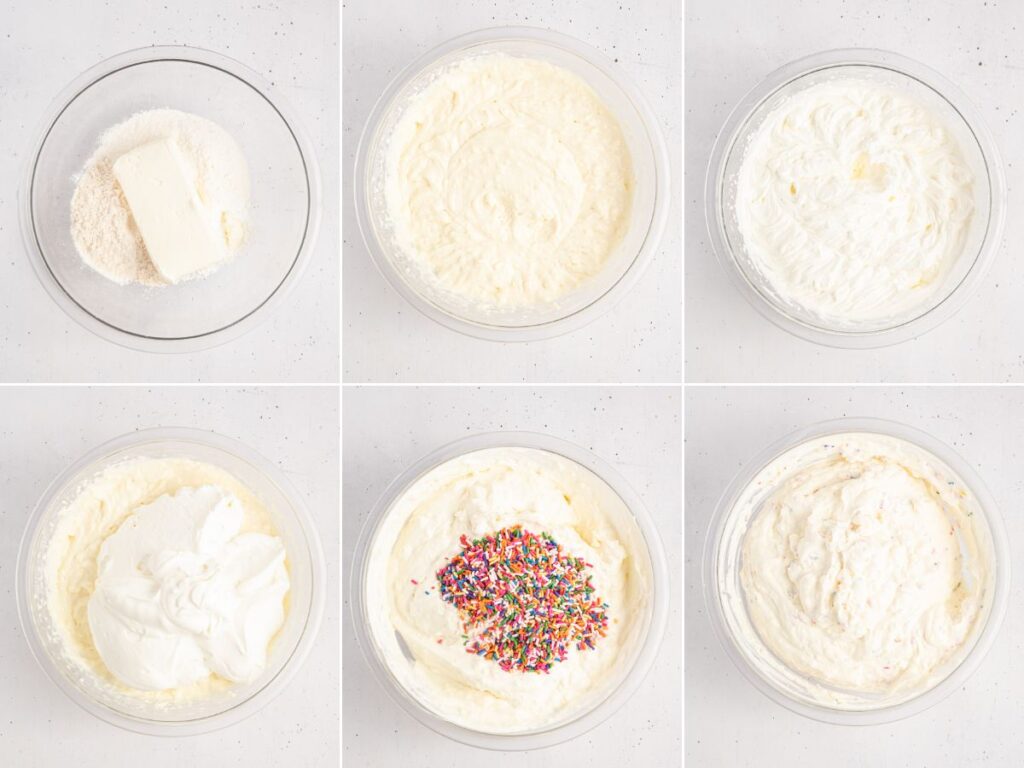
Gently stir the whipped cream into the white chocolate pudding mixture (in the larger bowl) along with the rainbow sprinkles.
Assemble : Spread a thin layer of the creamy funfetti mixture over the bottom of the prepared springform pan. Place a single layer of vanilla wafers over top, covering the entire area. Carefully spoon one third of the remaining funfetti mixture over the wafers, and spread it out evenly. Place another layer of vanilla wafers and spread another one third of the funetti mixture over top. Repeat the layers one more time ending with smoothing out the final funfetti layer over top.

Cover the dessert with plastic wrap and let it refrigerate for at least 6 hours, but overnight is the best. Before serving, place the dessert in the freezer for 1-2 hours to help it slice firmer and nicer.
Top it off with additional whipped cream and sprinkles (if wanted), slice it, and serve the icebox cake chilled.


Use Golden Oreos Instead of Vanilla Wafers
Try using golden Oreo cookies for the cookie layers instead of Nilla Wafers. Oreos are sweeter so the dessert will be slightly sweeter, but still delicious. I have also seen funfetti Oreos which would be a great substitute as well for the cookie layer in the icebox cake.

How To Heat Treat Cake Mix
This of course is optional, but I do recommend doing it just to make sure that any bacteria in the raw flour is killed off before consuming. I know some people worry about this while others don’t, so do want you prefer.
To heat treat dry cake mix, preheat the oven to 350 degrees F. Spread out the 1/2 cup of cake mix onto a baking sheet or baking pan and cook for 5 minutes. Give it a nice stir and let it cool to room temperature before using in the recipe.

How To Store & Serve A No Bake Icebox Cake
Store any leftovers inside the fridge for up to 7 days, or store in the freezer for a firmer texture , for up to 2 months. If storing in the freezer allow the cake to sit at room temperature for about 15 minutes to soften slightly before slicing and eating.
Place individual pieces of the icebox cake into airtight containers or you can cover the springform pan with plastic wrap and then aluminum foil for storage.
Serve the icebox cake directly from the fridge and eat it chilled. If you want a colder, firmer texture then put the icebox cake inside the freezer for 1-2 hours before serving. Let it soften slightly at room temperature for about 15 minutes before slicing and eating.
Recipe Tips & Substitutions
- Don’t Have a 9″ Springform Pan? : Use a 3-inch deep 9-inch round cake pan instead. You fan also use a 9×9 square baking pan.
- Instant Pudding Mix : I love the white chocolate pudding mix in this icebox cake because it has the purest white color, but you can also use vanilla instant pudding or cheesecake instant pudding in the recipe.
- Chill Time : Don’t rush the chill time as it’s needed to soften the vanilla wafers and to create thick layers that set when sliced for serving. I recommend refrigerating the icebox dessert overnight. When ready to serve, if you feel like you want it firmer for slicing and serving, put the icebox cake inside the freezer for 1-2 hours. I think the icebox cake does just fine after being in the fridge overnight (like 12 hours).

More Icebox Cake Recipes You’ll Love
- Pumpkin Icebox Cake
- Oreo Icebox Cake
- Chocolate Icebox Cake
- Strawberry Icebox Cake
- Chocolate Eclair Icebox Cake
- Nutter Butter Peanut Butter Icebox Cake
- Banana Split Icebox Cake


Funfetti Icebox Cake
Ingredients
- 2 boxes (3.3 oz each) white chocolate instant pudding
- 1 bar (8 oz) cream cheese room temperature
- 3/4 cup powdered sugar (divided)
- 1/2 cup dry yellow cake mix (*see notes)
- 3 cups whole milk OR half and half
- 1½ cups heavy whipping cream
- 1/2 cup rainbow sprinkles (not non-pareils)
- 1 box (11 oz) Nilla Wafers
Instructions
- Grease a 9-inch springform pan with butter shortening and/or cut a round piece of parchment paper and place it on the bottom of the pan. Set aside.
- In a large mixing bowl, add the white chocolate instant pudding mix powder, cream cheese, 1/2 cup of powdered sugar, and the heat treated cake mix.Use an electric hand mixer to beat the ingredients together on low speed, while gradually adding the milk. Continue mixing until the mixture is thick and all of the milk has been added, and everything is thoroughly combined.2 boxes (3.3 oz each) white chocolate instant pudding, 1 bar (8 oz) cream cheese, 3/4 cup powdered sugar, 1/2 cup dry yellow cake mix, 3 cups whole milk OR half and half
- In a separate mixing bowl, add the heavy whipping cream and the remaining 1/4 cup powdered sugar. Beat with an electric hand mixer, starting on low speed and increasing the speed as needed, until stiff peaks form.* This takes about 4-5 minutes.1½ cups heavy whipping cream
- Gently stir the whipped cream into the white chocolate pudding mixture (in the larger bowl) along with the rainbow sprinkles.1/2 cup rainbow sprinkles
- Assemble :– Spread a thin layer of the creamy funfetti mixture over the bottom of the prepared springform pan. – Place a single layer of vanilla wafers over top, covering the entire area.– Carefully spoon one third of the remaining funfetti mixture over the wafers, and spread it out evenly.– Place another layer of vanilla wafers and spread another one third of the funetti mixture over top. – Repeat the layers one more time ending with smoothing out the final funfetti layer over top.1 box (11 oz) Nilla Wafers
- Cover the dessert with plastic wrap and let it refrigerate for at least 6 hours, but overnight is the best. Before serving, place the dessert in the freezer for 1-2 hours to help it slice firmer and nicer (optional step).* I think it sets up just fine overnight in the fridge (12 hours) so I slice it and serve it from the fridge. If you want cleaner slices and more of a frozen dessert, then stick the icebox cake in the freezer before serving for 1-2 hours.
- Top it off with additional whipped cream and sprinkles (if wanted), slice it, and serve the icebox cake chilled.
Notes
Nutrition
Did You Make This Recipe?
I’d love to see it! You can share it with me on @togetherasfamilyblog and follow on Pinterest @together-as-family-blog-recipes or Facebook @togetherasfamilyblog for more!


Did you love this recipe?
Make sure to comment below so we can chat about it! Or follow on your favorite social network for even more family recipes.