
This post may contain affiliate links, view our disclosure policy.
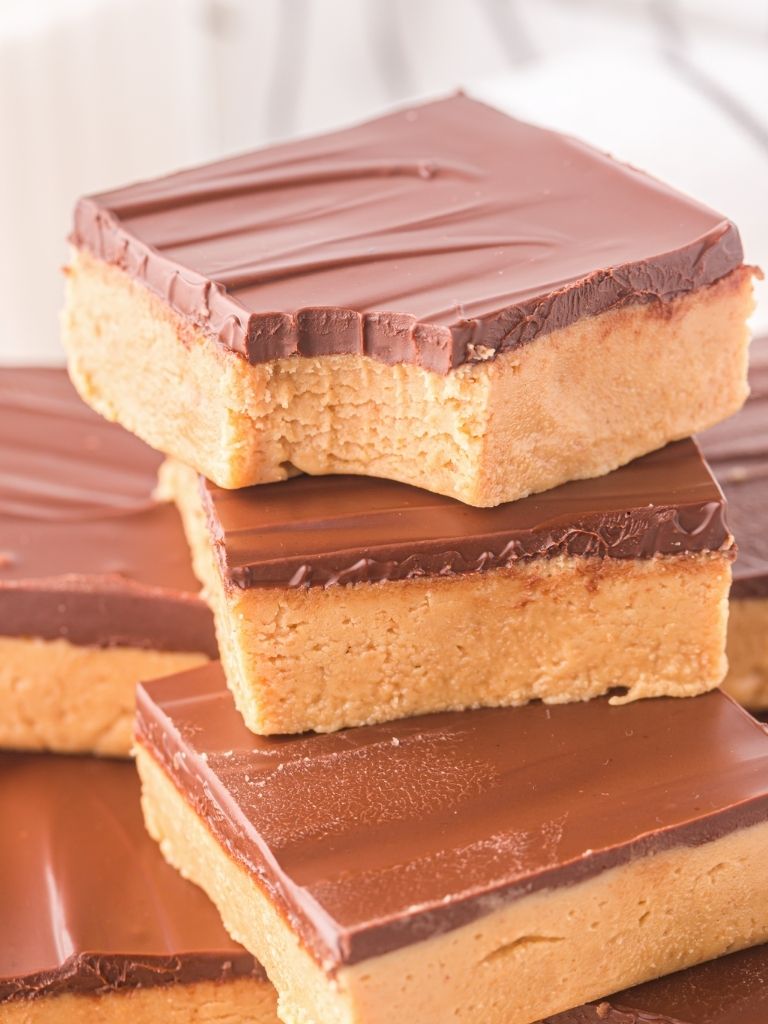
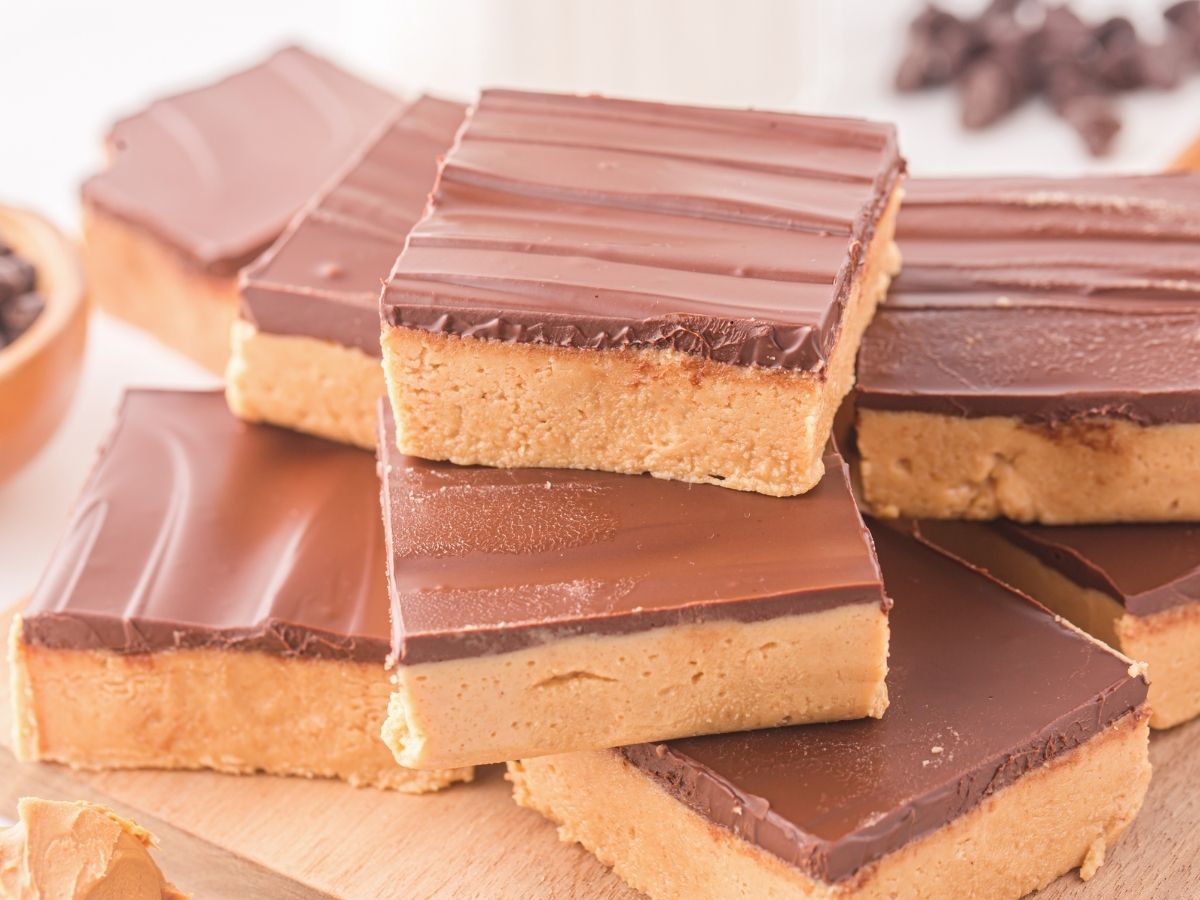
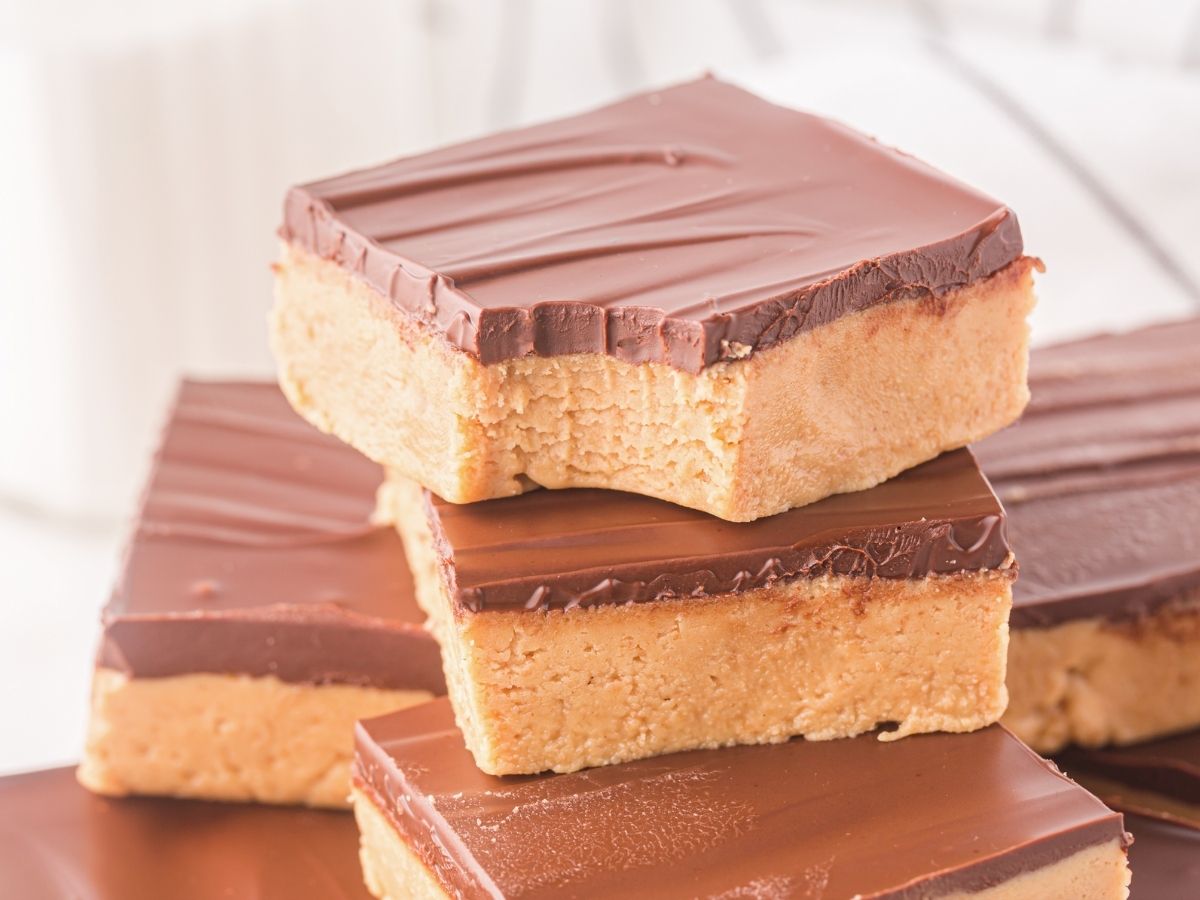
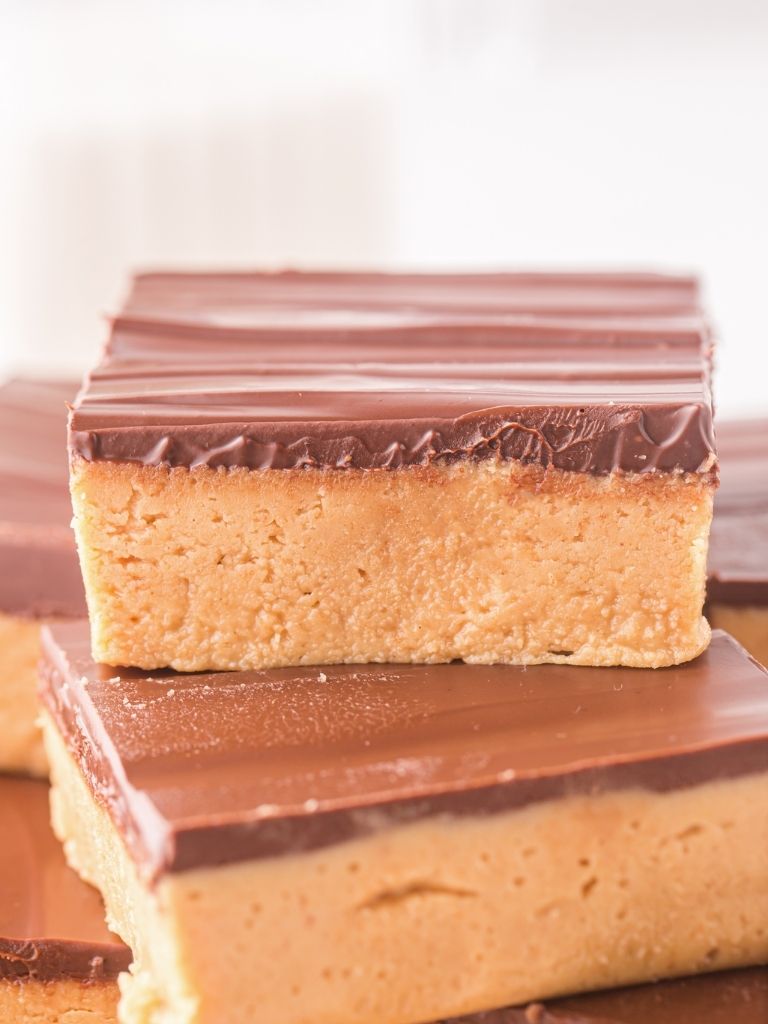
These no bake Peanut Butter Bars are a quick and easy dessert with a sweet & salty peanut butter layer, and topped with melted peanut butter chocolate. It tastes exactly like a homemade Reese’s but in bar form.
Peanut butter + chocolate were meant to be! Check out these other Reese’s-inspired favorites like this Reese’s Peanut Butter Cookie Cups, Reese’s Stuffed Monster Cookies, Reese’s Pieces Peanut Butter Bars, and Chocolate Reese’s Cookies.
Amazing & Easy Peanut Butter Bars (Homemade Reese’s Bars)
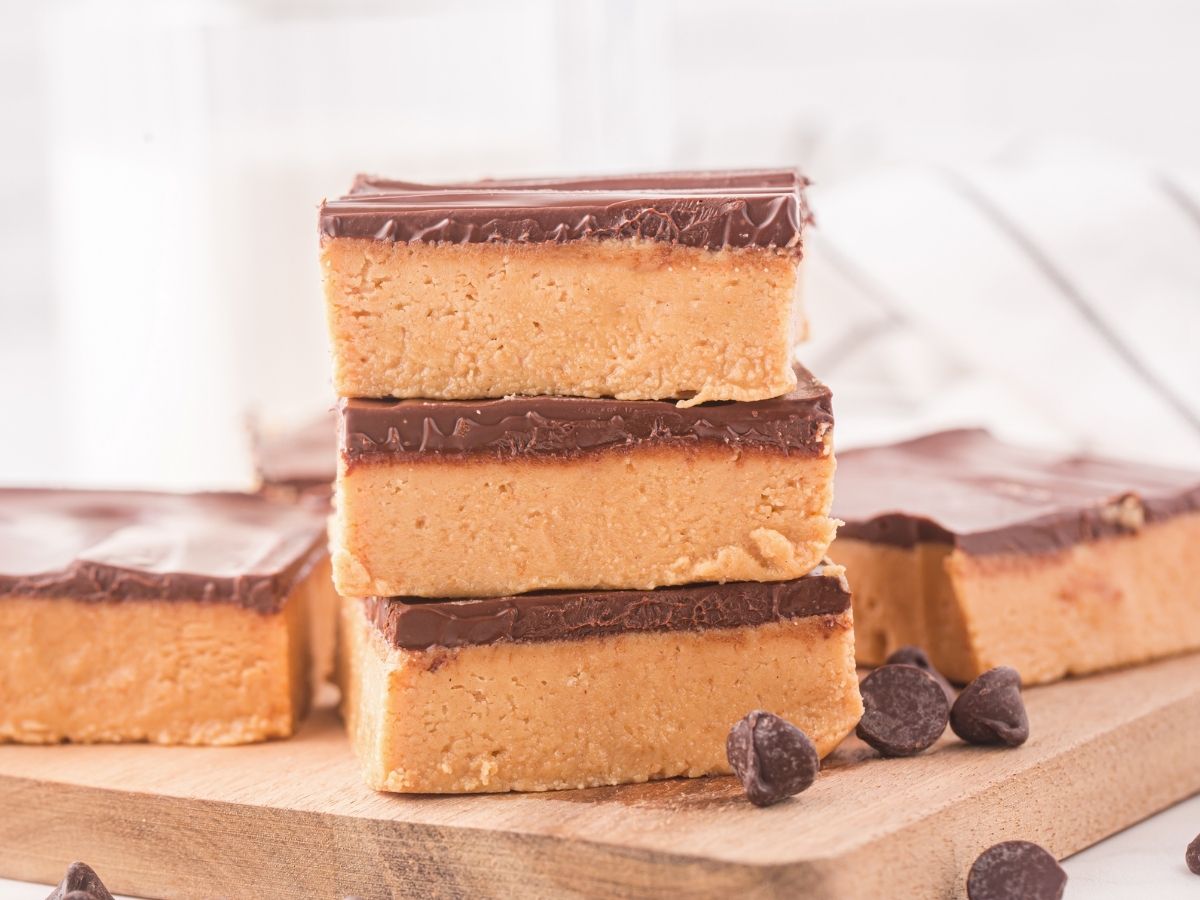
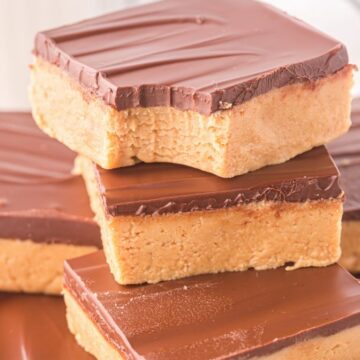
These peanut butter bars are sure to cure any craving for a sweet treat! Easy to make, with only a few ingredients, inside an 8×8 pan. The hardest part is waiting patiently for the fridge time to be done so you can dig in.
A creamy soft peanut butter layer that has crushed Nilla Wafers resembles the same taste and texture as the inside of a Reese’s peanut butter cup. The bars are then topped off with melted chocolate + peanut butter for the perfect finishing touch.
Ingredients Needed
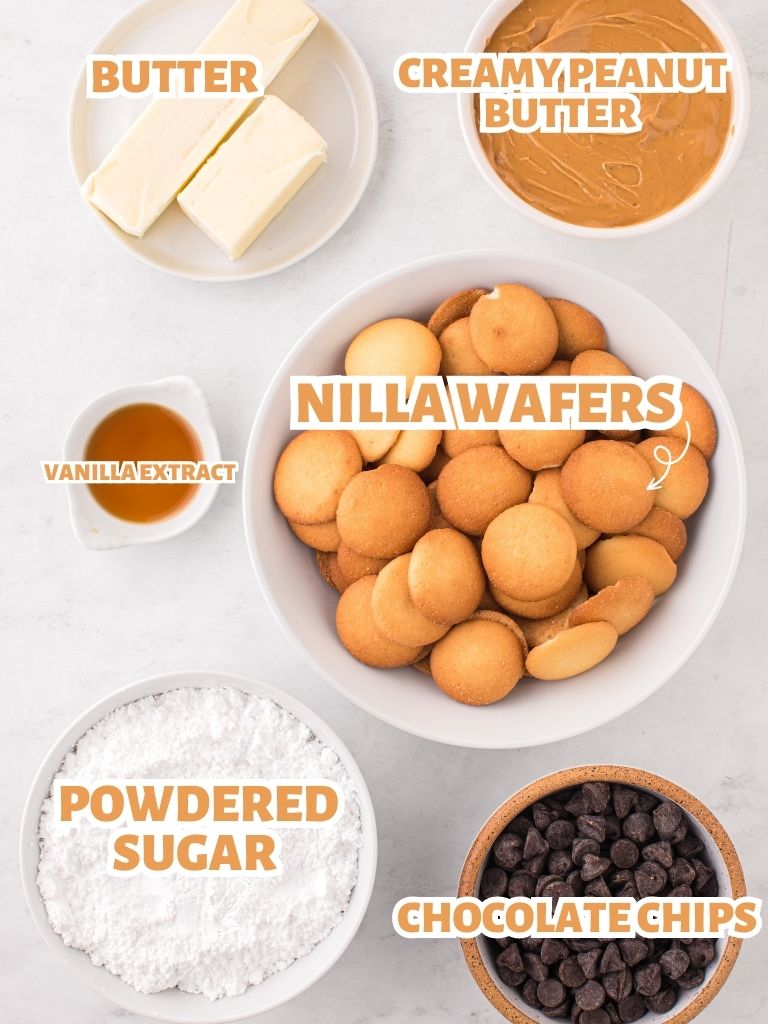
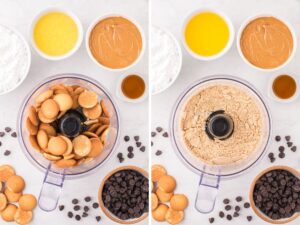
- Vanilla Wafers – The regular sized Nilla Wafers is what you’ll need for this recipe. Measure out 3 cups of the cookies and then put them into the food processor to crush. Don’t measure 3 cups of crushed Nilla Wafers, as that will yield too much for the recipe. Measure 3 cups of whole Nilla Wafers.
- Powdered Sugar
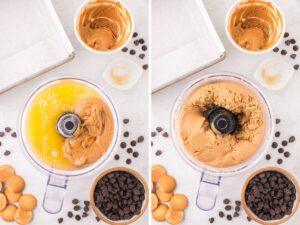
- Creamy Peanut Butter – This is divided in the recipe which means that you will use part of it in one step of the recipe and the remaining part in another step. Do not use all-natural or the no-stir peanut butter varieties in this recipe.
- Salted Butter – This will nee to be melted for this recipe.
- Vanilla Extract
- Semi-Sweet, Milk, or Dark Chocolate Chips – Use whichever one you prefer. I like using semi-sweet chocolate chips because it’s a good balance to all the sweetness going on in these bars. Use dark chocolate chips for less sweetness and use milk chocolate chips if you want more sweetness in the bars.
Step-by-Step Directions For How To Make Chocolate Peanut Butter Bars
Learn how to make these delicious no bake peanut butter and chocolate bars with the easy-to-follow steps below. Be sure and read to the bottom of the page where there is a detailed recipe card, a printable option, and a pin it button.
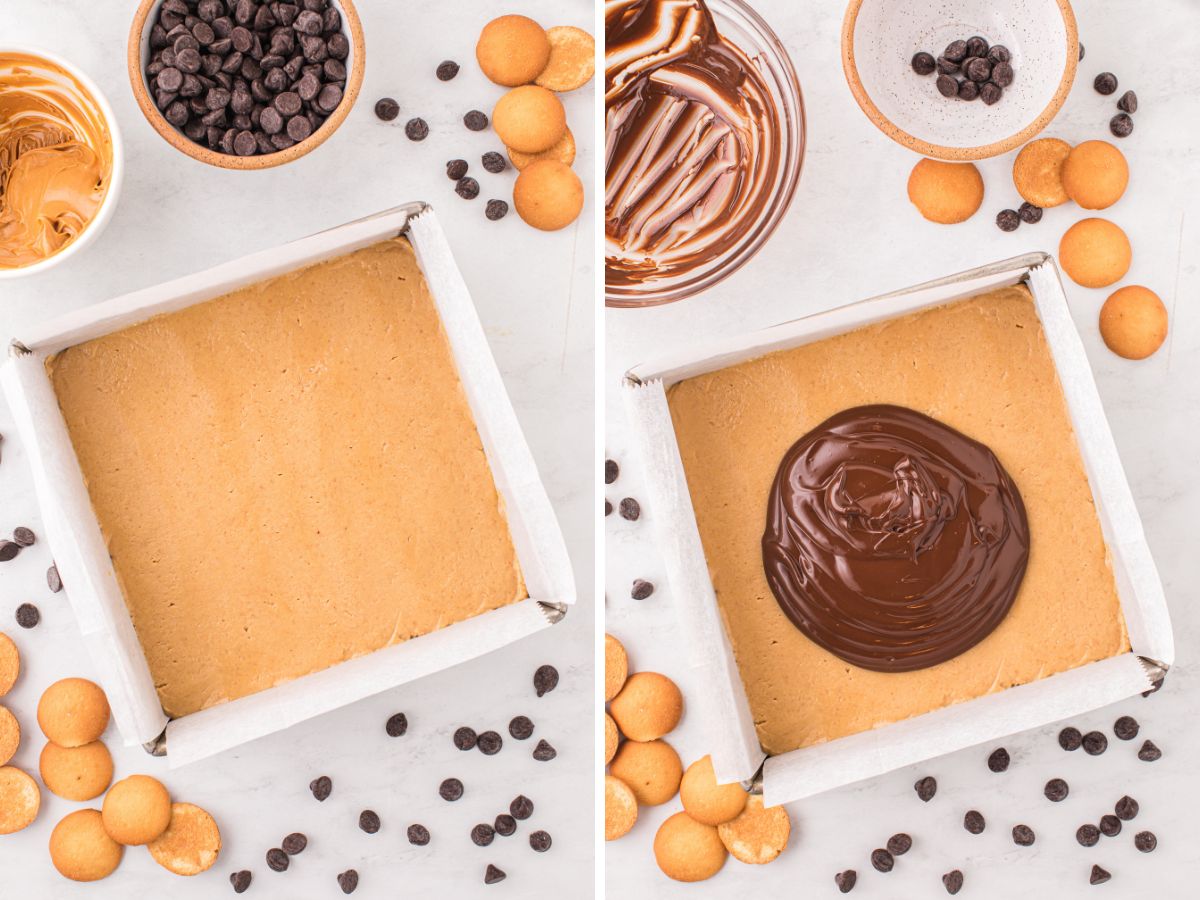
- Step 1 : Place the Nilla Wafers into a food processor or food chopper and pulse until very fine crumbs (like sand) are formed. This takes at least 1-2 minutes. Add in the powdered sugar and pulse a few times to combine. If your food chopper or processor is not big enough to add all the powdered sugar, try using a blender or do it in batches. Or just add the powdered sugar directly into the mixing bowl with the other ingredients in step 2, and just skip the food processor step with the powdered sugar.
- Step 2 : Combine the Nilla Wafers + Powdered Sugar mixture into a large mixing bowl, along with 1 cup of peanut butter, melted butter, vanilla extract. Mix together unit well combined.
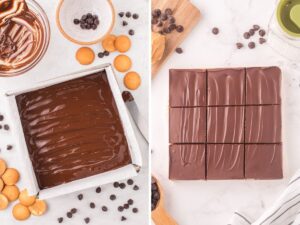
- Step 3 : Evenly press the peanut butter mixture into a 8×8 square baking pan, cover it with plastic wrap, and place it in the fridge for right now.
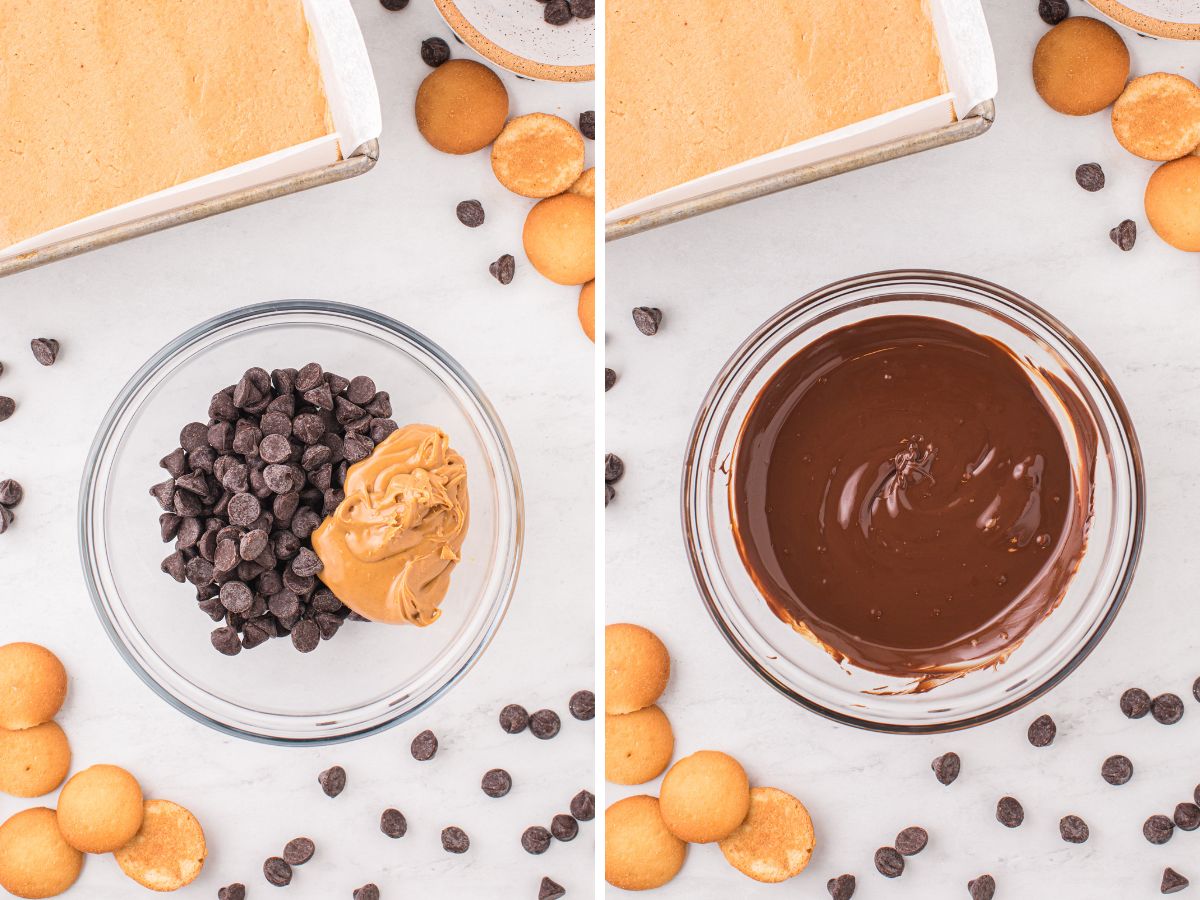
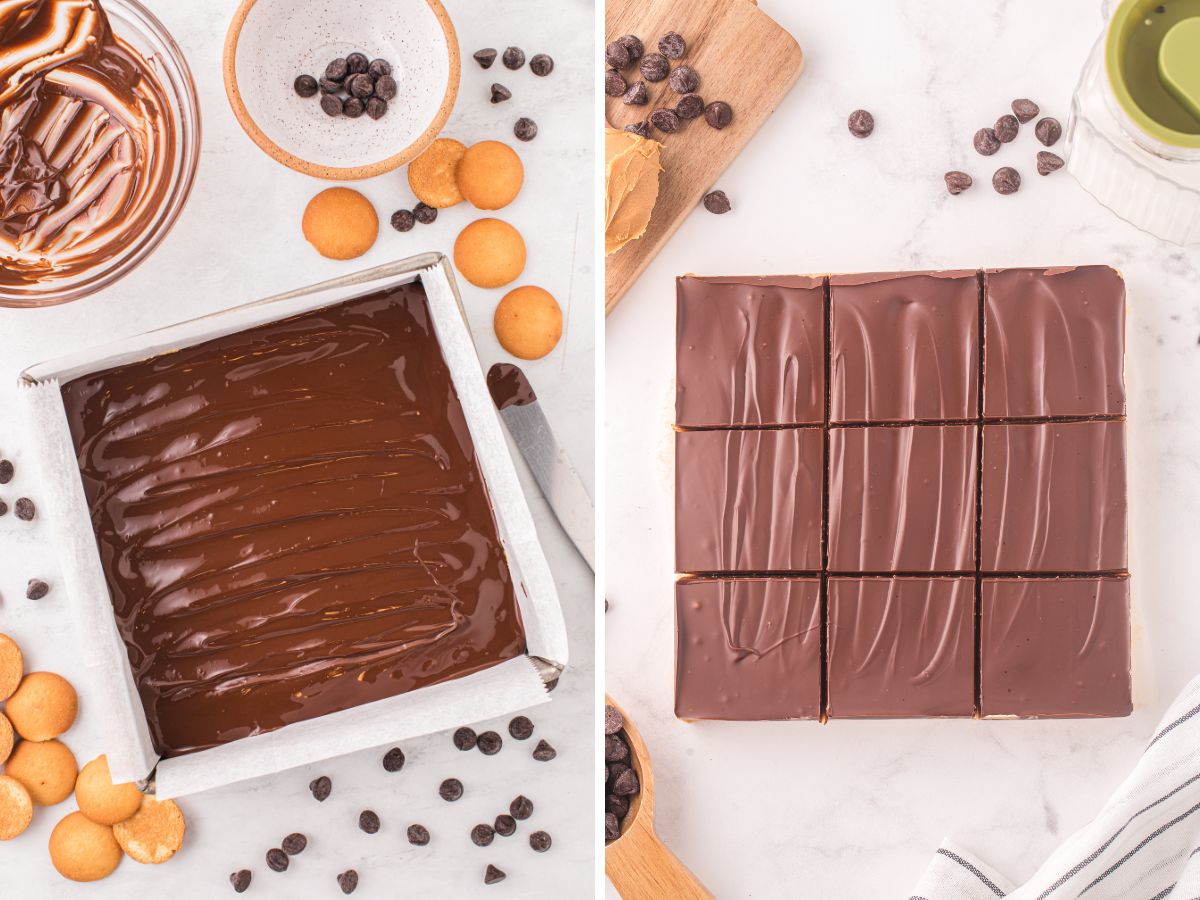
- Step 4 : Melt the chocolate chips and the remaining 1/4 cup of peanut butter in the microwave until smooth and melted. Pour this over the peanut butter layer and smooth it out evenly.
- Step 5 : Cover the pan with a lid or plastic wrap and refrigerate for at least 4-6 hours before cutting and eating.


Peanut Butter Bars FAQ’s
-
How Should I Store Peanut Butter Bars?
- Store these peanut butter bars in an airtight container, or cover the pan with plastic wrap or foil, in the fridge for up to 1 week.
- As these bars sit out at room temperature they will soften and the chocolate layer will get really soft and start to melt to the touch.
- To Freeze These Bars : Wrap the bars tightly in plastic wrap and then in foil. Place the wrapped bars inside a freezer-safe Ziploc bag and freeze for up to 3 months. When ready to eat, thaw them in the fridge for a few hours before serving.
-
What’s The Best Way To Cut Bars To Get Clean Slices?
- To get clean slices of the peanut butter bars, it’s a good idea to first chill the bars in the fridge until they are firm (as directed in the recipe). This will make them easier to cut without the chocolate topping cracking and peanut butter filling squishing out. So my #1 tip is to make sure they have plenty of chill time in the fridge.
- When you’re ready to cut the bars, remove the pan from the fridge and use a sharp knife to cut them into squares. It also helps if you line the pan with parchment paper and leave some overhang, that way you can easily grab the bars out of the pan which makes it easier to cut squares out of them.
- Another trick you can try is to run your knife under hot water, and then drying it off, between each cutting.
- If that chocolate layer does crack some, it’s ok, simply use a spatula or your finger, to smooth it back out.
-
Variation Ideas
- Crunchy Peanut Butter : Use crunchy peanut butter for more texture in these bars. I don’t like using crunchy peanut butter for all the peanut butter in this recipe, but rather I sometimes will use crunchy peanut butter in just the chocolate peanut butter top layer.
- Graham Crackers : Traditionally these bars are usually made with graham cracker crumbs but I love the Nilla Wafers better in this recipe. If wanted, substitute graham crackers for the Nilla Wafers.
- Unsalted Butter : If all you have is unsalted butter then just be sure to add a pinch of salt (like 1/4 teaspoon) in with the melted butter and other ingredients.
- Chocolate Chips : Use any variety you prefer. You could even use peanut butter chips instead for even more peanut butter flavor. Use semi-sweet, dark, or milk chocolate for that melted top layer with the peanut butter. I prefer using semi-sweet chocolate chips because it’s the perfect balance between sweet and unsweetened compared to all the other sweetness in the bars.
Recipe Tips
Here are a few of my helpful tips so that you can have success recreating this recipe in your own kitchen ♥
- Finely Ground Crumbs : It’s important for the texture of these bars that the Nilla Wafers are really ground into fine crumbs (like fine sand). It’s easiest to achieve this using a food processor, food chopper, or even a blender. If you don’t have either one of those, try putting them into a Ziploc bag and use a rolling pin or heavy meat pounder to crush them into crumbs. Take your time and really make sure they’re ground finely into crumbs.
- Parchment Paper Overhang : Make sure that you leave some parchment paper on at least 2 sides of the pan so that you can easily pull out the bars to cut them. It’s much easier to cut bars into nice and even squares when they’re out of the pan. You can also use wax paper or even aluminum foil if wanted.
More Chocolate & Peanut Butter Desserts
- No Bake Peanut Butter Chocolate Pie – Oreo crust with a layer of peanut butter cheesecake topped with a layer of chocolate cheesecake.
- Peanut Butter Chocolate Chip Banana Bread – Trio of the best flavors; chocolate + peanut butter + banana.
- Peanut Butter Chocolate Cake Mix Cookies – Easy to make with a cake mix.
- Oatmeal Chocolate Chip Peanut Butter Cookie Bars – A family favorite recipe with oats, chocolate, peanut butter chips that bake up perfectly thick & chewy and soft in a 9×13 pan.
- No Flour Peanut Butter Chocolate Chip Cookies – Great for gluten allergies or anyone cause they’re that good.

Peanut Butter Bars
Ingredients
Peanut Butter Bars
- 3 cups whole Nilla Wafers
- 2 cups powdered sugar
- 1 cup creamy peanut butter
- 12 tablespoons salted butter melted
- 1 teaspoon vanilla extract
Chocolate Peanut Butter Topping
- 1 cup chocolate chips (semi-sweet, milk, or dark)
- 1/4 cup creamy peanut butter
Instructions
- Prepare a square 8x8 baking pan by lining with parchment paper, wax paper, or aluminum foil. Be sure and leave an overhang so you can easily pull the bars out by it.
- Make The Peanut Butter Bars : Add the Nilla wafers into a large 9-cup food processor and pulse until fine crumbs form (that resemble sand). About 1-2 minutes. *If you don't own a larger food processor then simply pulse the Nilla wafers into fine crumbs (in whatever size food processor/chopper you have), and then add them into a large mixing bowl and combine with the remaining ingredients below. You might have to use an electric hand mixer to make it mix together well.3 cups whole Nilla Wafers

- Add in the powdered sugar and pulse a few times to combine.2 cups powdered sugar
- Add in the creamy peanut butter, melted butter, and vanilla extract. Blend together until a smooth and soft dough forms. About 2-3 minutes.1 cup creamy peanut butter, 12 tablespoons salted butter, 1 teaspoon vanilla extract
- Scoop the peanut butter dough into the prepared pan. Press it down into an even layer. Set aside for now.
- Make The Chocolate Peanut Butter Topping : Place the chocolate chips and creamy peanut butter into a microwave-safe bowl. Heat for 60 seconds and then stir it really well. If needed, heat in 10-second increments until it's melted and smooth.
- Pour the melted chocolate mixture over the peanut butter bars inside the pan. Use a spatula to smooth out the top into an even layer.
- Cover the pan with plastic wrap, or a lid, and refrigerate for at least 4-6 hours before cutting into squares and serving. *It's important that you give the bars plenty of chill time in the fridge so they can set, come together, and firm up nicely. This will also make them much easier to cut.


Notes
-
How Should I Store Peanut Butter Bars?
- Store these peanut butter bars in an airtight container, or cover the pan with plastic wrap or foil, in the fridge for up to 1 week.
- As these bars sit out at room temperature they will soften and the chocolate layer will get really soft and start to melt to the touch.
- To Freeze These Bars : Wrap the bars tightly in plastic wrap and then in foil. Place the wrapped bars inside a freezer-safe Ziploc bag and freeze for up to 3 months. When ready to eat, thaw them in the fridge for a few hours before serving.
-
What's The Best Way To Cut Bars To Get Clean Slices?
- To get clean slices of the peanut butter bars, it's a good idea to first chill the bars in the fridge until they are firm (as directed in the recipe). This will make them easier to cut without the chocolate topping cracking and peanut butter filling squishing out. So my #1 tip is to make sure they have plenty of chill time in the fridge.
- When you're ready to cut the bars, remove the pan from the fridge and use a sharp knife to cut them into squares. It also helps if you line the pan with parchment paper and leave some overhang, that way you can easily grab the bars out of the pan which makes it easier to cut squares out of them.
- Another trick you can try is to run your knife under hot water, and then drying it off, between each cutting.
- If that chocolate layer does crack some, it's ok, simply use a spatula or your finger, to smooth it back out.
-
Variation Ideas
- Crunchy Peanut Butter : Use crunchy peanut butter for more texture in these bars. I don't like using crunchy peanut butter for all the peanut butter in this recipe, but rather I sometimes will use crunchy peanut butter in just the chocolate peanut butter top layer.
- Graham Crackers : Traditionally these bars are usually made with graham cracker crumbs but I love the Nilla Wafers better in this recipe. If wanted, substitute graham crackers for the Nilla Wafers.
- Unsalted Butter : If all you have is unsalted butter then just be sure to add a pinch of salt (like 1/4 teaspoon) in with the melted butter and other ingredients.
- Chocolate Chips : Use any variety you prefer. You could even use peanut butter chips instead for even more peanut butter flavor. Use semi-sweet, dark, or milk chocolate for that melted top layer with the peanut butter. I prefer using semi-sweet chocolate chips because it's the perfect balance between sweet and unsweetened compared to all the other sweetness in the bars.
Nutrition
Did You Make This Recipe?
I'd love to see it! You can share it with me on @togetherasfamilyblog and follow on Pinterest @together-as-family-blog-recipes or Facebook @togetherasfamilyblog for more!


Did you love this recipe?
Make sure to comment below so we can chat about it! Or follow on your favorite social network for even more family recipes.