
This post may contain affiliate links, view our disclosure policy.
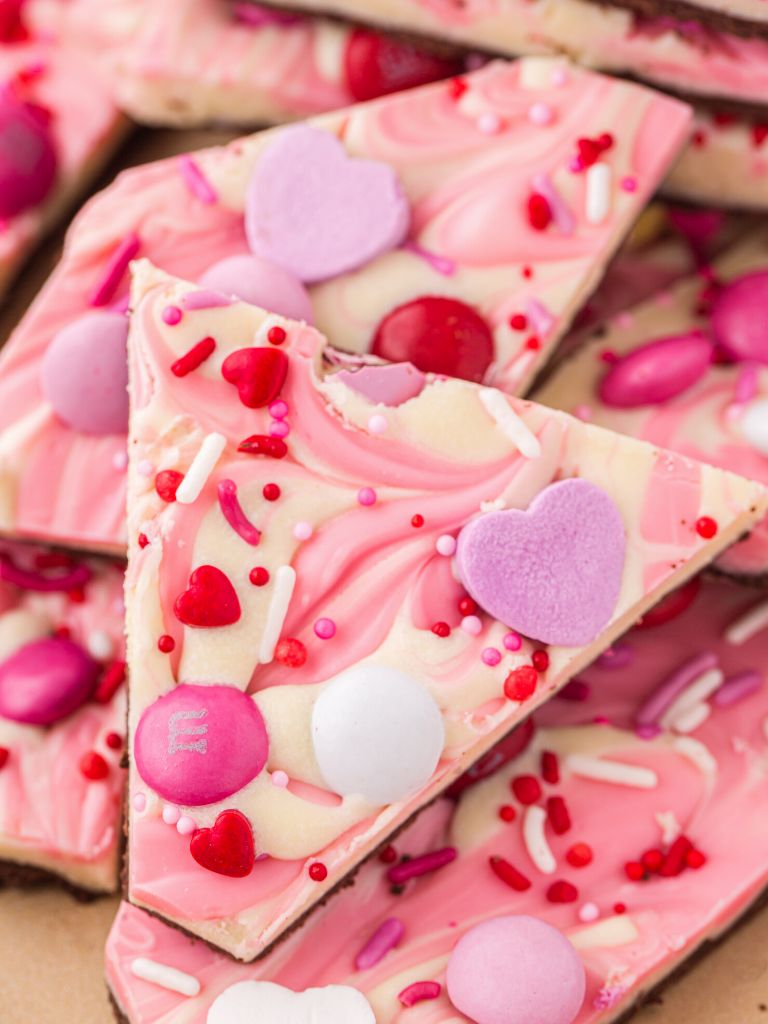
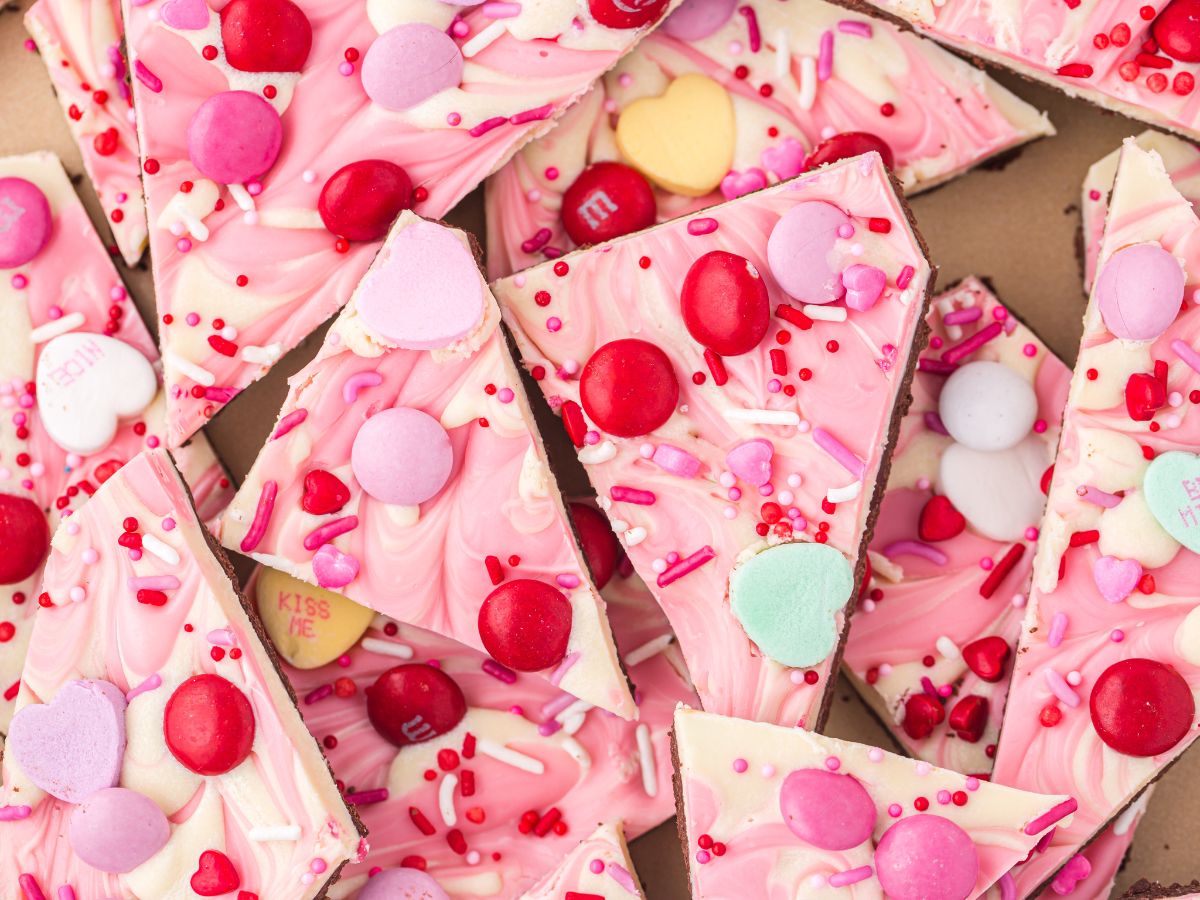
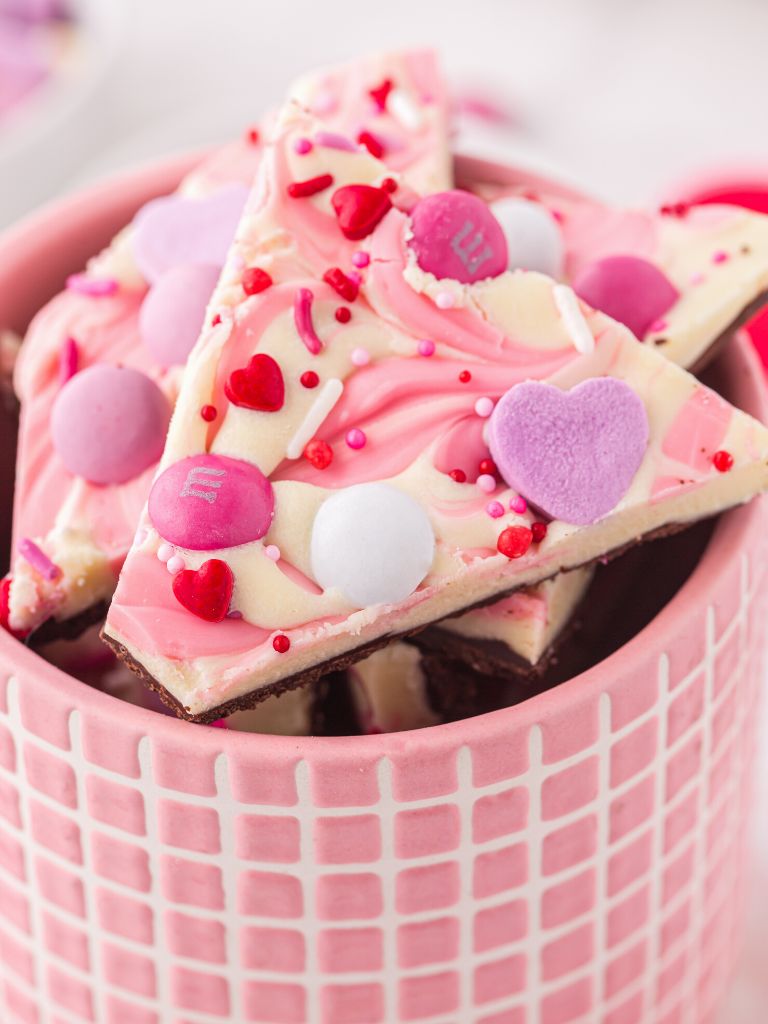
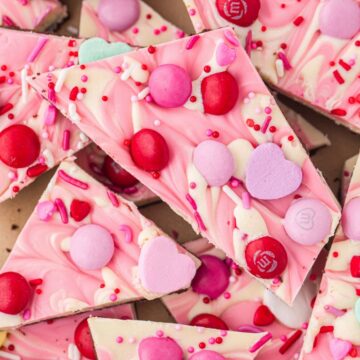
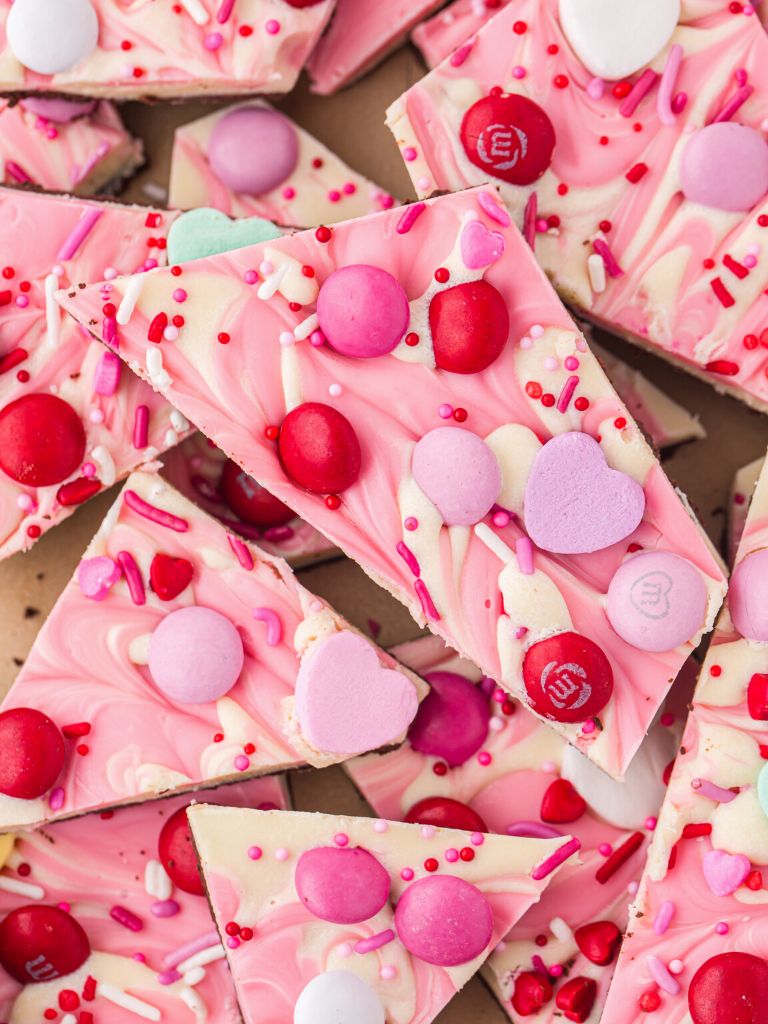
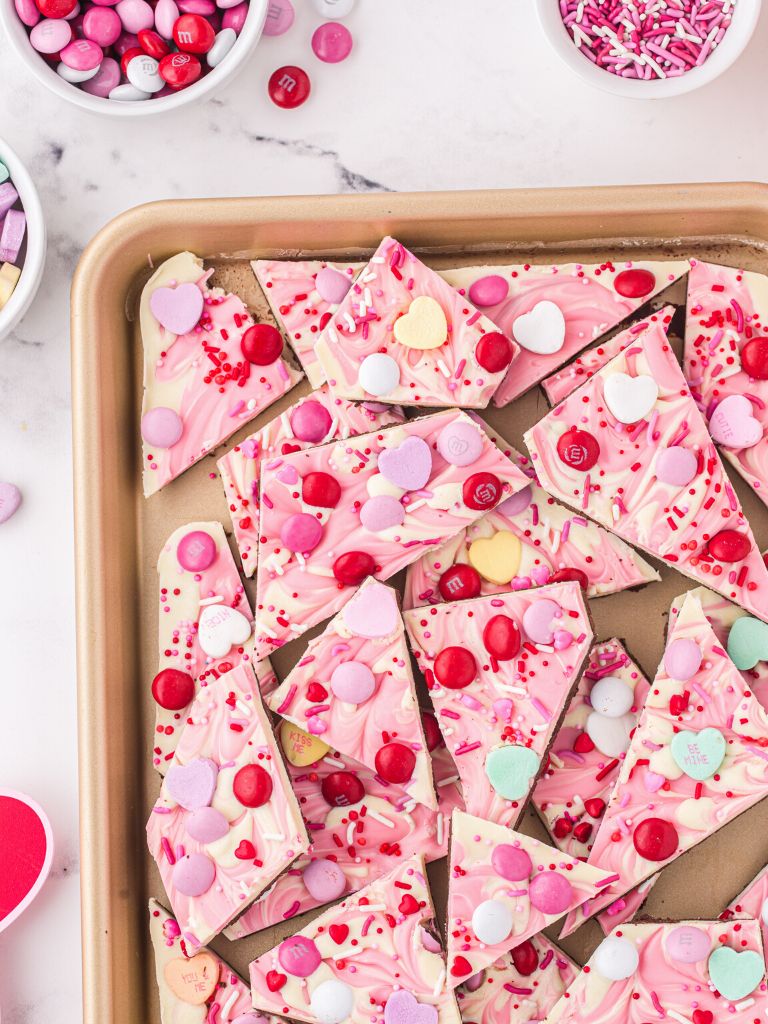
This Valentine’s Day Chocolate Bark will make your sweetheart fall in love for sure! With layers of dark chocolate & white chocolate, and topped with the perfect finishing touch of pink, candy hearts, m&m’s, and sprinkles. It’s the perfect treat for Valentine’s Day that everyone loves.
For more cute & festive Valentine’s treats be sure and try my Valentine’s Day Chocolate Covered Oreos or Valentine’s Day Caramel Pretzel Bites. If you’re looking for some fun games then you must check out these Valentine’s Day Minute to Win It Party Games (with conversation hearts!).

A Sweet Valentine’s Day Treat
Y’all know by now that I absolutely love cute, color-themed treats for the Holidays. Use up all that colorful Valentines Day candy and make this chocolate bark that just screams Valentines Day!
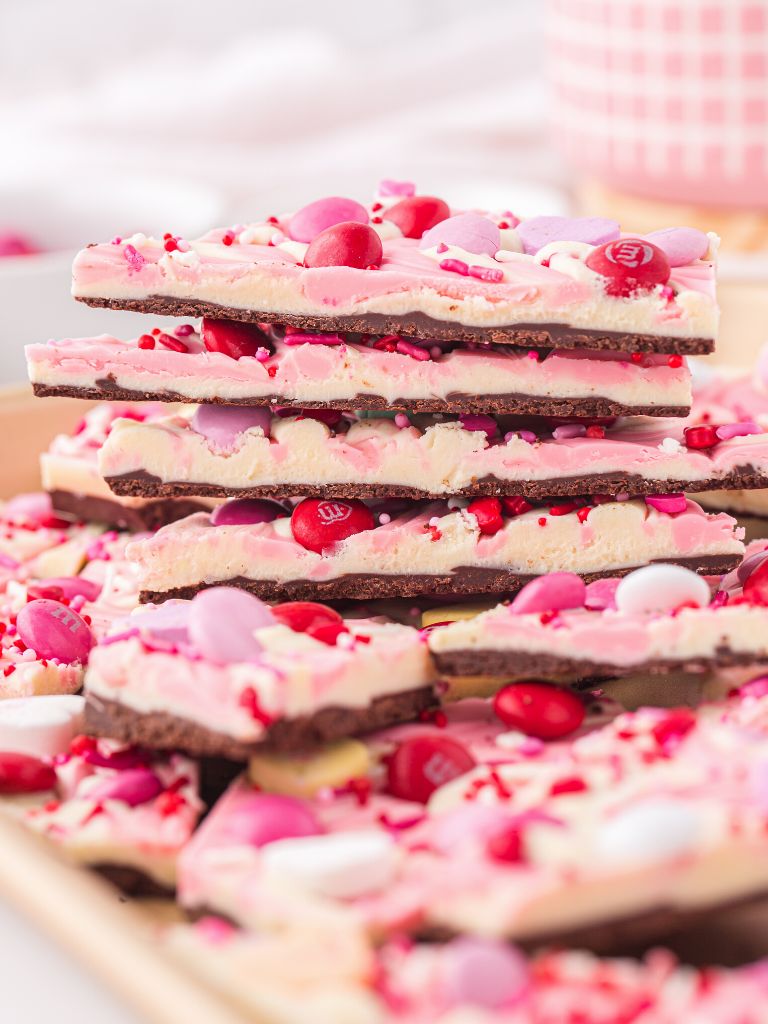
With layers of dark chocolate and white chocolate, and then topped with a decorative layer of pink candy melts + candy + sprinkles! This chocolate bark is sure to be a hit and can be easily customized using different candies and sprinkles. Even the chocolate too!
Learn how to make it with all my tips for success and lots of pictures to help you out.
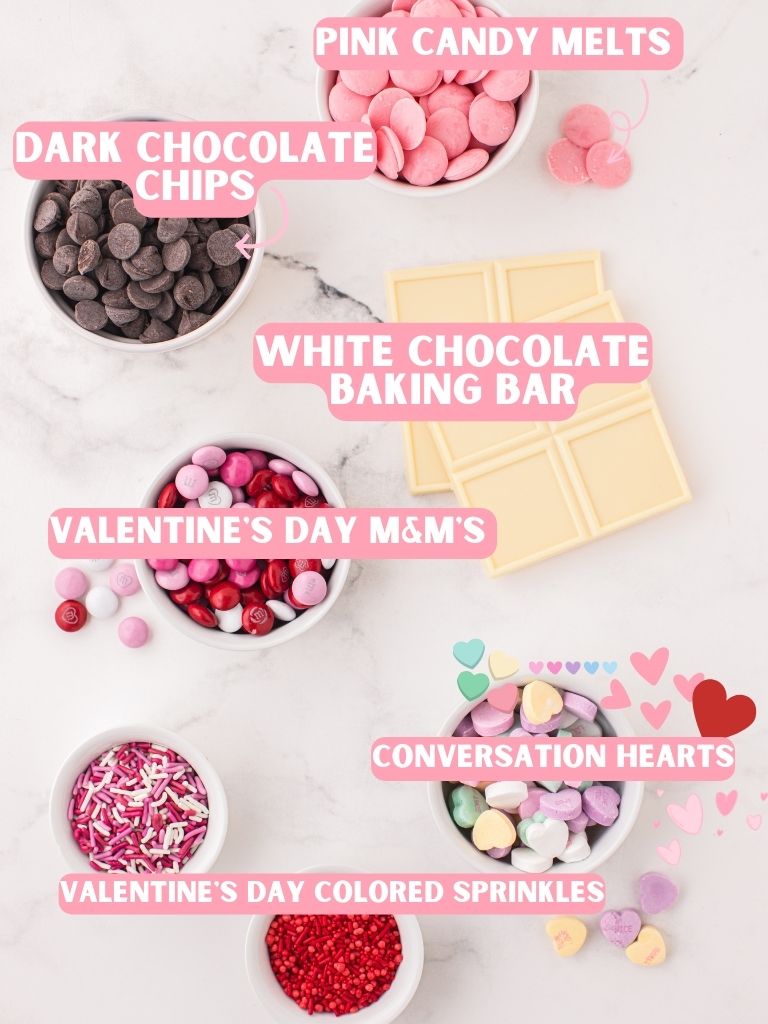
Ingredients Needed
- Dark Chocolate Chips – You can use dark chocolate chips or a dark chocolate baking bar for this chocolate bark recipe. Either one works. If you prefer a sweeter bark then try using semi-sweet chocolate chips or even milk chocolate chips. I like he contrast of the dark chocolate with the white chocolate and sweet pink candy melts.
- White Chocolate Baking Bar – A baking bar is recommended because it melts much smoother, and easier, than white chocolate chips do. You will find these in the baking aisle near the chocolate chips.
- Pink Candy Melts – Feel free to use any color you want here. They have bright pink, darker pink, or try using red candy melts. I prefer the pink color for this bark. Sometimes these are in the baking aisle but most of the time you can find them in the cake decorating aisle (if shopping at Walmart).
- Valentine’s Day Candy – Cupid’s Mix M&M’s and Conversation Hearts is what you’ll need for the decorative topping.
- Sprinkles – There are lots of Valentines Day mixes of sprinkles at the store so pick your favorite!
How To Make Chocolate Bark for Valentine’s Day
Learn how to make this festive chocolate bark for your Valentine’s Day celebrations. Be sure and read to the bottom of the post where there is a detailed recipe card, a printable option, along with a pin it button so you can save it for later.
- Prep : Line a cookie sheet with parchment paper. Set aside.
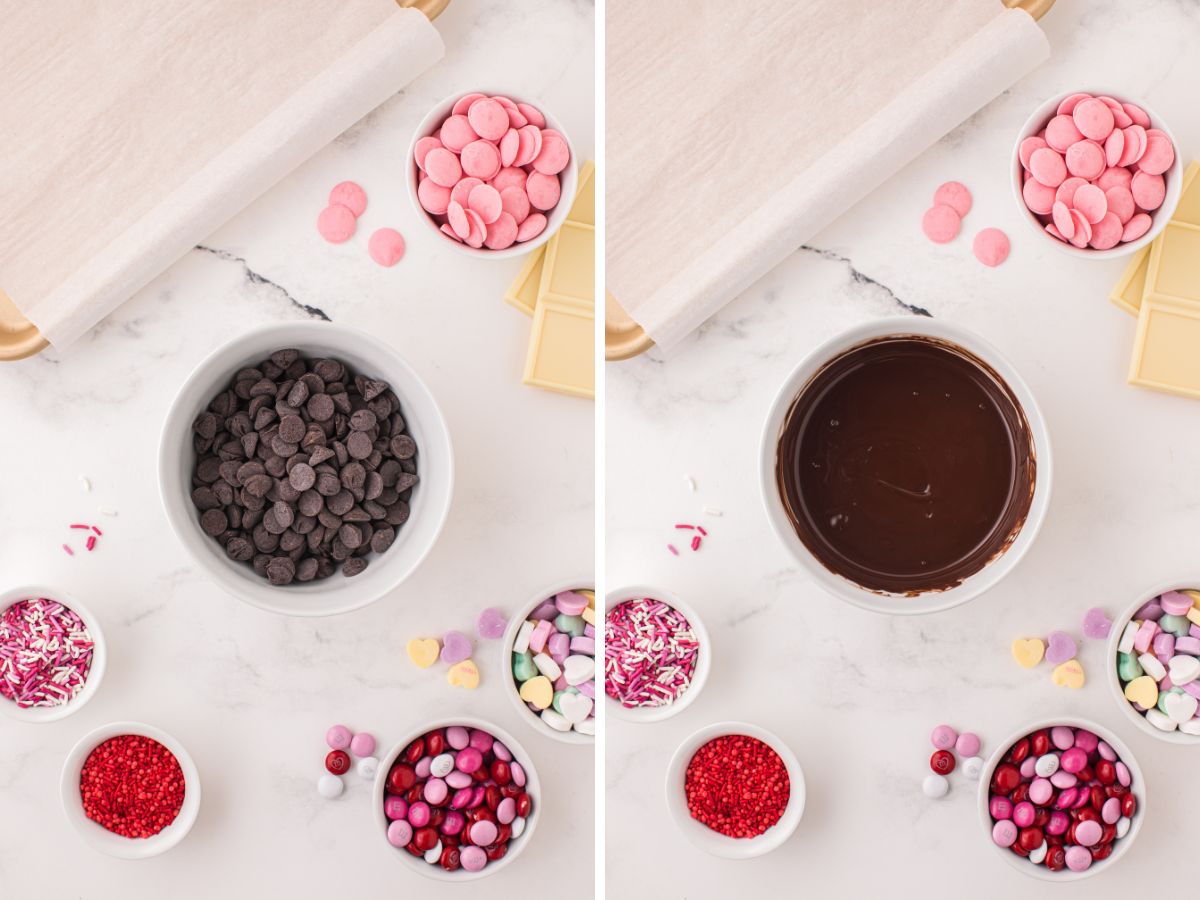
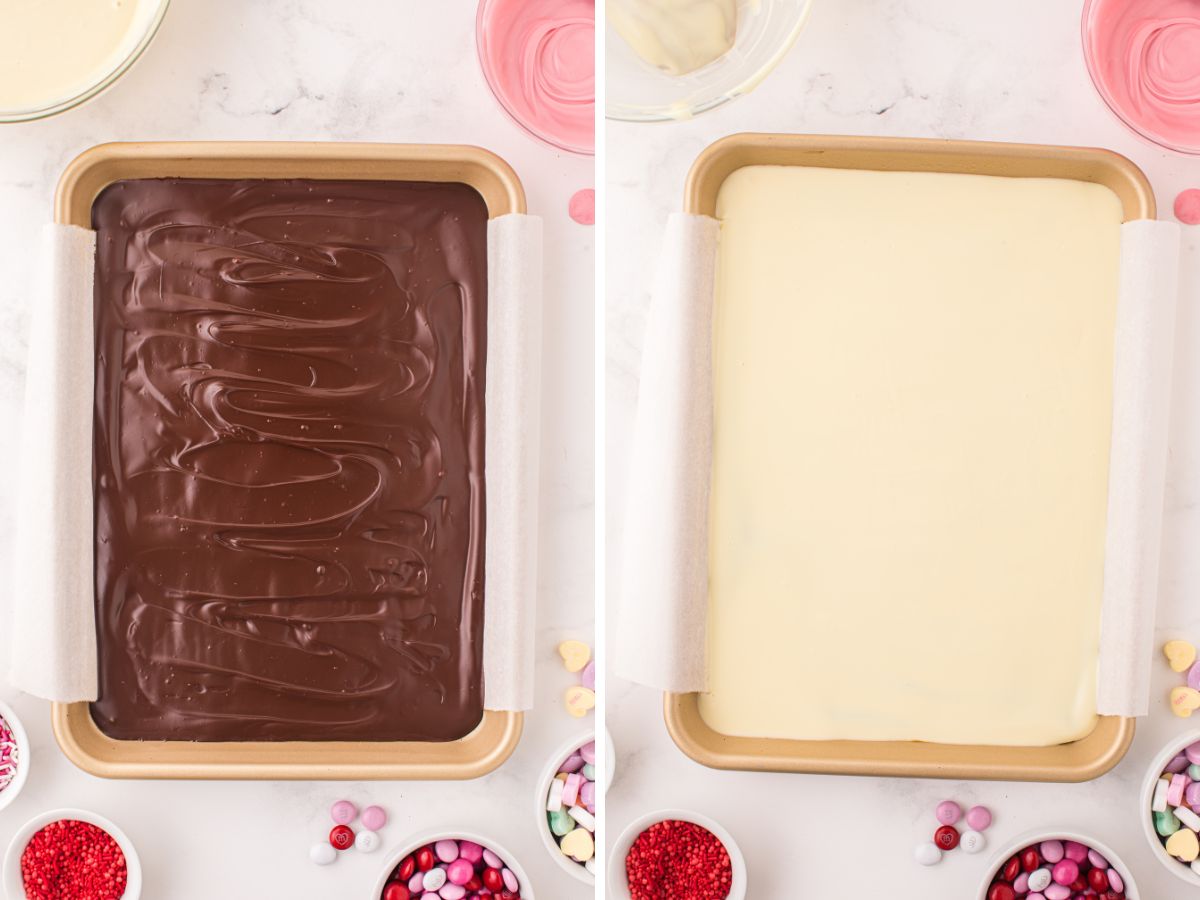
- Dark Chocolate Layer : Melt the dark chocolate chips in the microwave for 30 seconds. Stir and continue melting in 15-20 second increments until smooth. Pour this onto the parchment paper and smooth it out. Let the chocolate set for about 10 minutes at room temperature.
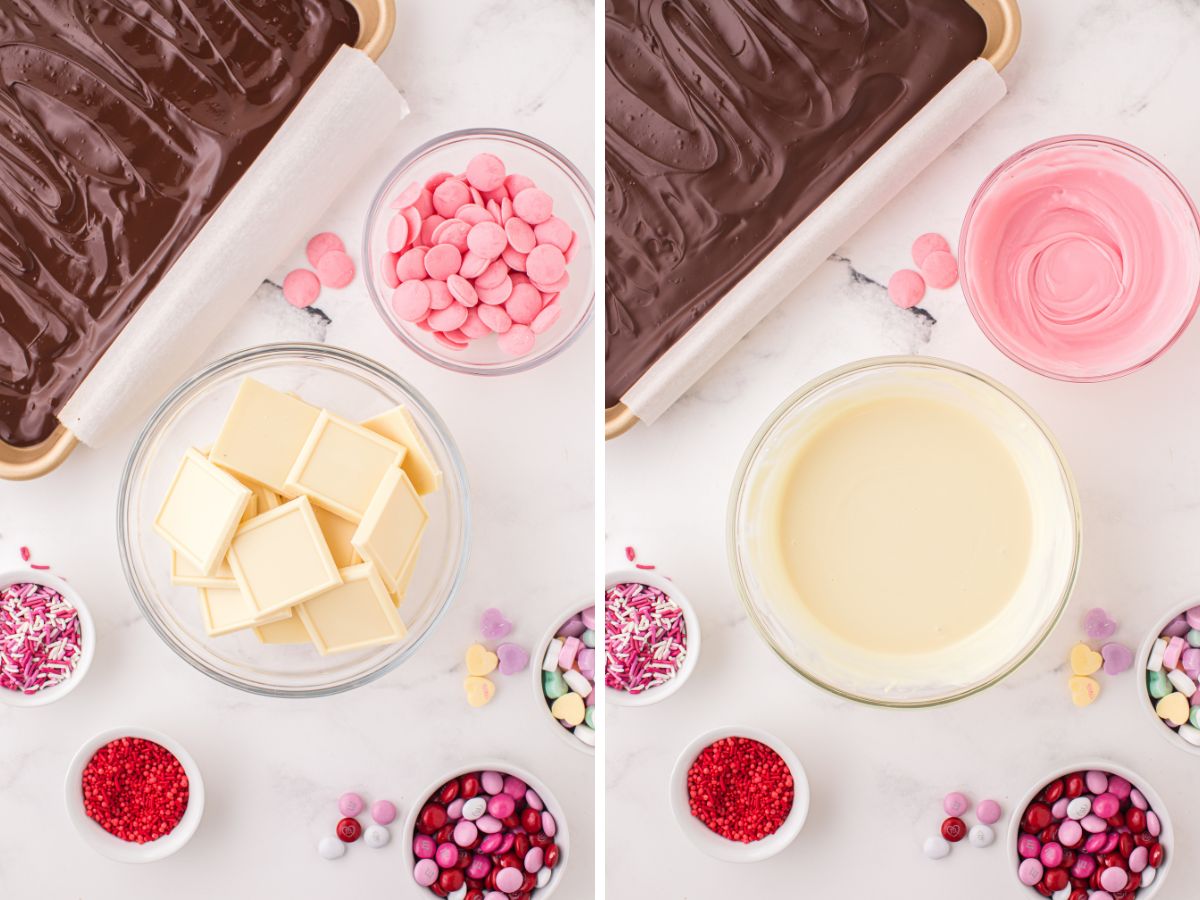
- White Chocolate Layer : Melt the white chocolate baking bars according to package instructions. Pour it over the dark chocolate and spread out evenly. Work quickly as the white chocolate will set fast.
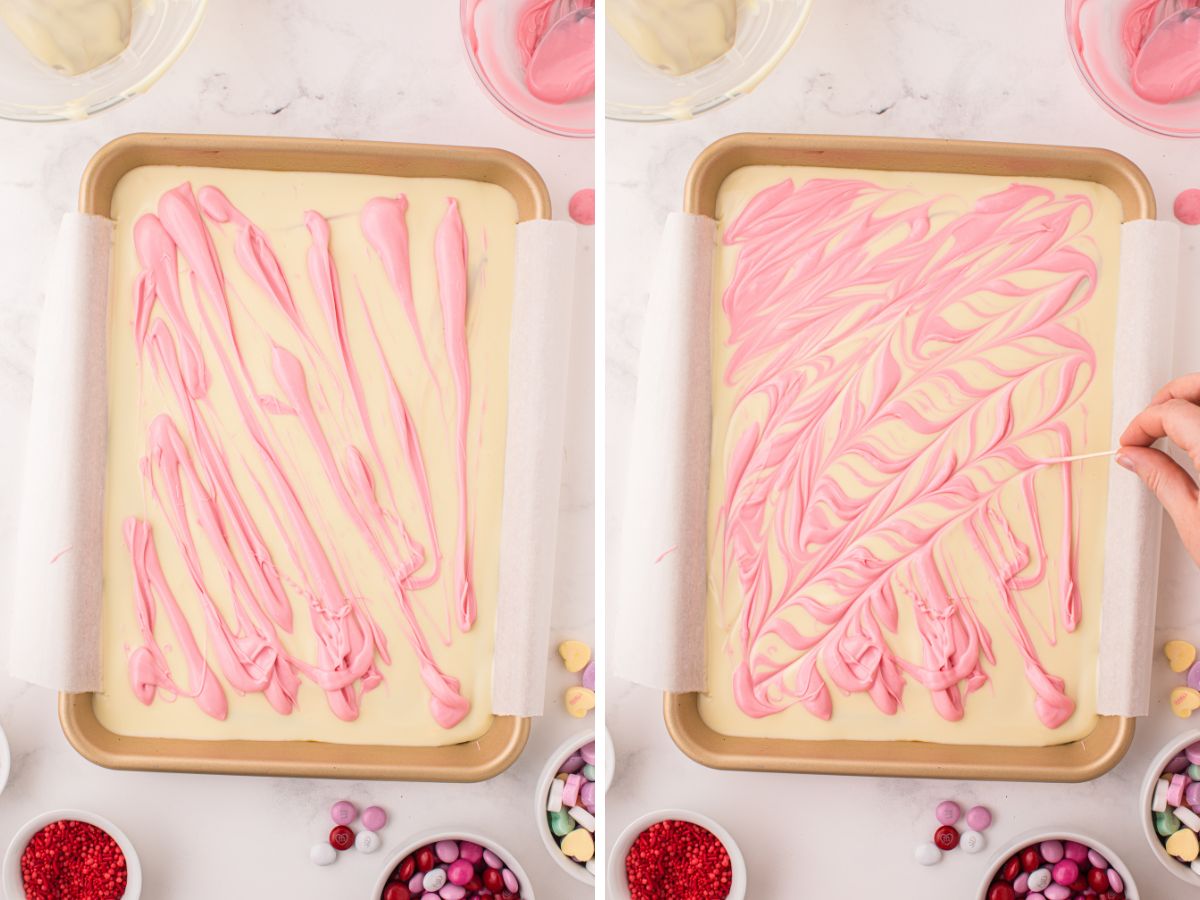
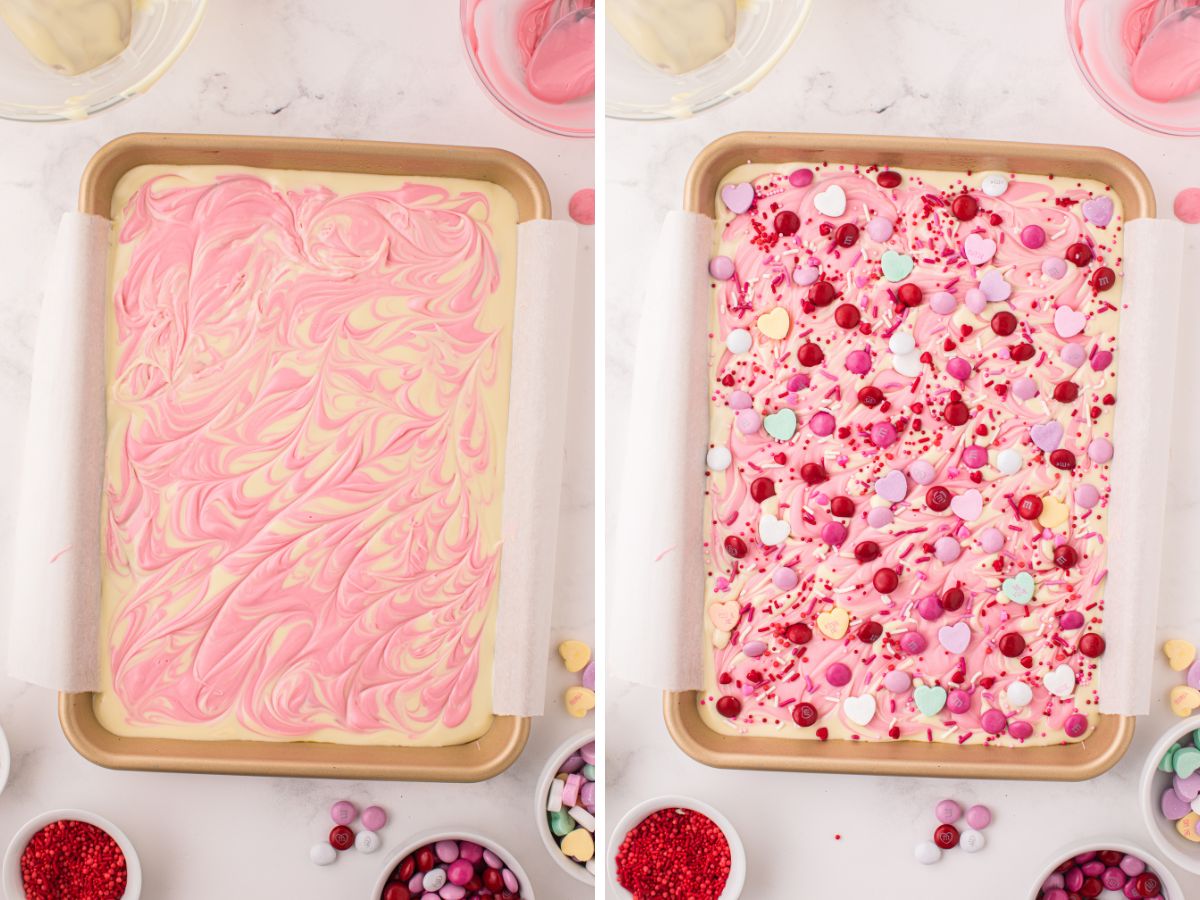
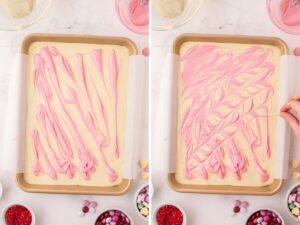
- Pink Candy Melt Swirl : Melt the candy melts in the microwave in 30 second increments until smooth. Drizzle it over the white chocolate before it has time to set. Swirl with a toothpick.
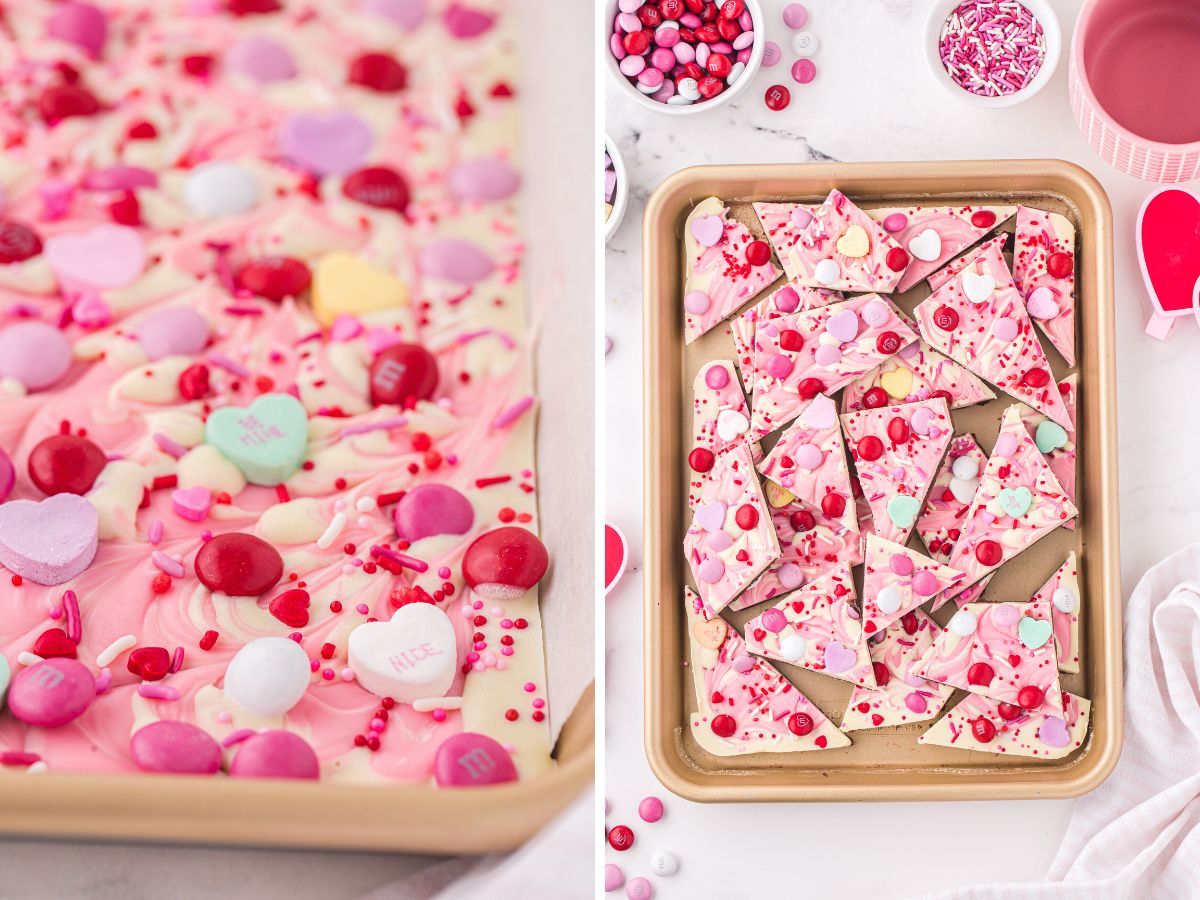
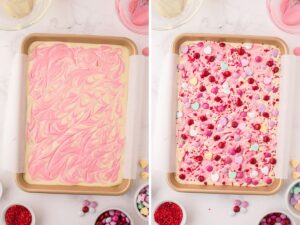
- Decorate : Place the candies and sprinkles on top.
Valentine’s Day Chocolate Bark FAQ’s
-
How To Store Chocolate Bark?
- Chocolate bark can be stored at room temperature, in an airtight container or bag, for up to 4-5 days. Do not place leftovers in direct sunlight or heat, or else it will melt and soften.
- It can be stored in the fridge for up to 2 weeks. Or you can freeze it for up to 4 months.
- Be aware that you may get streaks of white on the dark chocolate if the bark is chilled. This is a normal reaction that the chocolate has to temperature changes and does not affect the flavor. Depending on the type of candy that you use on top, it may or may not be affected by being chilled.
-
Tips and Tricks For This Recipe
- Here are a few of my helpful tips so that you can have success recreating this recipe in your own kitchen ♥
- Heat each chocolate layer slowly so that it does not seize. If you overheat any type of chocolate or candy melt, it will start to lump up and it is nearly impossible to get it spread evenly after that. Be patient and heat in small increments, with a lot of stirring between each, for best results.
- You want your layers to be almost completely hardened when you add the next layer. If the first layer is too soft then the two will blend. If you wait until each layer is completely hardened before adding the next layer, they won’t bond to each other and you may find that the layers snap off of one another.
- If you don’t have time to wait for the bar to harden at room temperature you can use the refrigerator. Be aware that this may affect the color of the chocolate, especially the dark chocolate, because chocolate reacts to temperature changes. It also may affect the smell and flavor of the bark if you have strong scents in your fridge (like broccoli!), so be sure to cover it with plastic wrap before putting it in the fridge. I recommend letting the chocolate layers harden and set at room temperature for optimal results.
- I recommend using the white chocolate baking bar, rather than white chocolate chips, because the chips tend to be more difficult to melt and spread compared to baking bars.
- When cutting the bark, I have found that if can be helpful to use a sharp pizza cutter instead of a knife. This allows you to cut the bark into more oven pieces. Or, you can also just use a knife or your hands to break the bark into pieces.
- Here are a few of my helpful tips so that you can have success recreating this recipe in your own kitchen ♥
-
Variation & Substitution Ideas
- Dark Chocolate Layer : If you prefer the sweeter taste of semi-sweet or milk chocolate, then use that in place of the dark chocolate. I love the contrast between the dark chocolate and the sweet white chocolate + candies. You can also use a dark chocolate baking bar if wanted instead of the chips.
- Decorative Toppings : Use any Valentine’s Day candy that you want! You could use Valentine’s Day nerds candies, sour patch kids, small heart shaped candies, etc. If wanted, you can also completely omit the candy and just use sprinkles on top.
- Pink Swirl Layer : Switch this up and use red candy melts or bright pink candy melts instead. You could also double the amount of pink candy melts to create a third layer for this bark, rather than just a pink swirl on top.
More Delicious Treats Perfect for a Valentine’s Day Party
- Strawberry Cake Mix Cookies – The prettiest, palest pink color ever. Easy to make too!
- Sheet Pan Sugar Cookie Bars – Soft sugar cookies in bar form topped with pink frosting, and then use Valentines day sprinkles to decorate.
- Red Velvet Crinkle Cookies – Red velvet cookies covered in powdered sugar.
- Valentine’s Day Peanut Butter Heart Cookies – A soft-baked peanut butter cookie topped with a Reese’s heart.
- Party Punch – The perfect pink & red color for a party. Tastes like homemade fruit punch.
- White Chocolate Valentine Fudge – Layers on pink and white chocolate topped with sprinkles.

Valentine's Day Chocolate Bark
Ingredients
- 1½ cups dark chocolate chips
- 3 bars (4 oz each) white chocolate baking bars
- 3/4 cup pink candy melts
- 1/4 cup Valentine's Day candy (cupid's mix m&m's & conversation hearts)
- 2 tablespoons Valentine's Day sprinkles
Instructions
- Line a cookie sheet (12"x18") with parchment paper. Set aside.
- In a microwave safe bowl, heat the dark chocolate chips for 30 seconds and then mix well. Continue heating in 15 second increments, stirring well after each time, until completely smooth and melted.

- Pour the chocolate onto the parchment paper and spread it out into a thin layer. Place the pan to the side, at room temperature, for about 10 minutes or until it's mostly hardened and set. * You don't want it completely set before you pour the white chocolate layer over top. You just want it almost hardened and set.
- While the dark chocolate layer is setting, break the white chocolate baking bars into squares and place them into a microwave safe bowl. Heat in the microwave for 30 seconds and then mix it well. Continue heating in 15 seconds increments, stirring well after each time, until it's completely smooth and melted. Set aside when melted.
- Put the pink candy melts into a microwave safe bowl and heat for 30 seconds, stir it well, and then continue heating in 15 seconds increments until smooth and melted.
- Pour the melted white chocolate over the dark chocolate layer and spread it out quickly. * The white chocolate will set fairly quickly so you want to work fast when working with the white chocolate and pink candy melts layers.
- Immediately drizzle the melted pink candy melts over top the white chooclate. Gently run a toothpick through the pink and white layers to make a marble swirl pattern, trying to avoid the dark chocolate layer.
- Sprinkle the candy and sprinkles over top.
- Let the chocolate bark harden and set completely, at room temperature, for about 30 minute to 1 hour.
- Break or cut the bark into pieces and serve. * I find it easiest to use a pizza cutter to cut the bark into more even pieces. You can also use a sharp knife.


Notes
-
How To Store Chocolate Bark?
- Chocolate bark can be stored at room temperature, in an airtight container or bag, for up to 4-5 days. Do not place leftovers in direct sunlight or heat, or else it will melt and soften.
- It can be stored in the fridge for up to 2 weeks. Or you can freeze it for up to 4 months.
- Be aware that you may get streaks of white on the dark chocolate if the bark is chilled. This is a normal reaction that the chocolate has to temperature changes and does not affect the flavor. Depending on the type of candy that you use on top, it may or may not be affected by being chilled.
-
Tips and Tricks For This Recipe
- Here are a few of my helpful tips so that you can have success recreating this recipe in your own kitchen ♥
- Heat each chocolate layer slowly so that it does not seize. If you overheat any type of chocolate or candy melt, it will start to lump up and it is nearly impossible to get it spread evenly after that. Be patient and heat in small increments, with a lot of stirring between each, for best results.
- You want your layers to be almost completely hardened when you add the next layer. If the first layer is too soft then the two will blend. If you wait until each layer is completely hardened before adding the next layer, they won't bond to each other and you may end that the layers snap off of one another.
- If you don't have time to wait for the bar to harden at room temperature you can use the refrigerator. Be aware that this may affect the color of the chocolate, especially the dark chocolate, because chocolate reacts to temperature changes. It also may affect the smell and flavor of the bark if you have strong scents in your fridge (like broccoli!), so be sure to cover it with plastic wrap before putting it in the fridge. I recommend letting the chocolate layers harden and set at room temperature for optimal results.
- I recommend using the white chocolate baking bar, rather than white chocolate chips, because the chips tend to be more difficult to melt and spread compared to baking bars.
- When cutting the bark, I have found that if can be helpful to use a sharp pizza cutter instead of a knife. This allows you to cut the bark into more oven pieces. Or, you can also just use a knife or your hands to break the bark into pieces.
- Here are a few of my helpful tips so that you can have success recreating this recipe in your own kitchen ♥
-
Variation & Substitution Ideas
- Dark Chocolate Layer : If you prefer the sweeter taste of semi-sweet or milk chocolate, then use that in place of the dark chocolate. I love the contrast between the dark chocolate and the sweet white chocolate + candies. You can also use a dark chocolate baking bar if wanted instead of the chips.
- Decorative Toppings : Use any Valentine's Day candy that you want! You could use Valentine's Day nerds candies, sour patch kids, small heart shaped candies, etc. If wanted, you can also completely omit the candy and just use sprinkles on top.
- Pink Swirl Layer : Switch this up and use red candy melts or bright pink candy melts instead. You could also double the amount of pink candy melts to create a third layer for this bark, rather than just a pink swirl on top.
Nutrition
Did You Make This Recipe?
I'd love to see it! You can share it with me on @togetherasfamilyblog and follow on Pinterest @together-as-family-blog-recipes or Facebook @togetherasfamilyblog for more!


Did you love this recipe?
Make sure to comment below so we can chat about it! Or follow on your favorite social network for even more family recipes.