
This post may contain affiliate links, view our disclosure policy.
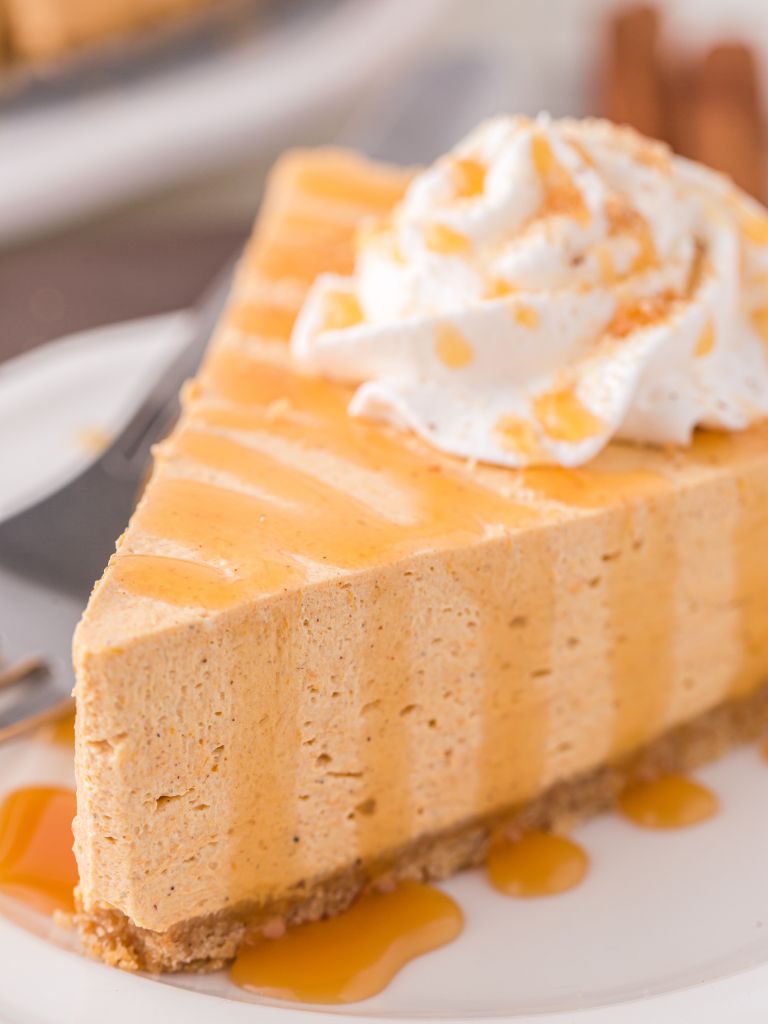
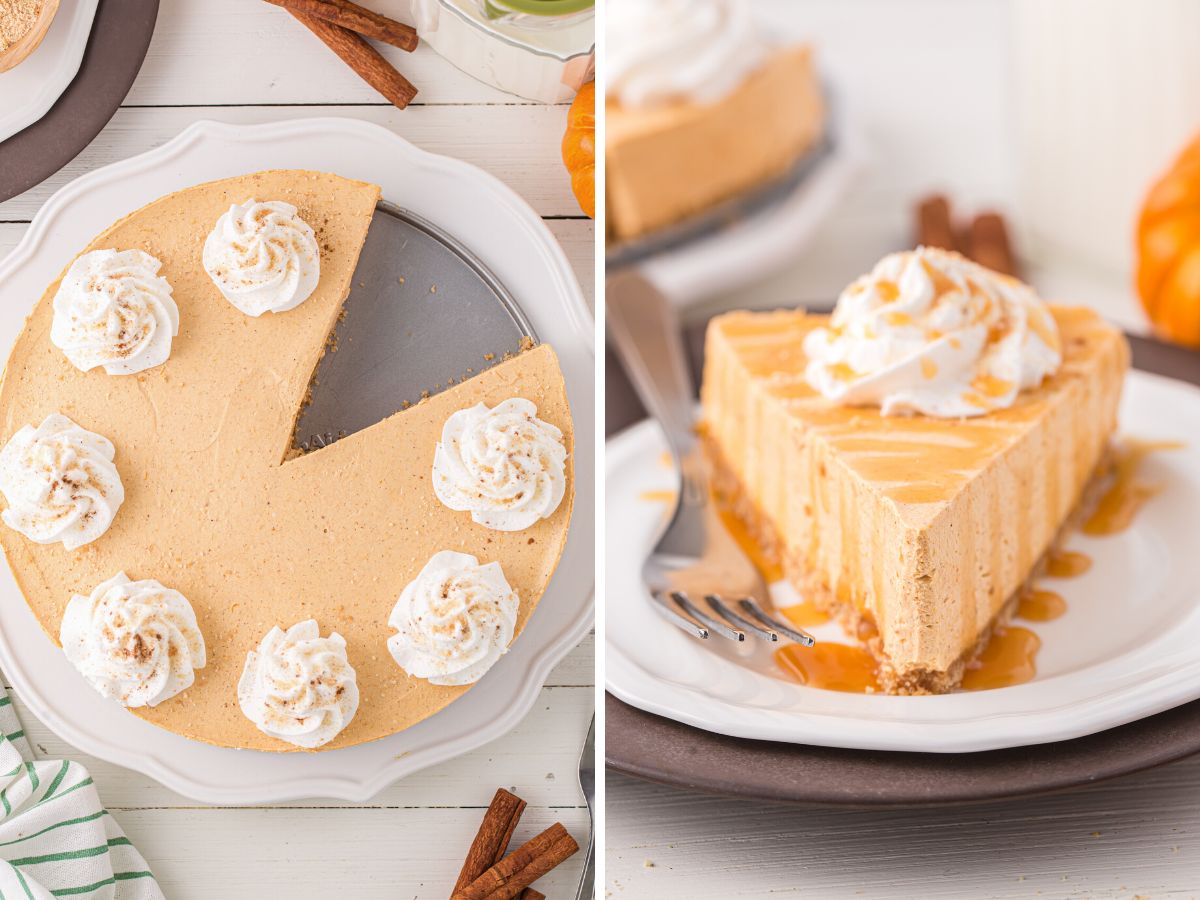
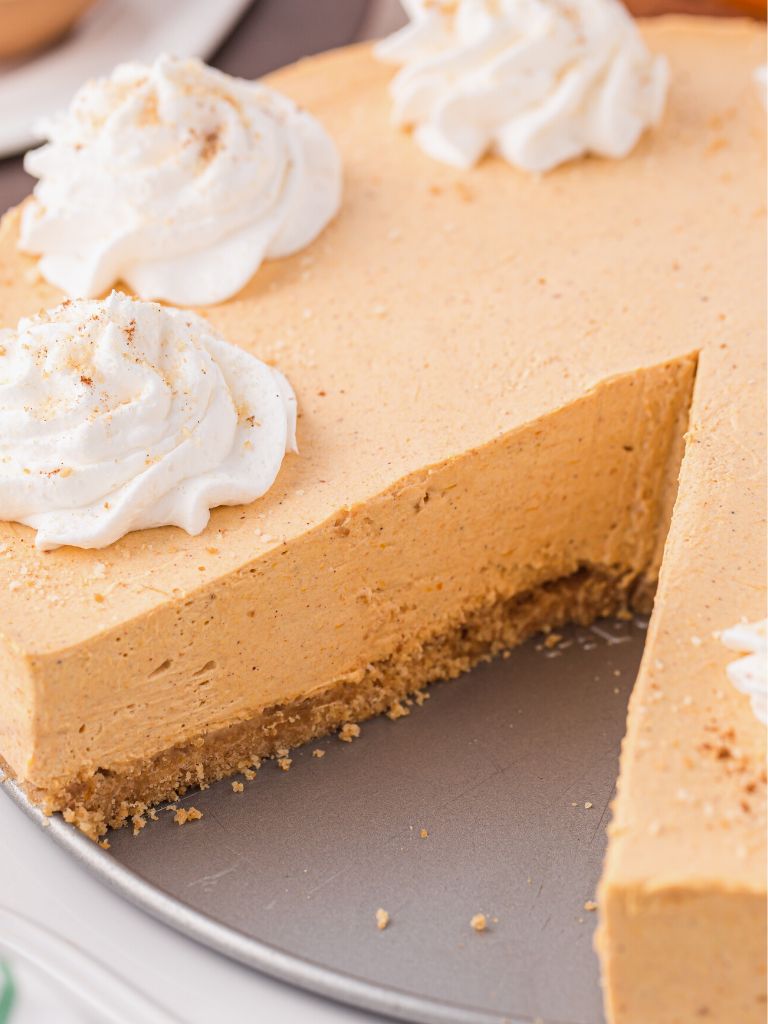
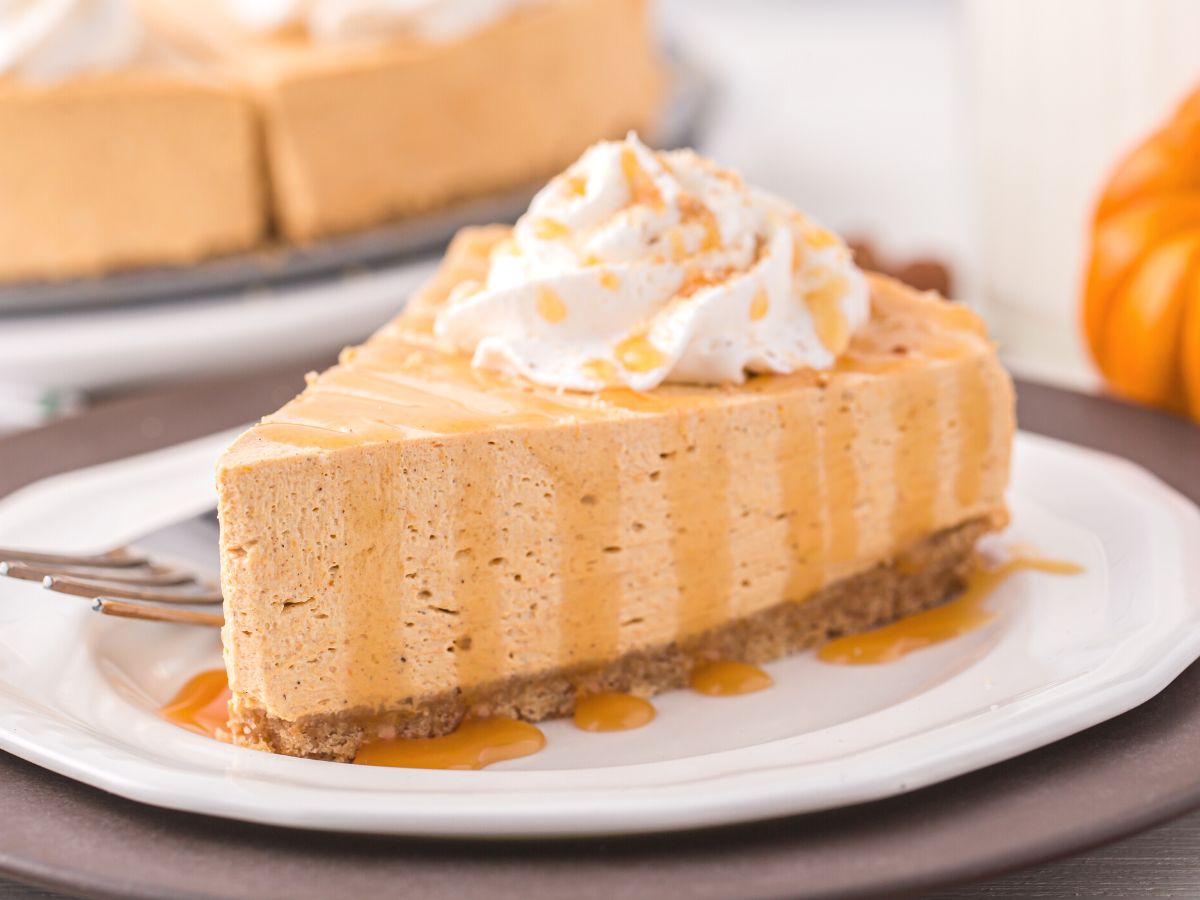
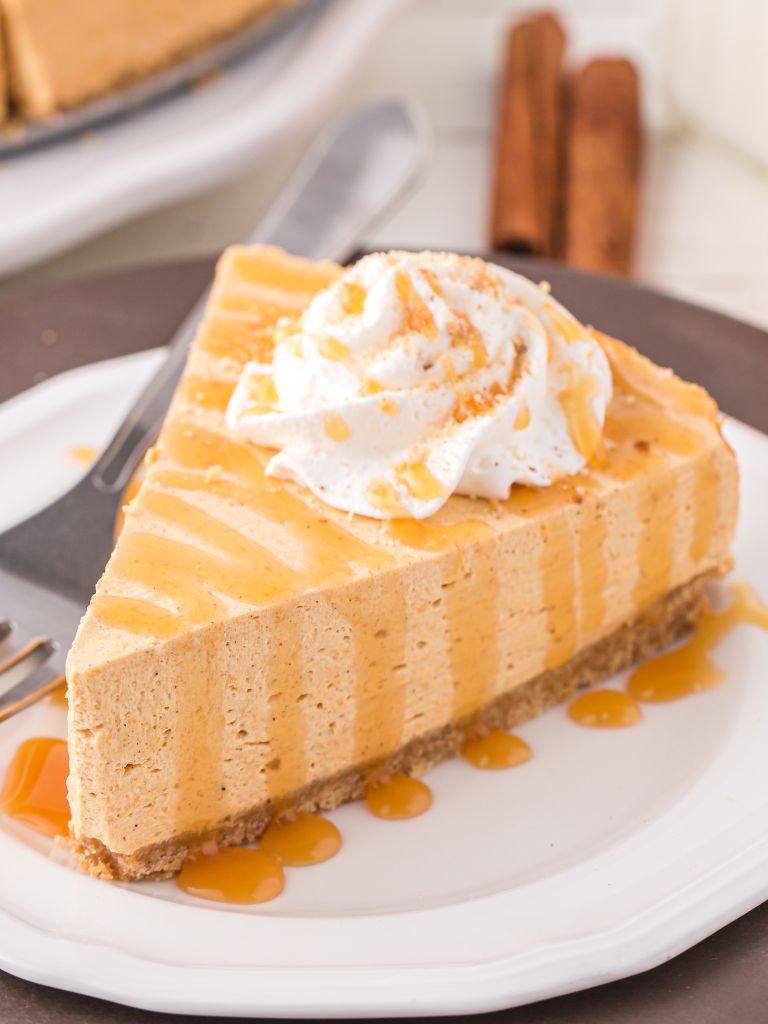
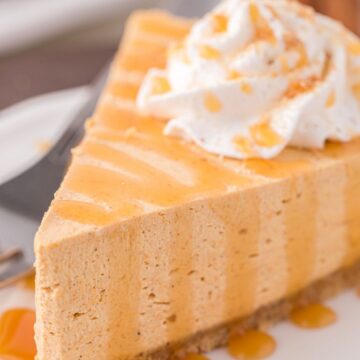
This decadent No Bake Pumpkin Cheesecake is the perfect blend of fall flavors and warm pumpkin spices. A homemade Nilla wafer crust is filled with a no bake cheesecake filling made with pumpkin, cream cheese, and whipped topping. Serve with whipped cream and a drizzle of caramel for a deliciously easy cheesecake dessert.
If you’re looking for a classic cheesecake recipe then try my Pumpkin Cheesecake or this Double Layer Pumpkin Cheesecake.
No Bake Pumpkin Cheesecake Recipe
I just love no bake desserts! They are so simple to make and the best part is that they need lots of refrigeration time, which means they’re the perfect make-ahead dessert for the Holidays.
This pumpkin cheesecake has a Nilla Wafer crust that is filled with a creamy and decadent no bake cheesecake filling with pumpkin and spices, and then topped with whipped cream! To really make this delicious, try serving each slice with a drizzle of Homemade Caramel Sauce.
You only need a few ingredients to make this no bake dessert that is perfect for the Thanksgiving dessert table.
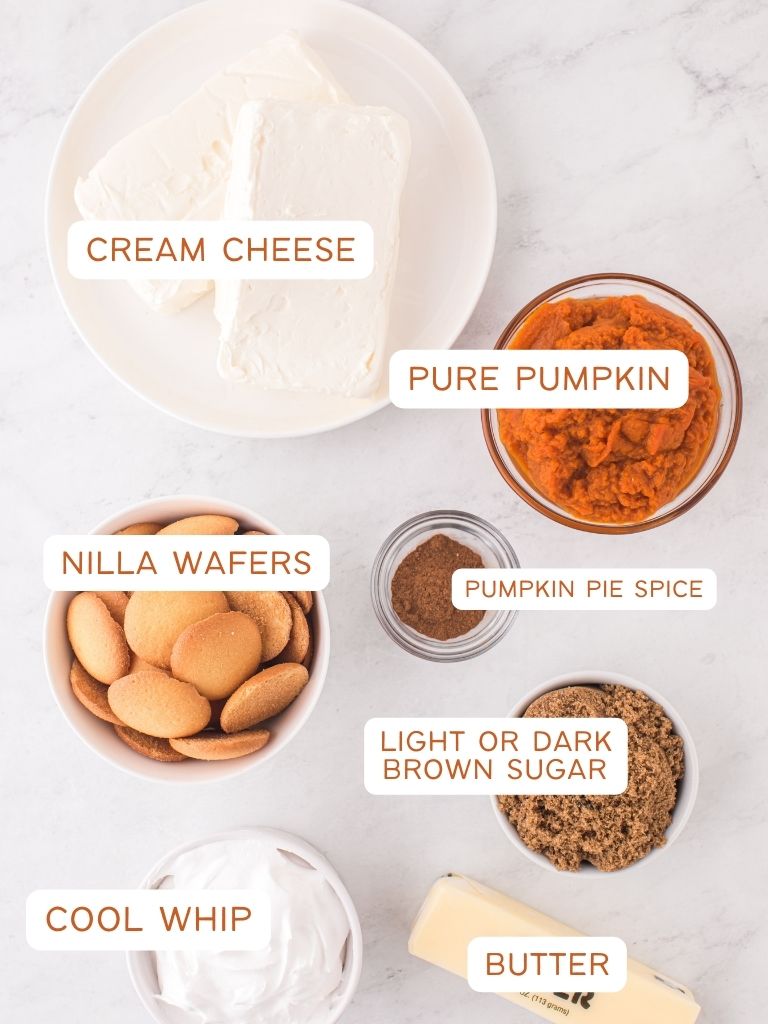
Ingredients Needed
- Nilla Wafers – I think these taste the best but you can substitute with graham crackers if wanted.
- Pumpkin Pie Spice – This is divided in the recipe, meaning that you will use some for the crust and then the rest for the cheesecake filling.
- Melted Butter – This holds the crust together. For best flavor use salted butter, but unsalted butter can be used if that’s your preference.
- Cream Cheese – Do not use the reduced-fat lite cream cheese. It’s not as thick and creamy. I also highly recommend using name brand cream cheese (Philadelphia brand) because it tastes so much better in cheesecake recipes.
- Brown Sugar – Light brown sugar or dark brown sugar will both work. I prefer light brown sugar, but if you want more of a bold pumpkin flavor then use dark brown sugar.
- Pure Pumpkin – Make sure you are using 100% pure pumpkin and not the pumpkin pie mix.
- Cool Whip – You can also make your own if wanted. Directions are below for that.
How To Make No Bake Pumpkin Cheesecake
Learn how to make this recipe for no bake pumpkin cheesecake with the easy to follow steps below. Be sure and read to the bottom of the page where there is a printable recipe card, a pin it button so you can save the recipe for later, and a recipe card with all the details and tips for success.
-
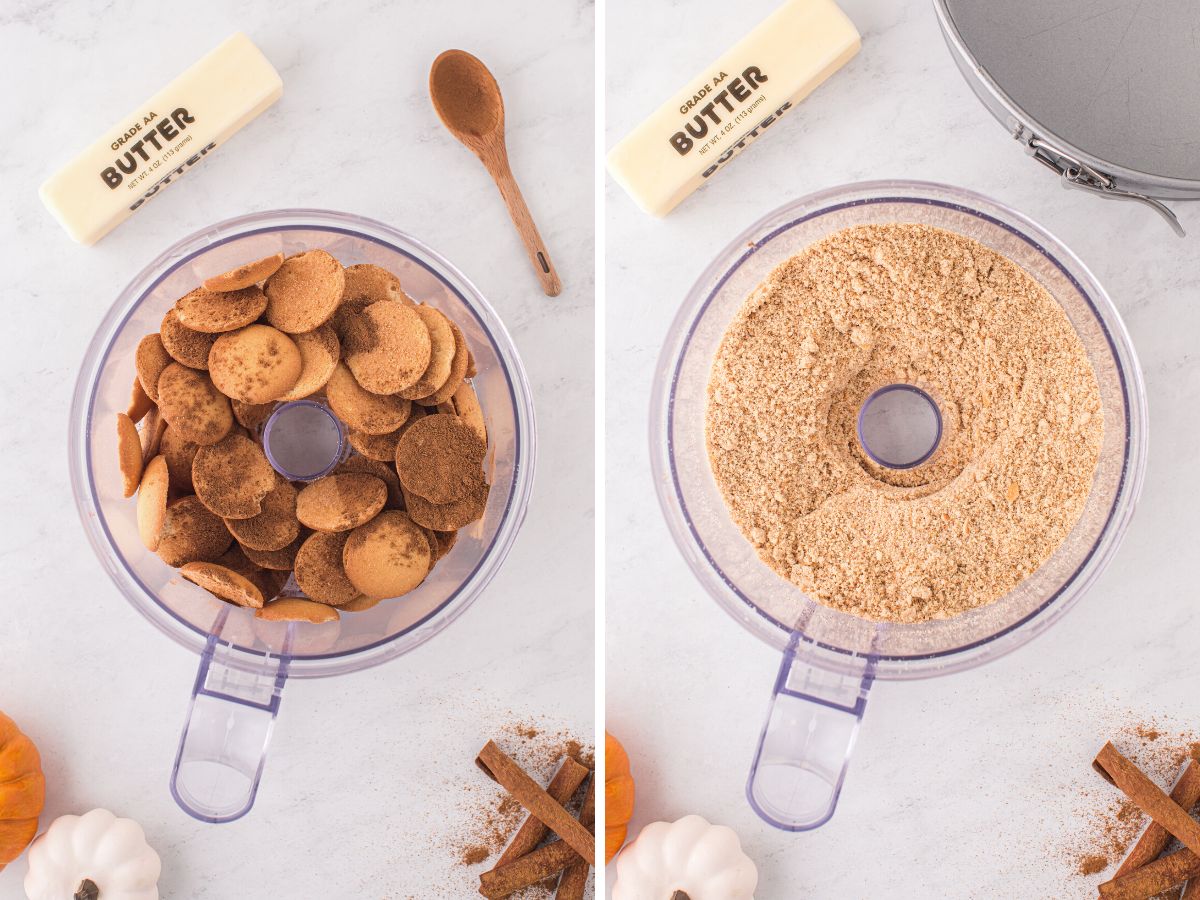
Nilla Wafer Crust
- Add the Nilla wafer cookies and 1 teaspoon of the pumpkin pie spice into a food processor. Mix until completely crumbled in fine crumbs. You can also use a Ziploc bag with a meat pounder (or something else that’s heavy) to crush them. You will get finer crumbs using a food processor or food chopper.
- Reserve 2 tablespoons of this mixture for garnish (used later in the recipe).
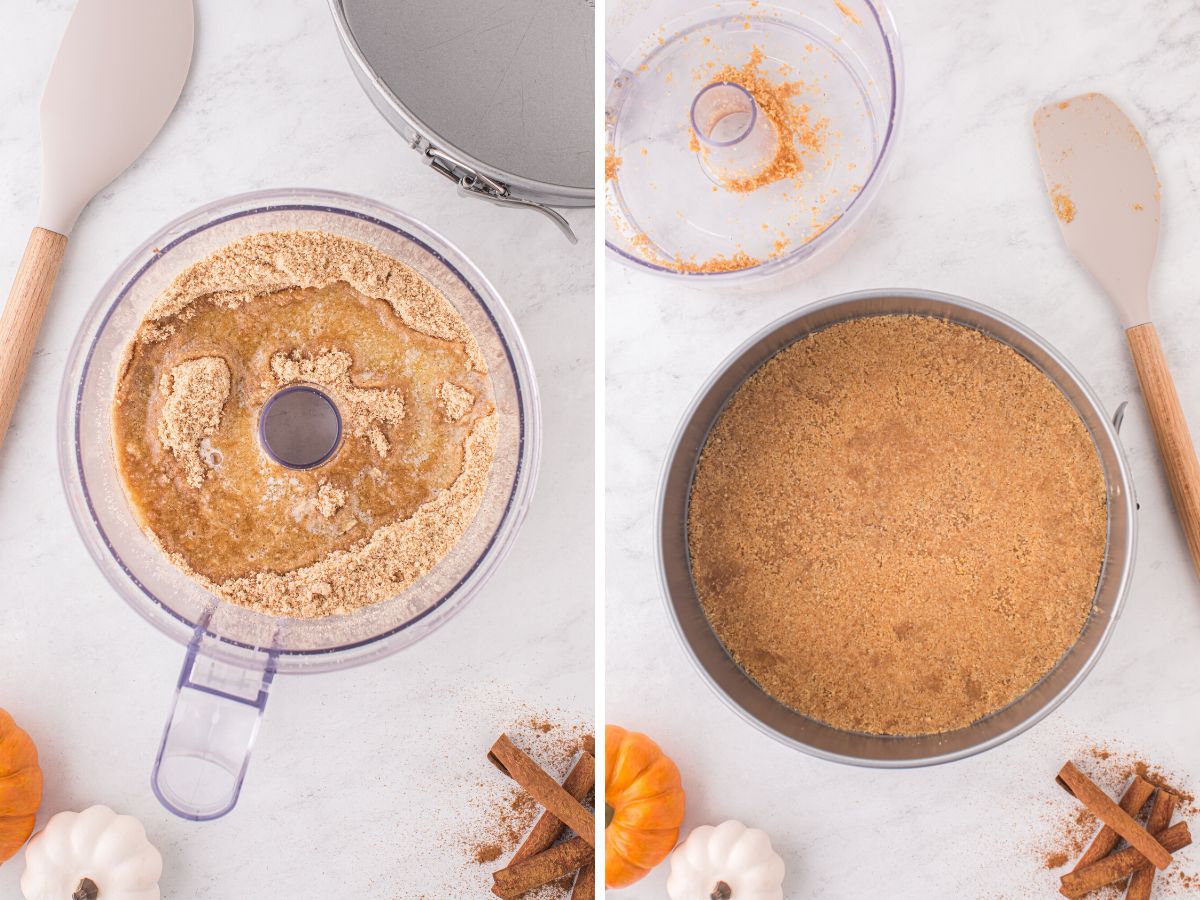
- Pour the melted butter in and pulse until combined. If using a Ziploc bag, I would combine the crushed crumbs + melted butter into a mixing bowl and then mix together until combined.
- Press the crust into a 9-inch springform pan, creating an even layer on the bottom, and pressing firmly.
- Cover and place it in the freezer while you prepare the rest.
-
No Bake Pumpkin Cheesecake Filling
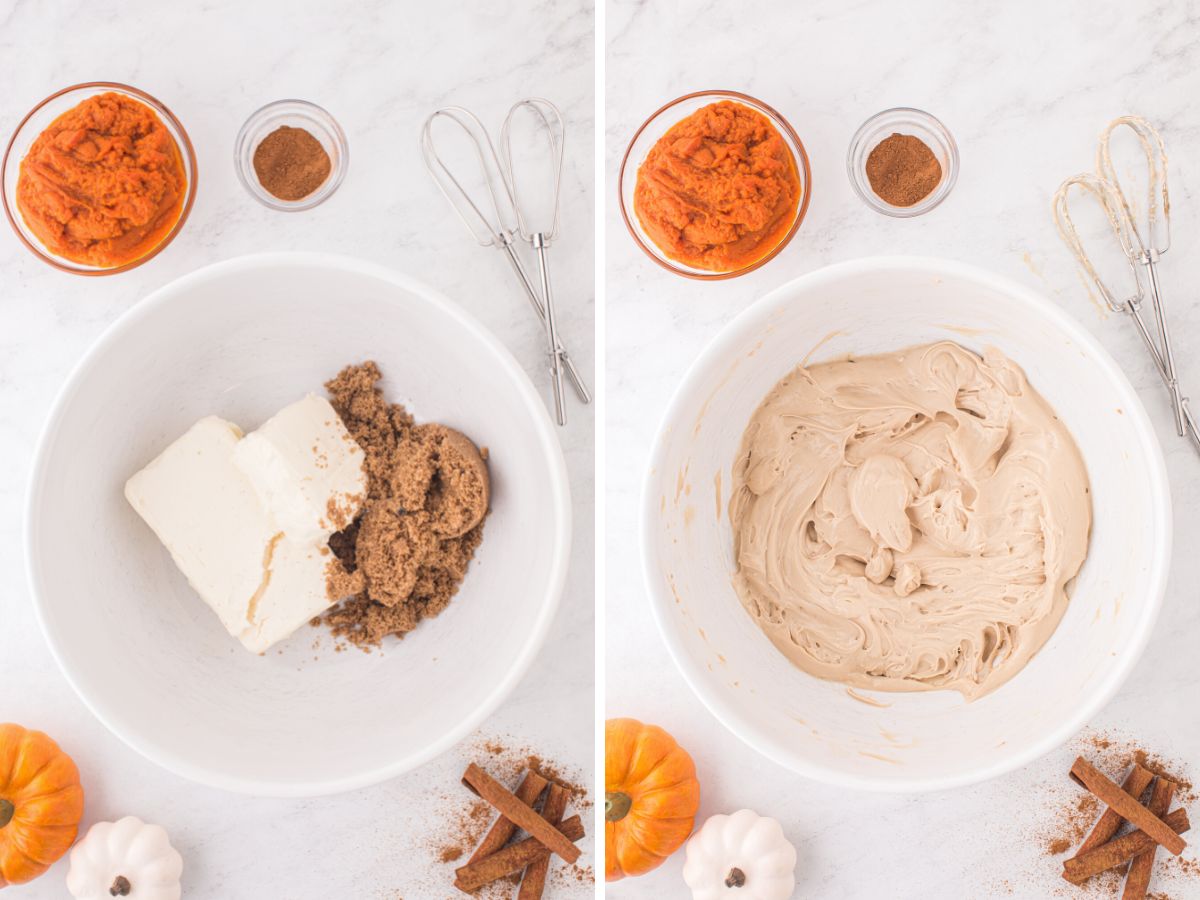
- In a mixing bowl with an electric hand held mixer, beat together the cream cheese and brown sugar until light & fluffy. About 3-5 minutes.
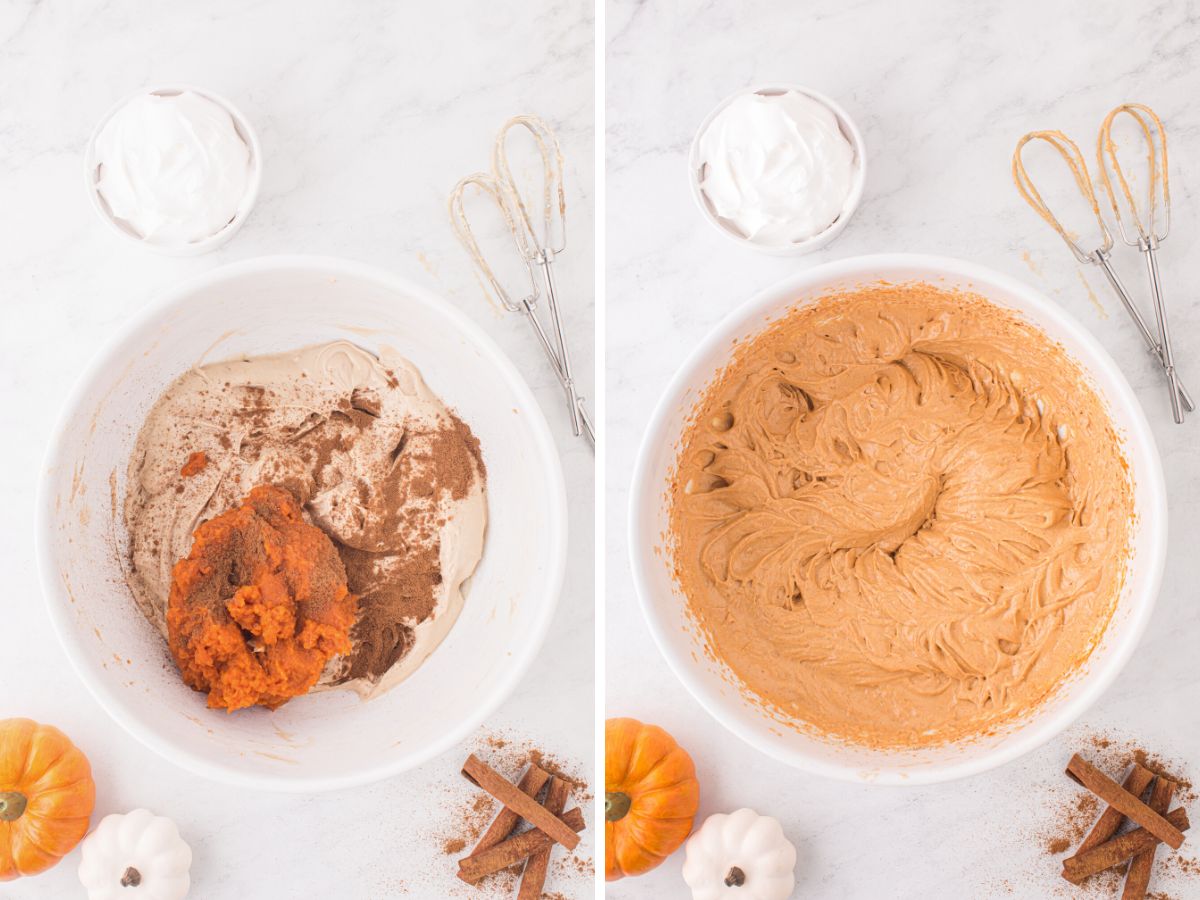
- Add in the pure pumpkin and remaining 1 teaspoon pumpkin pie spice. Beat until combined (about 1-2 minutes) scraping down the sides and bottom of the bowl as needed.
- Gently fold in 3 cups of the Cool Whip until incorporated.
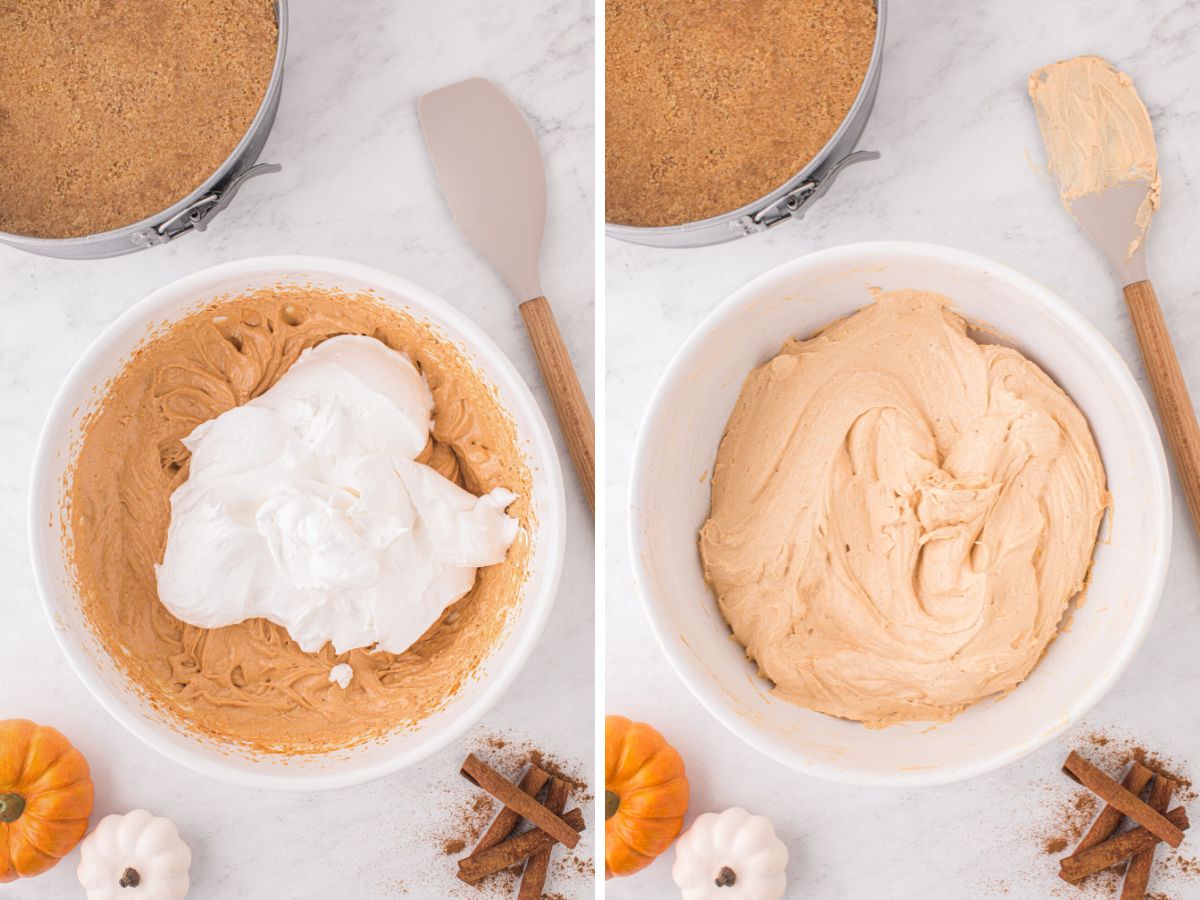
- Scoop the cheesecake filling into the crust and smooth out the top.
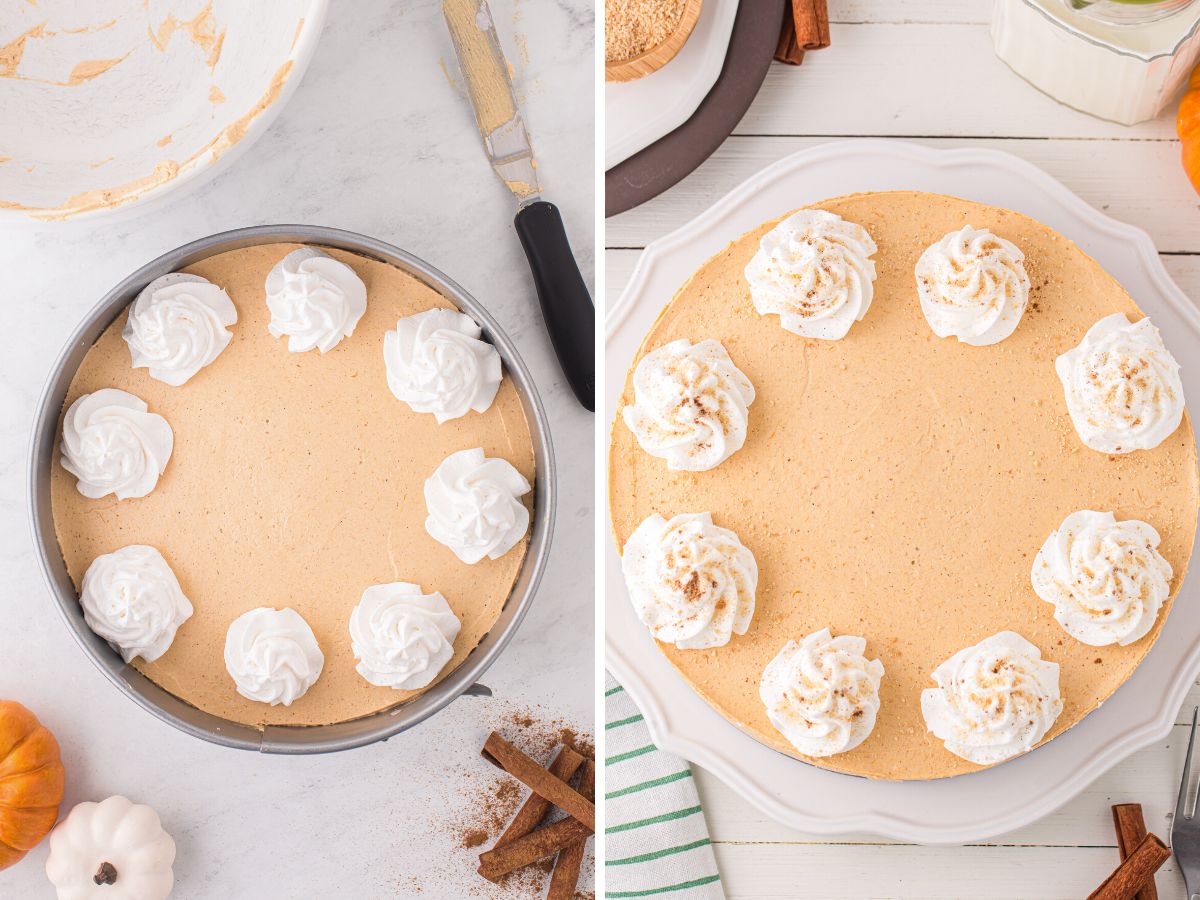
- Pipe or spread on the remaining Cool Whip and sprinkle the reserved Nilla wafers crumbs on top.
- Cover with plastic wrap and refrigerate for at least 8 hours, or overnight is preferred.
No Bake Cheesecake FAQ’s
-
How To Store Leftover No Bake Pumpkin Cheesecake
- Leftovers need to be stored chilled in the fridge, in an airtight container or covered tightly in plastic wrap, for 4-5 days. Any longer and the crust will start to get soggy and soft. As with anything pumpkin, the leftovers are even better than day 1. Which is also the reason I love to make this recipe ahead of time, to give it chill time in the fridge before serving.
-
Can I Freeze This?
- Yes you can! To freeze, I suggest cutting the cheesecake into slices and then freezing them individually wrapped in plastic wrap and stored inside a freezer-safe Ziploc bag. The cheesecake is hard to slice when frozen which is why it’s best store them already sliced, that way you can just take out however many you need. But you can easily freeze the entire cheesecake as well. Don’t add the whipped cream topping if freezing. Save that for right before serving.
- Let the cheesecake slices (or the whole cheesecake if freezing it that way) thaw in the fridge before serving.
- Wether you store it in the fridge or freezer, just make sure that it is well wrapped in plastic wrap or foil or covered well.
-
Can I Make It Ahead of Time?
- The cheesecake needs at least 8 hours, minimum, of chill time in the fridge. This is important to help the cheesecake set and thicken properly, and for the flavors to develop. Which also makes it the perfect make ahead dessert. Make it the day before and let it hang out in the fridge overnight and into the next day until it’s time to serve it.
- This cheesecake does well being made up to 24 hours ahead of time.
-
Serving Suggestions
- There are lots of ways to serve this. Try drizzling some caramel sauce (either homemade or store bought) over each slice. Garnish with chopped pecans if wanted. You can also serve it as is or try a chocolate syrup glaze for a pumpkin + chocolate combo. Or try some chocolate curls using a chocolate bar and a vegetable peeler. Place a gingersnap cookie on top of each slice. Lots of fun ways to serve this dessert.
- My favorite way to serve it is with whipped cream on top, chopped pecans, and a drizzle of caramel syrup.
Recipe Tips
Here are a few of my helpful tips so that you can have success recreating this recipe in your own kitchen ♥
- Cream Cheese : The cream cheese needs to be well softened, to room temperate, before preparing this cheesecake. If it’s not, you will end up with little chunks of cream cheese that will not incorporate smoothly into the cheesecake mixture. Put the cream cheese out at room temperature for 1-2 hours before starting this recipe. You can also remove the cream cheese from the wrapper, put it on a microwave-safe plate, and microwave it in short 15-20 second increments until softened. You don’t want it hot at all, just softened but still at room temperature.
- Don’t Over Mix : Avoid over-mixing the cheesecake once you have added the Cool Whip. You can’t really overmix if before this point but if you beat the Cool Whip in (like with a hand held mixer) instead of folding it in, you might end up with a flat and thick cheesecake rather than a light & fluffy cheesecake (which is what we want!). So just make sure that you are folding the Cool Whip into the cheesecake mixture. Which means, use a wooden spoon or spatula to gently fold/stir it in just until combined.
- Use Full-Fat Cream Cheese : I highly recommend only using the regular, classic full-fat cream cheese. It has a much richer and thicker flavor & texture that does really well in no bake dessert like this one. Avoid using the lite cream cheese (1/3 reduced-fat cream cheese).
More Pumpkin Recipes You’ll Love
- Pumpkin Icebox Cake – Another no bake pumpkin dessert made with layers of graham crackers, pumpkin spiced vanilla pudding, and whipped cream.
- Sheet Pan Chocolate Chip Pumpkin Bars – So soft with the perfect blend of pumpkin spice + chocolate!
- Pumpkin Spice Bundt Cake – Easy to make with a cake mix.
- Pumpkin Snickerdoodles – A yummy twist to the classic recipe with pure pumpkin and spices.
- Cinnamon Streusel Pumpkin Cake – A moist pumpkin cake topped with a sweet cinnamon streusel and glazed.
- No Bake Marshmallow Pumpkin Pie – This no bake pumpkin pie uses melted marshmallows! So unique and delicious.
- Pumpkin Cheesecake Layered Pudding Dessert – Even pumpkin haters have been known to fall in love with this layered dessert.

No Bake Pumpkin Cheesecake
Equipment
Ingredients
- 1 box (11 oz) Nilla Wafers
- 2 teaspoons pumpkin pie spice (divided)
- 1/2 cup (1 stick) salted butter melted
- 12 ounces full-fat cream cheese softened
- 1/3 cup dark or light brown sugar packed
- 1 cup pure pumpkin
- 1 tub (16 oz) Cool Whip thawed
Instructions
- Using a food processor or a Ziploc bag with a meat pounder, add the Nilla Wafers and 1 teaspoon of the pumpkin pie spice. Crush until it's completely crumbled. Remove 2 tablespoons of the crumb and set it aside for later (optional for the garnish).
- Pour the melted butter into the food processor and pulse to combine it with the crumbs. * If using a Ziploc bag, add the crumbs to a mixing bowl and pour the melted butter in. Stir together with a fork to combine.
- Press the crust mixture into a 9-inch springform pan, creating an even layer on the bottom and pressing it firmly together.* No need to go up the sides. Just press an even layer on the bottom.
- Cover it with plastic wrap and let it sit in the freezer while you prepare the cheesecake filling.
- In a large mixing bowl using an electric hand mixer, or use a stand mixer with the paddle attachment, cream together the cream cheese and brown sugar until light & very fluffy. * This will take about 3-4 minutes. You want to make sure you whip lots of air into it until it's fluffy and much lighter in color.
- Add in the pure pumpkin and the remaining 1 teaspoon of pumpkin pie spice. Beat until smooth and combined, about 1-2 minutes. * Be sure and scrape the sides and bottom of the bowl a few times with a spatula to make sure everything is getting in mixed together well.
- Gently stir in 3 cups of the Cool Whip with a spatula or wooden spoon. * Be careful to not over-mix this. Just gently stir it in until combined. Do not use the hand mixer for this!
- Scoop the cheesecake filling into the prepared crust and spread it into an even layer.
- Pipe or spread the remaining 1 cup Cool Whip on top of the cheesecake filling and garnish with the reserved crumbs that were set aside earlier.
- Cover the springform pan well with plastic wrap and let it refrigerate for a minimum of 8 hours. * I recommend making this the day before and letting it refrigerate overnight. You can make the cheesecake up to 24 hours in advance.
- When ready to serve, remove the plastic wrap and the springform ring. Cut into slices and serve chilled from the fridge.
Notes
Nutrition
Did You Make This Recipe?
I'd love to see it! You can share it with me on @togetherasfamilyblog and follow on Pinterest @together-as-family-blog-recipes or Facebook @togetherasfamilyblog for more!


Did you love this recipe?
Make sure to comment below so we can chat about it! Or follow on your favorite social network for even more family recipes.