
This post may contain affiliate links, view our disclosure policy.
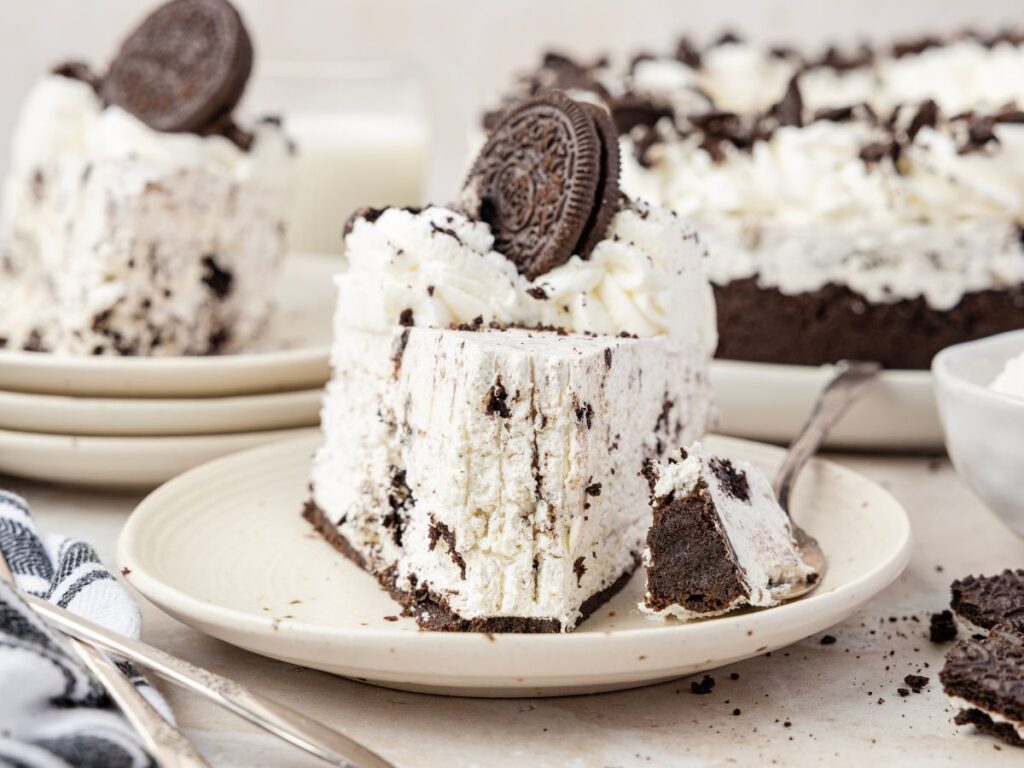
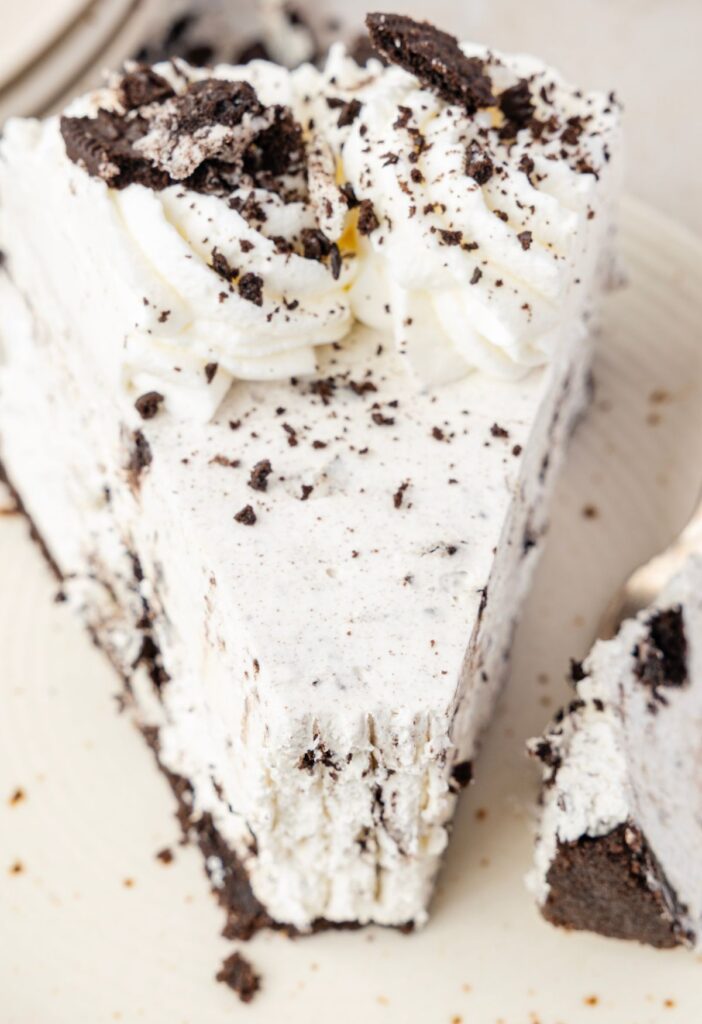
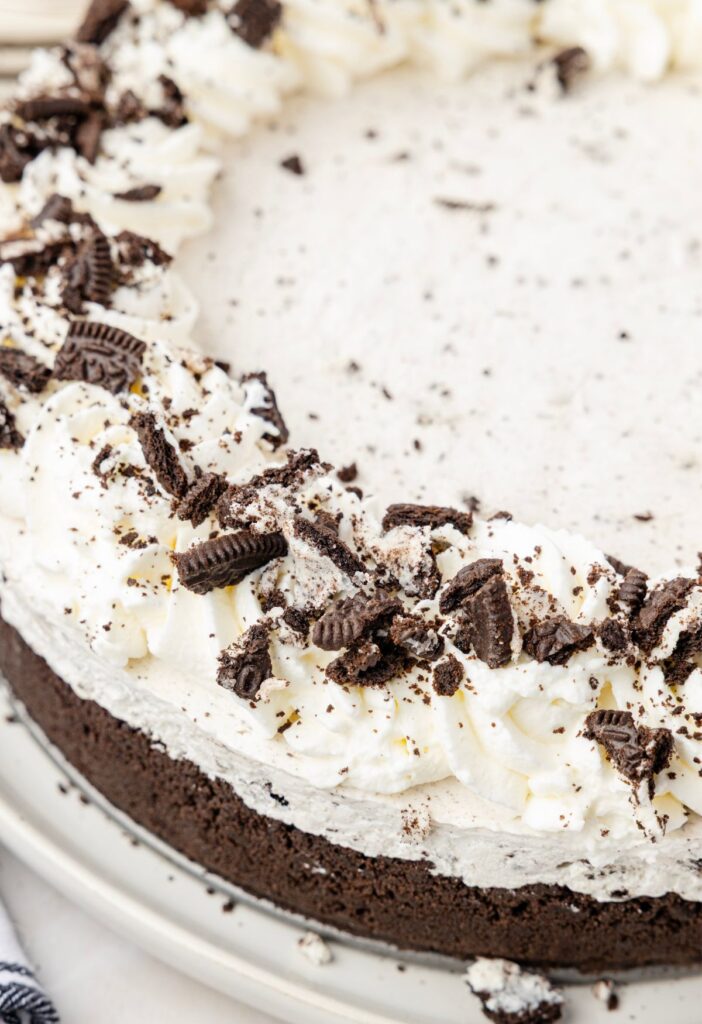
No Bake Oreo Cheesecake is one of the easiest desserts you’ll ever make, but it tastes completely bakery-worthy. It starts with a buttery Oreo cookie crust, filled with a creamy cookies and cream no bake cheesecake – every bite is rich, smooth, creamy, and irresistible.
For more no bake Oreo desserts be sure and make my No Bake Oreo Lush, Layered Oreo Dessert, and No Bake Oreo Pudding Pie.
No Bake Oreo Cheesecake Recipe (Homemade Oreo Crust)
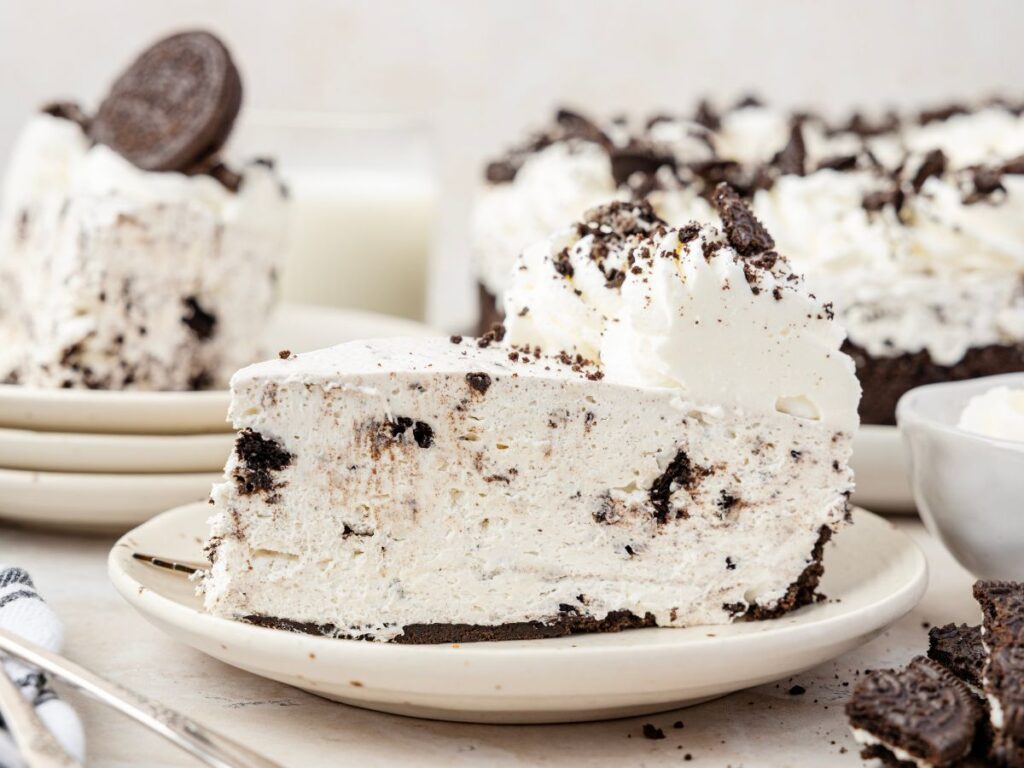
No bake oreo cheesecake is a no bake cheesecake recipe with a homemade oreo cookie crust, and filled with a creamy filling loaded with sweetened cream cheese, powdered sugar, and tons of Oreo pieces throughout.
The best part? You don’t even need to turn on the oven. This creamy no bake oreo dessert comes together with only a handful of ingredients and a few minutes of prep work, then chills to perfection in the fridge. It’s smooth, decadent, loaded with cookies and cream flavor, and guaranteed to impress.
This delicious dessert requires several hours of refrigeration time so make it the morning of and let the fridge do all the work for you – the chill time is so important because it allows the flavors to blend and the cheesecake to chill thoroughly before serving.
Why You’ll Love Oreo No Bake Cheesecake
- ❤︎ No oven required
- ❤︎ Easy make-ahead dessert
- ❤︎ OREO LOVERS dream
- ❤︎ Creamy, fluffy, light & rich
- ❤︎ Loaded with Oreo cookies
- ❤︎ Beginner-friendly recipe
Only 5 Simple Ingredients Needed
Oreo Cookie Crust Ingredients
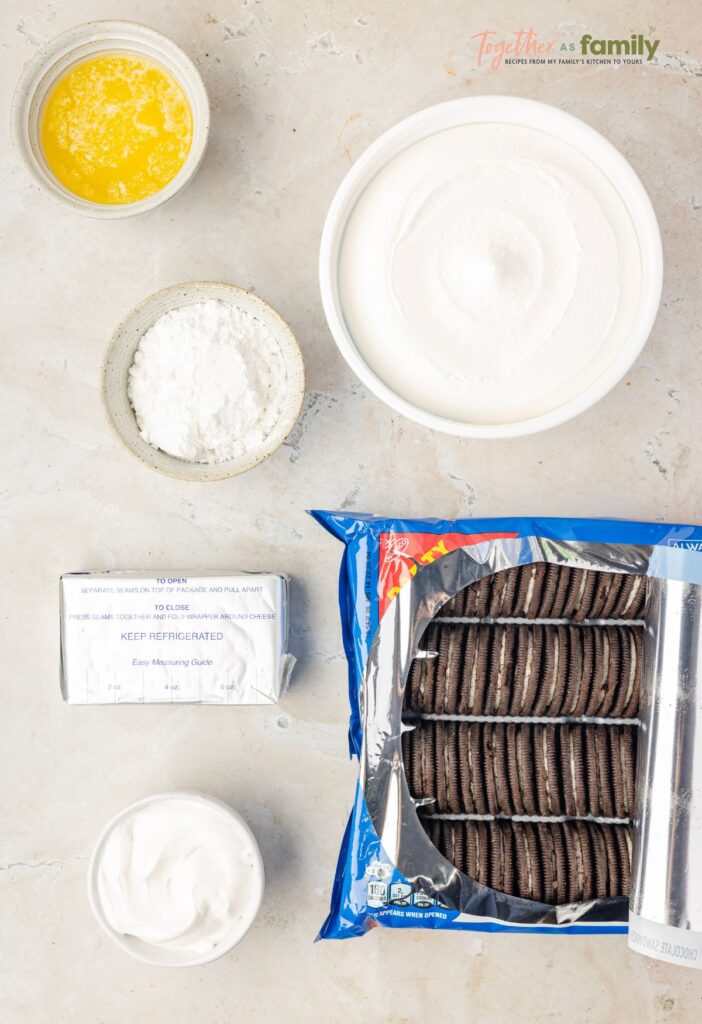
- Oreos : For the crust you will need 25 Oreo cookies; regular Oreos and not the Double-Stuf Oreo cookies.
- Melted Butter : I prefer salted butter but unsalted butter works well too.
No Bake Oreo Cheesecake Filling Ingredients
- Cream Cheese : For the best flavor, thick creamy texture, and to help the cheesecake set properly – I recommend only using full-fat softened cream cheese for this no bake cheesecake. I also think the Philadelphia brand tastes the best (by far!) so for the best flavor, I always use the name brand when making cheesecake.
- Powdered Sugar
- Oreos : You will need 15 Oreo cookies for the filling. I usually add a few more 😉
- Cool Whip : A larger 16 ounce container of thawed Cool Whip.
Topping & Garnish
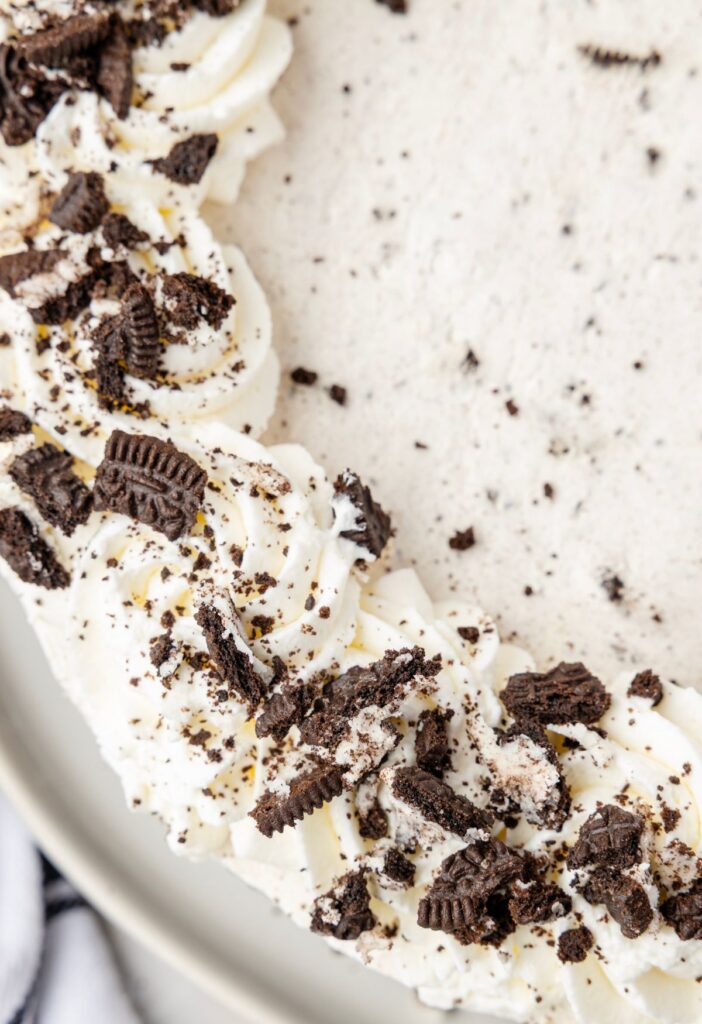
- Oreos : Chopped Oreos, or halved Oreos or mini Oreos, make for a great garnish for the top of the cheesecake.
- Whipped Cream : Use homemade whipped cream, whipped cream from a store-bought spray can, additional Cool Whip, etc. Or omit the extra whipped cream and just garnish the top of the cheesecake with chopped Oreo cookies for serving, or leave it as is. This is an optional ingredient for serving only.
How To Make No Bake Oreo Cheesecake Recipe (Printable Recipe Card)
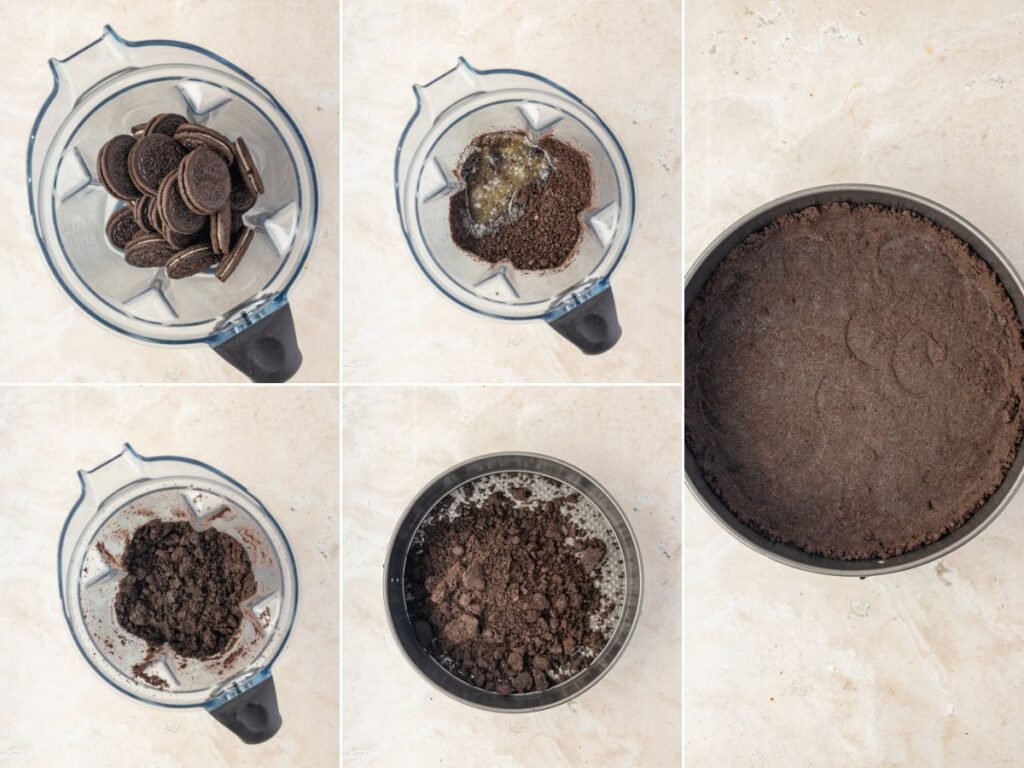
Make The Oreo Cookie Crust : Place the Oreo cookies inside a food processor or food chopper, and pulse until the mixture resembles fine oreo crumbs like wet sand. Add in the melted butter and pulse again just until combined.
Transfer the cookie crust mixture to a 9-inch springform pan and press it about 1-inch up the sides of the pan, making sure to form a flat even bottom crust layer. Refrigerate the crust for 30 minutes.
Make The Oreo Cheesecake Filling : In a large bowl, using an electric mixer or stand mixer, beat the cream cheese until it’s light and fluffy.
Add in the powdered sugar and mix on low speed, increasing speed as needed, until thoroughly combined.
Add the chopped Oreo cookies and cool whip and continue mixing, on low speed, until combined.
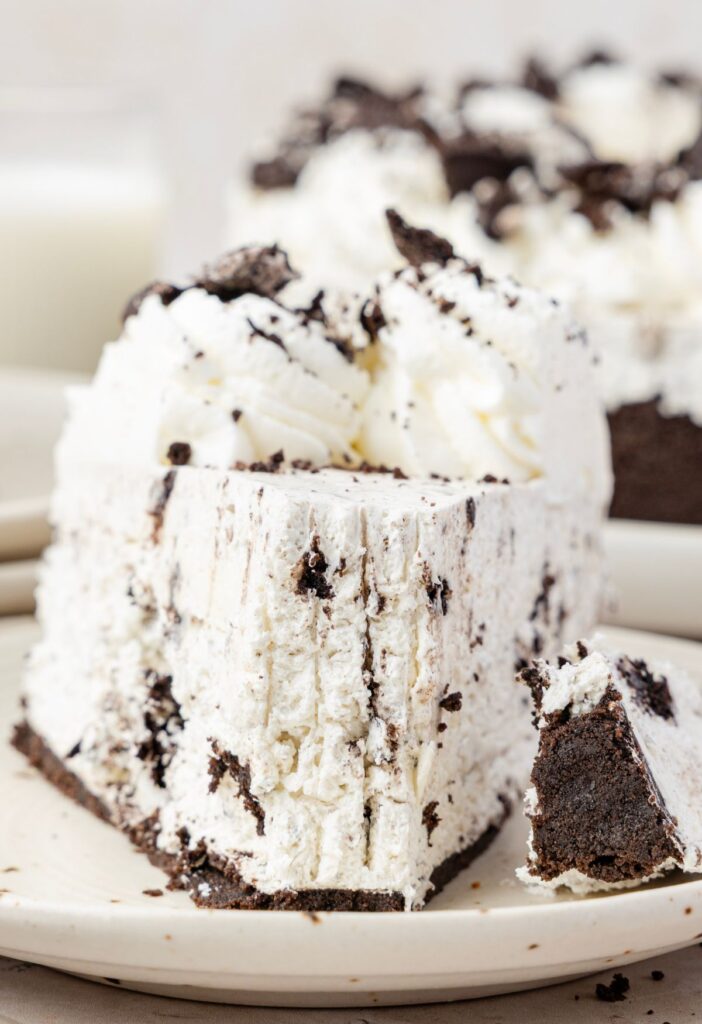
Spread the cheesecake filling evenly into the crust. Cover the springform pan with plastic wrap and refrigerate for at least 6-8 hours. I don’t recommend chilling the cheesecake for longer than about 12 hours before serving, as the cookies throughout the cheesecake will soften. For the best texture refrigerate up to 8 hours before serving.
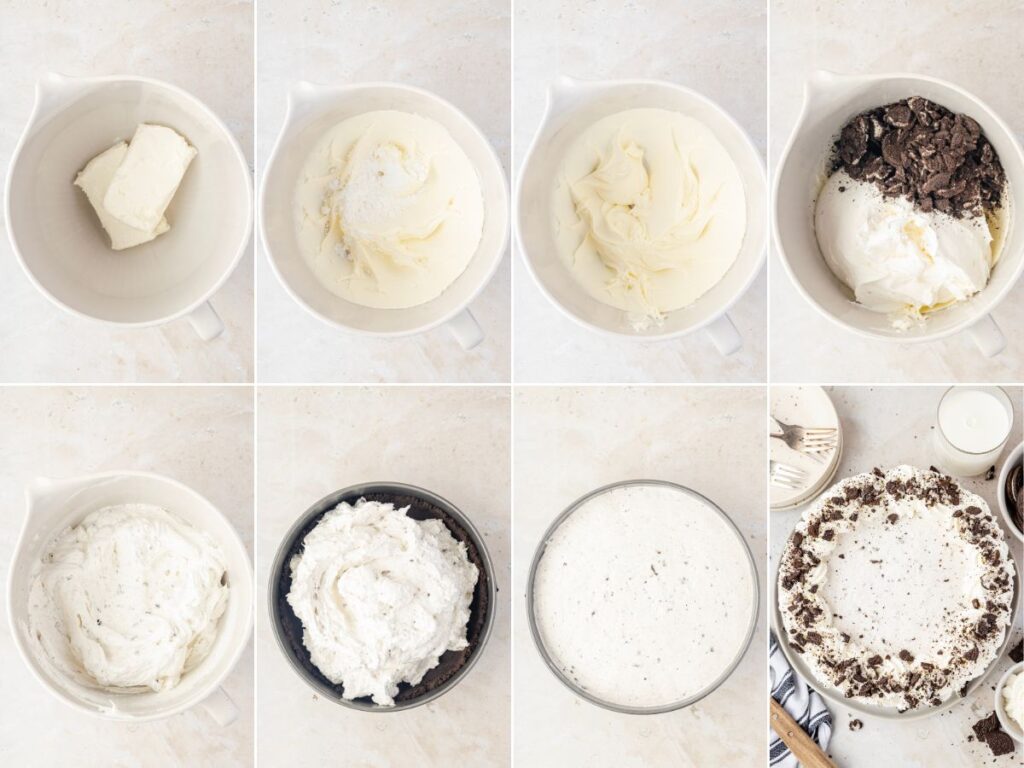
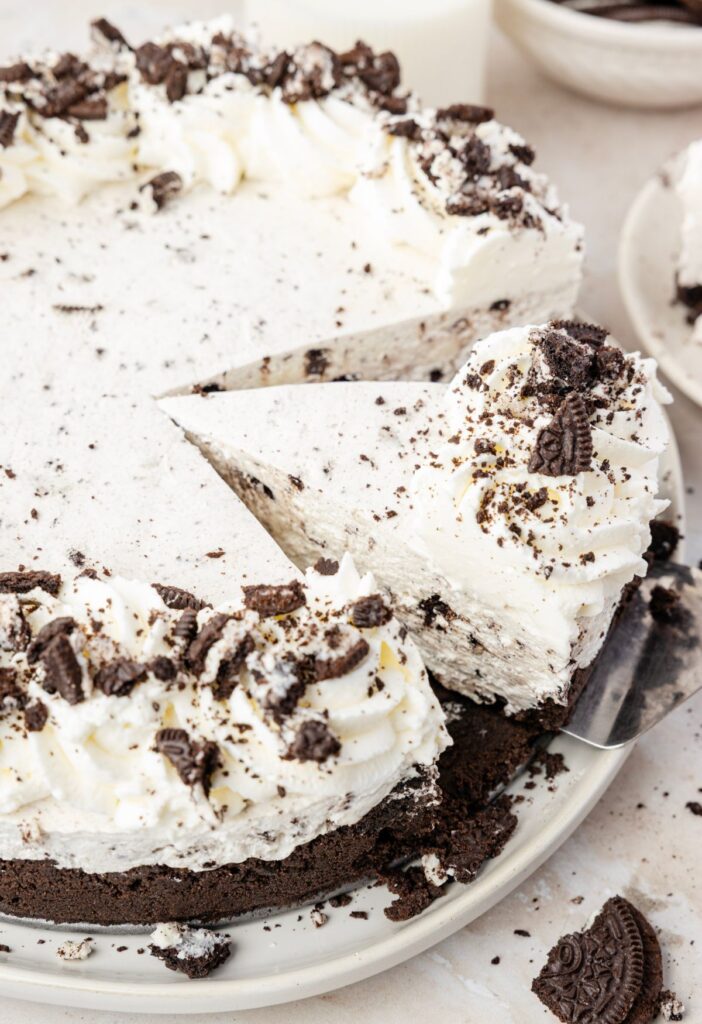
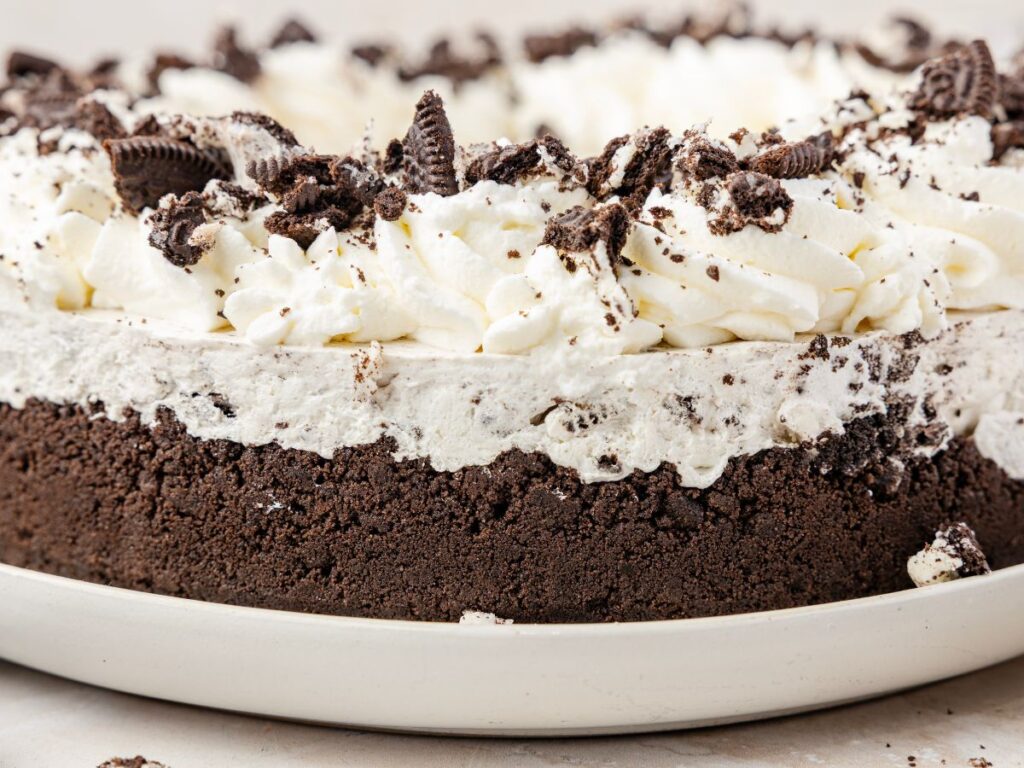
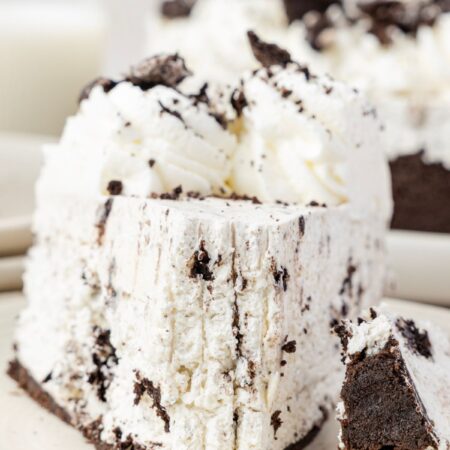
Serving & Optional Garnish : Remove the cheesecake from the fridge and undo the sides of the springform pan. Either pipe on the whipped cream around the cheesecake or spread it over top to form an even layer. Garnish with the chopped Oreo cookies or mini Oreo cookies. Cut into slices and serve the cheesecake chilled. Enjoy!
How To Store Leftover No Bake Oreo Cheesecake
This no bake cheesecake should be stored covered, in the refrigerator, for up to 5 days. The longer the cheesecake is in the fridge the softer the cookies will become. Leave the cheesecake inside the springform pan covered, or you can remove individual slices to an airtight container for storage.

Pro Tips From The Test Kitchen
- Easily make this delicious cheesecake gluten-free by simply using gluten-free Oreos.
- You want to make sure that you are tightly and firmly compacting the Oreo cookie crust inside the springform pan. Use the bottom of a measuring cup, back of a spoon, or something similar to compact and press the crust down and up the sides slightly.
- The longer the cheesecake sits in the fridge, the softer the Oreo cookies will become inside the cheesecake filling. Leftovers are fabulous, but for the best texture for serving, I recommend not letting it refrigerate for longer than 24 hours before serving – but I think the best amount of time is around 8 hours of chill time before serving. This allows plenty of time for the cheesecake to chill and the flavors to blend, but not enough time for the cookies to get really soft.
- I highly recommend using full-fat cream cheese only! The creamier, richer, and thicker texture makes such a big difference in the taste and how the cheesecake thickens and sets while it chills.
- You don’t need to add the additional whipped cream garnish and oreo cookies – I like to pipe on some homemade whipped cream around the edges of the cheesecake, and then place a mini Oreo cookie on top of each one. This just makes it look pretty but you don’t need it. For the garnish whipped cream you can make your own (beat 1 cup heavy whipping cream + ¼ cup powdered sugar in a bowl until stiff peaks form), you can use Cool Whip (although it is softer and won’t hold up well), or use a spray can of whipped cream from the grocery store (it’s softer but not as soft as Cool Whip when using as a garnish).
- You can use salted butter or unsalted butter; whichever you prefer baking with. I prefer salted butter because it better balances the rich and sweet flavors, but it really does not make a huge difference which butter you use.
Recipe FAQs
Do I Need To Remove The Oreo Filling For The Crust?
No, do not remove the white cream filling from the Oreo cookies. Use the entire cookie as it will help add some creaminess to the crust.
Can This Be Made Ahead of Time?
Yes, this is a great dessert to make ahead of time, but no longer than 24 hours ahead of time. The extra time will allow more time for the flavors to marry and the cheesecake to chill and set. The reason it’s best to not make it longer than one day ahead of time, is because the cookies throughout the cheesecake will absorb moisture and start to soften, and also bleed some dark black cookie color more into the cheesecake.
I Don’t Have a Springform Pan. What Should I Use?
If you don’t have a 9-inch springform pan, you can also make this recipe inside a 9×13-inch pan.
Why Can I Not Serve It Immediately?
The reason for chilling the cheesecake is to allow the room temperature cream cheese to set back up and thicken. This way, when you slice your cheesecake, the slice will hold its form, and the cheesecake doesn’t collapse on itself. The chill time also helps the cheesecake to taste better because the flavors have time to blend, and a chilled cheesecake always tastes best.


More Oreo Dessert Recipes
- Oreo Fudge
- Oreo Truffles (Oreo Balls)
- Oreo Cheesecake Bars
- Oreo Dirt Pie
- Oreo Poke Cake
- Oreo Cream Pie
- Oreo Rice Krispie Treats
- Easy Oreo Dirt Cake
- Cookies & Cream Oreo Brownies
- Mini Oreo Cheesecakes

No Bake Oreo Cheesecake
Equipment
Ingredients
Oreo Crust
- 25 Oreo cookies
- 6 tablespoons butter melted
Oreo Cheesecake Filling
- 2 bars (8 oz each) full-fat cream cheese (softened to room temperature)
- 1/2 cup powdered sugar
- 15 Oreo cookies chopped
- 1 container (16 oz) Cool Whip thawed
Optional Garnish For Serving
- whipped cream
- chopped Oreo cookies OR mini Oreo cookies
Instructions
Oreo Crust
- Place the Oreo cookies inside a food processor or food chopper, and pulse until the mixture resembles fine Oreo crumbs like wet sand.25 Oreo cookies
- Add in the melted butter and pulse again just until combined.6 tablespoons butter
- Transfer the cookie crust mixture to a 9-inch springform pan and press it about 1-inch up the sides of the pan, making sure to form a flat even bottom crust layer. Refrigerate the crust for 30 minutes.
Oreo Cheesecake Filling
- In a large bowl, using an electric mixer or stand mixer, beat the cream cheese until it's light and fluffy.2 bars (8 oz each) full-fat cream cheese
- Add in the powdered sugar and mix on low speed, increasing speed as needed, until thoroughly combined.1/2 cup powdered sugar
- Add the chopped Oreo cookies and cool whip and continue mixing, on low speed, until combined.15 Oreo cookies, 1 container (16 oz) Cool Whip
- Spread the cheesecake filling evenly into the crust. Cover the springform pan with plastic wrap and refrigerate for at least 6-8 hours.*I don't recommend chilling the cheesecake for longer than about 12 hours before serving, as the cookies throughout the cheesecake will soften. For the best texture refrigerate anywhere from 6-12 hours before serving.
Serving & Optional Garnish
- Remove the cheesecake from the fridge and undo the sides of the springform pan.
- Either pipe on the whipped cream around the cheesecake or spread it over the top to form an even layer. Garnish with the chopped Oreo cookies or mini Oreo cookies. Cut into slices and serve the cheesecake chilled. Enjoy!*You can buy spray can whipped cream (it is softer so might hold up as well) or make homemade whipped cream. See notes. Or serve the cheesecake as is with no whipped topping and just crumbled Oreo cookies on top.whipped cream, chopped Oreo cookies OR mini Oreo cookies
Notes
- Easily make this delicious cheesecake gluten-free by simply using gluten-free Oreos.
- You want to make sure that you are tightly and firmly compacting the Oreo cookie crust inside the springform pan. Use the bottom of a measuring cup, back of a spoon, or something similar to compact and press the crust down and up the sides slightly.
- The longer the cheesecake sits in the fridge, the softer the Oreo cookies will become inside the cheesecake filling. Leftovers are fabulous, but for the best texture for serving, I recommend not letting it refrigerate for longer than 24 hours before serving – but I think the best amount of time is around 8 hours of chill time before serving. This allows plenty of time for the cheesecake to chill and the flavors to blend, but not enough time for the cookies to get really soft.
- I highly recommend using full-fat cream cheese only! The creamier, richer, and thicker texture makes such a big difference in the taste and how the cheesecake thickens and sets while it chills.
- You don’t need to add the additional whipped cream garnish and oreo cookies – I like to pipe on some homemade whipped cream around the edges of the cheesecake, and then place a mini Oreo cookie on top of each one. This just makes it look pretty but you don’t need it. For the garnish whipped cream you can make your own (beat 1 cup heavy whipping cream + ¼ cup powdered sugar in a bowl until stiff peaks form), you can use Cool Whip (although it is softer and won’t hold up well), or use a spray can of whipped cream from the grocery store (it’s softer but not as soft as Cool Whip when using as a garnish).
- You can use salted butter or unsalted butter; whichever you prefer baking with. I prefer salted butter because it better balances the rich and sweet flavors, but it really does not make a huge difference which butter you use.
Nutrition
Did You Make This Recipe?
I’d love to see it! You can share it with me on @togetherasfamilyblog and follow on Pinterest @together-as-family-blog-recipes or Facebook @togetherasfamilyblog for more!


Did you love this recipe?
Make sure to comment below so we can chat about it! Or follow on your favorite social network for even more family recipes.